KC's Blog

How To Enable WinRM with Domain Group Policy for PowerShell Remoting

PowerShell Remoting really makes my work a lot easier but it requires quite a bit of work to get all the remote computers ready to take the remoting calls, such as automatically start Windows Remote Management services, set up the HTTP listener for incoming WinRM requests, as well as open Firewall Port to allow the traffic to go through.
For individual computers
It’s quite easy. Just open a PowerShell as Administrator window on the computer and run the following cmdlet and it will take care of the rest.

For large network
Deploying the settings via Group Policy is definitely the way to go. If you are on Windows Server 2012 R2, open Group Policy Management and find the Grou Policy object you want to tweak and edit from there. Or create a new one if needed.
Once you are in there, there are three places that you need to go through:
1. Allow remote server management through WinRM
Go to Computer Configuration > Policies > Administrative Templates > Windows Remote Management (WinRM) > WinRM Service .
Double-click the setting “ Allow remote server management through WinRM ”

Select Enable and type in “*” in for both IPv4 filter and IPv6 filter .

Click OK to close the window.
* If you don’t see Windows Remote Management in your Group Policy Editor, there is probably the WinRM admin template missing in your Active Directory.
2. Enable WinRM service
Go to Computer Configuration > Policies > Preferences > Control Panel Settings .
And right-click Services and choose New > Service .

Choose Automatic (Delayed Start) as startup type, pick WinRM as the service name, set Start service as the action.

Click OK to save the change.
3. Set up the Firewall rule
Go to Computer Configuration > Policies > Security Settings > Windows Firewall with Advanced Security.
And right-click Inbound Rules and start a New Rule…

Select Predefined: option and choose Windows Remote Management from the list (not the one with compatible). Click Next.

Select the one for Domain and Private , and Allow the connection option at the next screen. And click Finish.
To reduce the exposure to this service we can remove the Private and only leave only Domain profile in place. Double-click the new rule we just created, go to Advanced tab and uncheck the Private option from the Profiles section.

Test it out
You can scan the port 5985 on the remote computer to see if it responses, like below:
Oh, simply open a PowerShell session on the remote computer and see if it succeeds.

10 thoughts on “ How To Enable WinRM with Domain Group Policy for PowerShell Remoting ”
Computer Configuration > Policies > Windows Settings > System Services > Windows Remote Management (WS-Management)
Will enforce the Policy WinRM such that it can’t be interacted with
- Pingback: How To Tell If A Remote Computer Needs Reboot - ONCALL Solutions
- Pingback: How To GPUpdate on Remote Computers - ONCALL Solutions
- Pingback: Script to Validate Your Active Directory Controller is Patched for ZeroLogon – WebSetNet
- Pingback: Cómo ejecutar la línea de comandos de PowerShell en una computadora remota - TecnoTraffic
- Pingback: Cómo GPUpdate en computadoras remotas - TecnoTraffic
- Pingback: Cómo encontrar la capacidad del disco y el espacio libre de las computadoras remotas - TecnoTraffic
- Pingback: Cómo saber si una computadora remota con Windows 10 necesita reiniciarse - TecnoTraffic
- Pingback: Cách tìm dung lượng đĩa và dung lượng trống của máy tính từ xa - Wiindows.net
- Pingback: Enable WinRM for domain user
Leave a Reply Cancel reply
Your email address will not be published. Required fields are marked *
Notify me of follow-up comments by email.
Notify me of new posts by email.
Articles in this section
- Introduction to server monitoring, and supported server hardware platforms
- How do I view server monitoring data?
- What is the difference between in-band and out-band hardware monitoring?
- Support for IBM AIX OS SSH servers
- Support for Solaris OS SSH servers
- WinRM monitoring
How do I configure and troubleshoot WinRM?
- Linux OS SSH monitoring
- How do I configure Linux OS SSH monitoring?
- Incidents, events and thresholds applicable to server devices

- November 07, 2023 14:42
Applicable to Entuity v19.0 upwards
To configure WinRM
To configure WinRM access as a non-admin user
Troubleshooting Windows OS monitoring
To configure WinRM:
Entuity v19.0 upwards supports monitoring for Windows servers via WinRM. Before you can monitor Windows servers, you must configure WinRM on the server for remote management. Please see below for details on how to configure WinRM.
winrm quickconfig
- You must ensure that the WinRM service is not blocked by a firewall and therefore is remote accessible. By default, WinRM uses port 5985, which needs to be open. If WinRM is configured to use a non-default port, then this port needs to be open. Note, Entuity can use the non-default port.
- to manage a Windows OS that is part of the domain, use <domain>\<user> format, e.g. 'mydomain\username'
- to manage a Windows OS that is not part of the domain, use just the username, e.g. 'Administrator'
To configure WinRM access as a non-admin user:
It is possible to manage Windows OS with a user account that is not a member of the local administrators group. There are four requirements for configuring non-admin user access, each of which are explained below.
- User must be a member of required groups.
- User must have access to WinRM resources.
- User must have access to WMI namespace.
- User must have query service manager permissions.
- as a prerequisite, the below instructions assume that you have created a domain user account which will be used for monitoring. In the below instructions, it is referred to as <domain>\<user> , which will be replaced with an actual domain user when setting up the non-admin user.
- all actions in the below instructions are performed on the Windows server that is to be monitored with an administrative account (command prompt runs as administrator).
1. To add the user to the required groups:
net localgroup "Remote Management Users" /add <domain>\<user> net localgroup "Performance Monitor Users" /add <domain>\<user>
2. To give the user access to WinRM resources:
winrm configSDDL default
- This command will open the Permissions for Default dialog.
- In the Group or user names section, add <domain>\<user> to the list.
- Click OK to confirm your changes.
3. To give the user access to WMI namespace:
- In the command prompt, execute the following prompt:
- This will open the Security for Root dialog. In the Group or user names section, add 'Remote Management Users' group.
- This will open the Permission Entry for Root dialog. In the Applies to dropdown field, select 'This namespace and subnamespaces'.
- Execute Methods
- Enable Account
- Remote Enable
- Click OK to save your changes.
4. To allow the user service control manager queries:
- Open command prompt in Administrator mode.
- Obtain and take note of the SID of the user by using ' wmic useraccount where name="<username>" get name,sid '.
D:(A;;CC;;;AU)(A;;CCLCRPRC;;;IU)(A;;CCLCRPRC;;;SU)(A;;CCLCRPWPRC;;;SY)(A;;KA;;;BA)(A;;CC;;;AC) (A;;CCLCRPWPRC;;;<user SID>) S:(AU;FA;KA;;;WD)(AU;OIIOFA;GA;;;WD)
(A;;CCLCRPWPRC;;;<SID of User>)
(A;;CCLCRPWPRC;;;S-1-0-10-200000-30000000000-4000000000-500)
D:(A;;CC;;;AU)(A;;CCLCRPRC;;;IU)(A;;CCLCRPRC;;;SU)(A;;CCLCRPWPRC;;;SY)(A;;KA;;;BA)(A;;CC;;;AC) (A;;CCLCRPWPRC;;;S-1-0-10-200000-30000000000-4000000000-500) S:(AU;FA;KA;;;WD)(AU;OIIOFA;GA;;;WD)
sc sdset scmanager <SDDL from Step 5>
Troubleshooting Windows OS monitoring:
In some cases, errors may be caused by the WMI performance metrics database being out of sync. To resolve this issue, follow the below instructions:
- Log in to the affected server.
cd %windir%\system32\ lodctr /R cd %windir%\sysWOW64\ lodctr /R
Related articles
- Connectivity issues
- Introduction to OS Service monitoring (Windows Service and Linux OS monitoring)
- Polled data retention in Entuity
- How do I scale an Entuity installation up to support more server OSs per Entuity polling server?
Please sign in to leave a comment.
Windows OS Hub / Group Policies / How to Enable and Configure WinRM (Windows Remote Management) via GPO
How to Enable and Configure WinRM (Windows Remote Management) via GPO
In this article, we will show how to enable and configure Windows Remote Management (WinRM) on domain computers using Group Policy (GPO). Windows Remote Management is an implementation of the WS-Management Protocol for remote management of Windows desktops and servers. WinRM allows you to remotely manage computers through:
- Server Manager (Windows Server)
- PowerShell Remoting (PSSession)
- Windows Admin Center (WAC)
How to Manually Enable WinRM in Windows?
Configuring winrm via group policy, checking winrm settings and powershell connectivity.
The WinRM service is available in all modern Windows versions. In Windows Server it is enabled by default, but it is disabled in desktop Windows 11/10/8.1 editions. By default, the WinRM listener doesn’t accept remote connections. To check it, run the command below on a client:
WinRM enumerate winrm/config/listener
You will see an error saying that the WinRM is not configured:

To enable and configure the WinRM service on Windows, it is enough to run this command:
winrm quickconfig
Enable-PSRemoting –Force

This command will change the WinRM service startup type to automatic, apply default WinRM settings, and add exceptions for WinRM ports (TCP 5985 and 5986) to the list of exceptions in the Microsoft Defender Firewall.
You can automatically enable and configure WinRM on domain computers using Windows GPO.

- Open the policy to edit it;

Update GPO settings on your clients and make sure that WinRM has been configured automatically. You can use the gpresult tool to troubleshoot Group Policy settings on client computers.
To check that the WinRM settings on the computer are configured through GPO, run the command:
winrm e winrm/config/listener
The command displays the current WinRM listener settings. Note the Listener [Source="GPO"] line. This means that the current WinRM settings are configured through the GPO.

You may list the complete configuration of your WinRM service using this command:
winrm get winrm/config
Then try to connect to a remote computer via WinRM. Open the PowerShell console and run the command below:
Test-WsMan wsk-w10b01
If WinRM is enabled, the following response will appear:

Test-NetConnection -ComputerName wsk-w10b01 -Port 5985
Then you may try to connect to a remote computer interactively using PSRemoting and the Enter-PSSession cmdlet :
Enter-PSSession wsk-w10b01

In this case, the connection is successfully established and the PS console of the remote host appears.
Besides PSRemoting, you can use the Invoke-Command to execute commands and scripts on a remote computer:
Invoke-Command -ComputerName wsk-w10b01 -ScriptBlock {ipconfig /all}
If the PSRemoting connection is established, you will see the ipconfig output on the screen.
You can also run a command on a remote host as follows:
winrs -r: wsk-w10b01 dir
In some cases, you may see the following error when connecting via PSSession:
Check current WinRM connection permissions:
Set-PSSessionConfiguration -ShowSecurityDescriptorUI -Name Microsoft.PowerShell
Make sure that your account is a member of the Administrators or Remote Management Users group (check how to allow WinRm connection for non-admin users ) and that they have FullControl permissions. Also, make sure that there are no Deny rules.

Adding USB 3.0 and NVMe Drivers to Windows 7 Install Media
Migrating rds roles (connection broker, web access) to another server, related reading, how to hide or show the ‘safely remove..., enable hyper-v on windows 10/11 pro and home..., how to hide or show specific settings pages..., mount physical and network drives in wsl2 (windows..., change network connection (adapter) priorities in windows.

7. Configuration -> Policies -> Windows Components -> Windows Remote Shell Should be Configuration -> Policies -> Administrative Templates -> Windows Components -> Windows Remote Shell thank you for the help.

Fixed, thanks!

Leave a Comment Cancel Reply
Notify me of followup comments via e-mail. You can also subscribe without commenting.
Current ye@r *
Leave this field empty
Set and Check User Rights Assignment via Powershell
You can add, remove, and check user rights assignment (remotely / locally) with the following powershell scripts..
Posted by : blakedrumm on Jan 5, 2022

Local Computer
Remote computer, output types.
This post was last updated on August 29th, 2022
I stumbled across this gem ( weloytty/Grant-LogonAsService.ps1 ) that allows you to grant Logon as a Service Right for a User. I modified the script you can now run the Powershell script against multiple machines, users, and user rights.
Set User Rights
How to get it.
All of the User Rights that can be set:
| Privilege | PrivilegeName |
|---|---|
| SeAssignPrimaryTokenPrivilege | Replace a process level token |
| SeAuditPrivilege | Generate security audits |
| SeBackupPrivilege | Back up files and directories |
| SeBatchLogonRight | Log on as a batch job |
| SeChangeNotifyPrivilege | Bypass traverse checking |
| SeCreateGlobalPrivilege | Create global objects |
| SeCreatePagefilePrivilege | Create a pagefile |
| SeCreatePermanentPrivilege | Create permanent shared objects |
| SeCreateSymbolicLinkPrivilege | Create symbolic links |
| SeCreateTokenPrivilege | Create a token object |
| SeDebugPrivilege | Debug programs |
| SeDelegateSessionUserImpersonatePrivilege | Obtain an impersonation token for another user in the same session |
| SeDenyBatchLogonRight | Deny log on as a batch job |
| SeDenyInteractiveLogonRight | Deny log on locally |
| SeDenyNetworkLogonRight | Deny access to this computer from the network |
| SeDenyRemoteInteractiveLogonRight | Deny log on through Remote Desktop Services |
| SeDenyServiceLogonRight | Deny log on as a service |
| SeEnableDelegationPrivilege | Enable computer and user accounts to be trusted for delegation |
| SeImpersonatePrivilege | Impersonate a client after authentication |
| SeIncreaseBasePriorityPrivilege | Increase scheduling priority |
| SeIncreaseQuotaPrivilege | Adjust memory quotas for a process |
| SeIncreaseWorkingSetPrivilege | Increase a process working set |
| SeInteractiveLogonRight | Allow log on locally |
| SeLoadDriverPrivilege | Load and unload device drivers |
| SeLockMemoryPrivilege | Lock pages in memory |
| SeMachineAccountPrivilege | Add workstations to domain |
| SeManageVolumePrivilege | Perform volume maintenance tasks |
| SeNetworkLogonRight | Access this computer from the network |
| SeProfileSingleProcessPrivilege | Profile single process |
| SeRelabelPrivilege | Modify an object label |
| SeRemoteInteractiveLogonRight | Allow log on through Remote Desktop Services |
| SeRemoteShutdownPrivilege | Force shutdown from a remote system |
| SeRestorePrivilege | Restore files and directories |
| SeSecurityPrivilege | Manage auditing and security log |
| SeServiceLogonRight | Log on as a service |
| SeShutdownPrivilege | Shut down the system |
| SeSyncAgentPrivilege | Synchronize directory service data |
| SeSystemEnvironmentPrivilege | Modify firmware environment values |
| SeSystemProfilePrivilege | Profile system performance |
| SeSystemtimePrivilege | Change the system time |
| SeTakeOwnershipPrivilege | Take ownership of files or other objects |
| SeTcbPrivilege | Act as part of the operating system |
| SeTimeZonePrivilege | Change the time zone |
| SeTrustedCredManAccessPrivilege | Access Credential Manager as a trusted caller |
| SeUndockPrivilege | Remove computer from docking station |
Note You may edit line 437 in the script to change what happens when the script is run without any arguments or parameters, this also allows you to change what happens when the script is run from the Powershell ISE.
Here are a few examples:
Add Users Single Users Example 1 Add User Right “Allow log on locally” for current user: . \Set-UserRights.ps1 -AddRight -UserRight SeInteractiveLogonRight Example 2 Add User Right “Log on as a service” for CONTOSO\User: . \Set-UserRights.ps1 -AddRight -Username CONTOSO\User -UserRight SeServiceLogonRight Example 3 Add User Right “Log on as a batch job” for CONTOSO\User: . \Set-UserRights.ps1 -AddRight -Username CONTOSO\User -UserRight SeBatchLogonRight Example 4 Add User Right “Log on as a batch job” for user SID S-1-5-11: . \Set-UserRights.ps1 -AddRight -Username S-1-5-11 -UserRight SeBatchLogonRight Add Multiple Users / Rights / Computers Example 5 Add User Right “Log on as a service” and “Log on as a batch job” for CONTOSO\User1 and CONTOSO\User2 and run on, local machine and SQL.contoso.com: . \Set-UserRights.ps1 -AddRight -UserRight SeServiceLogonRight , SeBatchLogonRight -ComputerName $ env : COMPUTERNAME , SQL.contoso.com -UserName CONTOSO\User1 , CONTOSO\User2
Remove Users Single Users Example 1 Remove User Right “Allow log on locally” for current user: . \Set-UserRights.ps1 -RemoveRight -UserRight SeInteractiveLogonRight Example 2 Remove User Right “Log on as a service” for CONTOSO\User: . \Set-UserRights.ps1 -RemoveRight -Username CONTOSO\User -UserRight SeServiceLogonRight Example 3 Remove User Right “Log on as a batch job” for CONTOSO\User: . \Set-UserRights.ps1 -RemoveRight -Username CONTOSO\User -UserRight SeBatchLogonRight Example 4 Remove User Right “Log on as a batch job” for user SID S-1-5-11: . \Set-UserRights.ps1 -RemoveRight -Username S-1-5-11 -UserRight SeBatchLogonRight Remove Multiple Users / Rights / Computers Example 5 Remove User Right “Log on as a service” and “Log on as a batch job” for CONTOSO\User1 and CONTOSO\User2 and run on, local machine and SQL.contoso.com: . \Set-UserRights.ps1 -RemoveRight -UserRight SeServiceLogonRight , SeBatchLogonRight -ComputerName $ env : COMPUTERNAME , SQL.contoso.com -UserName CONTOSO\User1 , CONTOSO\User2
Check User Rights
In order to check the Local User Rights, you will need to run the above (Get-UserRights), you may copy and paste the above script in your Powershell ISE and press play.

Note You may edit line 467 in the script to change what happens when the script is run without any arguments or parameters, this also allows you to change what happens when the script is run from the Powershell ISE.
Get Local User Account Rights and output to text in console:
Get Remote SQL Server User Account Rights:
Get Local Machine and SQL Server User Account Rights:
Output Local User Rights on Local Machine as CSV in ‘C:\Temp’:
Output to Text in ‘C:\Temp’:
PassThru object to allow manipulation / filtering:
I like to collaborate and work on projects. My skills with Powershell allow me to quickly develop automated solutions to suit my customers, and my own needs.
Email : [email protected]
Website : https://blakedrumm.com
My name is Blake Drumm, I am working on the Azure Monitoring Enterprise Team with Microsoft. Currently working to update public documentation for System Center products and write troubleshooting guides to assist with fixing issues that may arise while using the products. I like to blog on Operations Manager and Azure Automation products, keep checking back for new posts. My goal is to post atleast once a month if possible.
- operationsManager
- troubleshooting
- certificates
PowerShell Remoting (PSRemoting) Explained: Ultimate Guide
Published: 25 January 2021 - 13 min. read

Read more tutorials by Tyler Muir!
Table of Contents
PowerShell Remoting (PSRemoting) is one of the most-used features in all of PowerShell. Why? Because it’s so darn useful! Using a single command, you can seamlessly connect to one or thousands of remote computers and execute commands.
In this Ultimate Guide, you will go deep into PSRemoting. You’ll learn what it is, how it works, and all of the various technologies that make PSRemoting work. This guide will not cover how to use PSRemoting. You’ll see plenty of references to many of our how-to guides throughout.
How PSRemoting Works
In a nutshell, PSRemoting allows you to run commands on remote computers just as if you were sitting in front of them. PSRemoting provides a set of features that connects and authenticates a user user, runs remote commands and returns any output from that command to the local computer.
Think of PSRemoting like telnet or SSH or even psexec. It’s just a way to run commands on computers within PowerShell.
Related: PSExec: The Ultimate Guide
PSRemoting heavily relies on a concept called a session. A session is a term used to describe a remote shell that runs commands inside. The process to create one of these sessions goes through many steps in the background.
When you initiate a PSRemoting session, the following rough steps carry out:
- The client attempts to connect to the destination server on a WinRM listener (more on WinRm listeners below). A WinRM listener is a tiny web service that runs on the destination server. WinRM is Microsoft’s implementation of a standard called WSMan . WSMan is an open standard created with many other large tech companies at the time like Dell, Intel, and Sun Microsystems.
- When the client connects to the listener over the HTTP or HTTPS protocol, the authentication process begins. All details of each method of authentication will be covered later, but for now, just know that the client needs to pass credentials to the server in some manner.
- After the client connects and authenticates to the server, PSRemoting creates a session.
- Once the PSRemoting creates the session, it then is open for business. At this point, the client can begin sending information to the server with the server returning any necessary output known as serialization . This communication is typically encrypted.

WinRM Listeners: Available for Connection
A client needs somewhere to connect to when coming in from over the network. The client needs to “talk” to something that’s “listening” on the other side; that “listening” is the role of the WinRM listener.
You can discover all of the WinRm listeners running on any Windows computer by using the winrm command below.

WinRm listeners have a few important components. They have:
- A listening address – The listening address is the IP address that they bind to. This is the IP address that a client connects to.
- The type of transport – Every WinRM listener needs a way to communicate with the client; they do this via a transport using either HTTP or HTTPS.
- An optional certificate thumbprint – When a WinRM listener uses HTTPS for the transport, it must know what private key to authenticate the client against; this key is found using a certificate thumbprint.
Use an HTTPS listener when possible. Setting up HTTPS transport increases security by ensuring server validity and encrypting both the authentication and transport traffic. When issuing a certificate, use a trusted certificate from a certification authority, when possible rather than a self-signed certificate.
Trusted Hosts: Validating a Server
How psremoting authentication over winrm works.
As stated above, one of the first steps that PSRemoting goes through is authentication. Authentication is one of the most complicated yet most essential parts of PSRemoting.
When PSRemoting was first introduced, it only had one authentication mechanism, Windows Remote Management (WinRM) but nowadays, you can also authenticate using SSH which you’ll see later.
WinRM supports two distinct types of authentication; a username and password or a certificate with various types of authentication for a username/password combination.
Basic Authentication
Starting at the easiest, yet most insecure type of authentication is Basic authentication . This type of authentication is a standard built into the HTTP protocol. Basic authentication sends a base64 encoded copy of the username and password in the HTTP header from the client to the listener.
Because Basic authentication only encodes the username and password and does not encrypt it, it’s trivial to intercept the credentials over the network.
Do not use Basic authentication unless you absolutely have to. There are many other more secure methods WinRM can authenticate!
Kerberos Authentication
Are both your client and server in an Active Directory environment? If so, you’re using already using Kerberos authentication across many of your network services.
When the WinRM client attempts to connect to a WinRM listener over Kerberos:
- The server first attempts to retrieve a session key or ticket-granting-ticket for the client from a domain controller.
- The domain controller looks up the client and the server and if both are valid and trusted, it issues the token.
- The server then validates the client’s connection using the trusted token rather than the username and password.
During Kerberos authentication, the domain controller validates both the client and server during the ticket retrieval steps stopping someone malicious from impersonating the server.
Kerberos is a mature and secure authentication method and is the default authentication type when a client and server are both members of an Active Directory domain. But, it does require both client and server to be joined to the same Active Directory forest or with a trust set up between forests.
Related: Repairing Active Directory Trust Relationships for Good
Negotiate Authentication
WinRm can also attempt to use Kerberos and if not available fall back and attempt to use an authentication protocol called NT Lan Manager (NTLM) .
When using NTLM:
- The server sends the client a string.
- The client then encrypts the string with a hash of the user’s password.
- The encrypted string is then sent back to the server that sends the username, original string, and encrypted string to a domain controller.
- The domain controller then looks up the password hash for that user and repeats the same encryption process on the string to ensure it matches.
NTLM is good for validating the client, but unlike Kerberos, it does not validate the server. This opens up multiple attacks where the server could be impersonated by an attacker.
You can improve NTLM security by also validating the server with a server authentication certificate and assigning it to an HTTPS WinRM listener. In this setup, the client is authenticated with NTLM against the domain controller, and the server is authenticated with a trusted certificate. Although this setup provides both client and server authentication, the NLTM protocol uses an older encryption cipher with an outdated key size.
For these reasons, NLTM is only usable if you add the server to the trusted host list or use an HTTPS listener.
Digest Authentication
One of the most uncommon authentication methods to use in WinRM is Digest authentication. NTLM and Digest are similar authentication methods. Like NTLM, Digest generates a unique string that is encrypted with the hash of the user’s password. The password then doesn’t need to be sent to the server.
Digest uses the MD5 hashing algorithm to encrypt the password. Due to this choice of algorithm, Digest is generally seen as obsolete and should not be used. MD5 has various known vulnerabilities that make it unsuitable for cryptographic use.
Credential Security Support Provider (CredSSP)
Although we could go into the ins and outs of CredSSP , it’s not necessary. Why? Because when it comes to PSRemoting and WinRM, CredSSP is implemented for typically one reason, the “second hop problem” which you’ll learn about below.
When configured for CredSSP authentication, the WinRM client and server both use Negotiate authentication to authenticate both the user and client. But once completed, the user’s password is sent to the server.
Because the password is sent after the authentication process has been completed, it is now encrypted. CredSSP also encrypts the password with the TLS session keys so that the encrypted string will be unique between sessions.
CredSSP is helpful because after authentication, the server can then connect to anything else on your behalf. However, when this happens, you are fully trusting the server you connected to with the user password.
Certificate-Based Authentication
Arguably the most secure method of authentication to use with PSRemoting is certificate-based authentication. In this method of authentication, a typical key exchange happens with a private and public key on the client and a server validating the certificate.
WinRM authenticates the user by mapping a user on the server within WinRm. The only thing that is passed during the authentication process is the public key so it is a very secure way to authenticate
Although the most secure, certificate-based authentication is not too common. Why? Simply because of the leg work necessary to set it up. You must:
- Build a certificate authority
- Create a user authentication certificate
- Share the public key
- Use local user account with appropriate permissions (Administrators group probably)
- Set up an HTTPS listener
- …and other steps.
You cannot use a domain user to authenticate with certificates even if the client and server are both a part of Active Directory.
Related: How to Configure WinRM over HTTPS
Windows OS Authentication Defaults
Now that you’ve seen there are many different authentication options available, how do you know which are available out-of-the-box? Below you’ll see a table with two columns indicating if the WinRM client, by default, is enabled and if that particular authentication type is enabled by default.
All of the aforementioned authentication types are configurable but using the table below will give you a good idea of what you’ll need to configure yourself.
| Method | Client | Service |
| Basic | Enabled | Disabled |
| Kerberos | Enabled | Enabled |
| Negotiate | Enabled | Enabled |
| CredSSP | Disabled | Disabled |
| Digest | Enabled | Disabled |
| Certificate | Enabled | Disabled |
The Second Hop or Double-Hop Problem
One of the biggest issues with PSRemoting is known as the “second hop problem” or a “double-hop”. This situation occurs when you connect to a remote system over PSRemoting and you then need to connect to another remote computer.
This situation is problematic because when the WinRm client authenticates to the first remote computer, the server only validates the identity of the originating client without sending the password to the server. When you attempt to connect to the second computer from the server of the first connection, the final server does not have any way to validate the user’s identity.
You can solve the double-hop problem a few different ways either through using CredSSP or Kerberos Delegation.
Using CredSSP
The most common way to get around the double-hop problem is by using CredSSP. CredSSP authentication gets around this situation by storing a user credential on the first remote server which the server turned client can then pass to the second remote server.
There’s one catch to using CredSSP though. The user credential stored on the first remote server can be stored in plain-text thus introducing an obvious security concern. In newer operating systems a hash of the password and the Kerberos Ticket Granting Ticket (TGT). These can be used together to authenticate as the user anywhere on the network just like a plain-text password, but it does lower the risk a little.
With Negotiate, the client and server pass information back and forth to validate who they say they are, but the user’s password is never accessible. Due to this security feature, there is no way that the 1st server can authenticate you when you connect to the 2nd server.
Using Kerberos Delegation
Kerberos, as mentioned earlier, is a common way to set up PSRemoting. Being part of the ubiquitous Active Directory and already set up, by default, it’s extremely common. Although on its own, Kerberos is a fine way to authenticate WinRM, it doesn’t get around the double-hop problem.
To get around the double-hop scenario, you can use a second type of authentication known as Kerberos Delegation . Although there are many varieties of Kerberos Delegation, the only variety capable of (and secure enough) to pose as an alternative to CredSSP is called Kerberos Constrained Delegation more specifically resource-based Kerberos Constrained Delegation.
Resource-based Kerberos Constrained Delegation is a form of delegating Kerberos authentication tokens based on domain resources, like computers, in this case, that is constrained to a specific list of Kerberos (Active Directory) objects.
To configure this Kerberos delegation you need to edit the ADComputer object of the third computer in the chain. For example, if you were going to remote from ClientA to ServerB to ServerC, you have to edit the ADComputer object for ServerC, but you also need to know what ServerB will be. For this example run the below command in PowerShell:
Using resource-based Kerberos Delegation works for remote connections like …. or … but it will not work with PSRemoting. You will not be able to connect to a third computer when connected to a computer over WinRM using PSRemoting.
Setting up resource-based Kerberos Constrained Delegation is a one-line PowerShell command using the Set-ADComputer cmdlet. If, for example, you’re connected to ServerB from ClientA over PSRemoting and want to connect to ServerC with …., you can do so by running the below PowerShell command.
Related: How to Install the Active Directory Module
WinRm caches failed connections for 15 minutes. Because of this feature, you may not be able to connect to the third computer even after setting up resource-based Kerberos Constrained Delegation. To remediate, either wait or run the command klist purge -LI 0x3e7 on the third computer to purge the failed Kerberos tokens.
How PSRemoting Authentication over SSH Works
Although WinRm authentication is the most common method of authentication for PSRemoting, as of PowerShell v6, you have another way; SSH. Using SSH as an authentication method allows you to use PSRemoting with Linux.
Related: How to Set up PSRemoting with Windows and Linux
SSH, unlike WinRm, requires some additional configuration on both the client and the server such as setting up an SSH client on the Windows client and …
Related: Installing OpenSSL with PowerShell and Chocolatey
Using SSH to handle the authentication means you are limited to the types of authentication that SSH supports. This narrows the list down with the main two being password-based and public-key-based.
There are other types of authentication supported by SSH, but they are usually deemed less secure than the password and public-key based options so we will just focus on these two.
Password Authentication
The easiest way to set up SSH authentication with PSRemoting is with password-based authentication. Password-bassed authentication allows you to provide a password to validate yourself.
In the SSH authentication process, the password is exchanged after the SSH connection is made and the password is encrypted in transmission. Unlike some authentication methods used by WinRM, like Kerberos, this authentication method does send the whole password to the server.
You can sorta compare SSH password authentication to the WinRM authentication method Basic using an HTTPS listener. The password itself is not protected in any meaningful way, but the entire connection, including the password, is encrypted based and the server is validated based on a certificate.
Certificated-Based Authentication
While password-based authentication is easy to set up and straightforward to use, it has two issues.
- First is there is no way to authenticate in an unattended format securely.
- Password authentication still sends a password across the network. While the password is encrypted within the SSH connection, the server receives the whole password. If the server is in some way compromised, it could become a security issue.
Certificate-based authentication, on the other hand, does not send any sensitive data across the network like the password. Instead, the server has a copy of a public key, the client has a copy of the private key and the negotiations happens on the server.
A rough workflow goes as follows:
- When the client attempts to authenticate, it sends the ID or thumbprint of the public key to the server.
- If the server has the public key listed as authorized, it responds with a string encrypted with the public key.
- The client then decrypts the string with the private key.
- The private key is then hashed with a session ID.
- The session ID is sent back to the server, which then compares it against the hash is generated using the original string and session ID.
- If the session ID hash from the client and the session ID on the server match, the client authenticates and is allowed to connect.
Anything encrypted with the public key can only be decrypted with an associated private key. Anything encrypted with the private key can only be decrypted with the public key. The session ID is also thrown in to provide what is called Perfect Forward Secrecy (PFS).
PFS provides security if the private key is compromised, the attacker would not be able to decrypt all of the messages that had gone back and forth. A unique session ID means that the shared secret used to encrypt communication is different for every session.
Certificate-based authentication with SSH, like WinRm, does require additional effort to set up such as generating the private/public key paid and authorizing the public key on the remote server.
User Rights Required to Connect
By default, two local groups of users can connect to a server remotely using PSRemoting; Administrators and Remote Management Users .
While you can just add user accounts to the local Administrators group on a remote server, you should always provide the least amount of access. If a user simply needs to connect with PSRemoting to a remote computer, can add the user account to the Remote Management Users group; not Administrators .
To further control PSRemoting access, you can also use a feature called Just Enough Administration (JEA) . JEA allows non-administrator users to only run specific commands as administrators in PowerShell’s constrained language mode .
Implicit vs. “Explicit” Remoting
If you’ve used PSRemoting before, you’re probably familiar with commands like Invoke-Command , New-PSSession , Enter-PSSession , etc. When you run these commands, it’s clear you’re connecting to a remote computer somehow. You’re explicitly using PSRemoting.
Related: Invoke-Command: The Best Way to Run Remote Code
When you run PSRemoting-specific commands, you’re explicitly running those commands but did you know there’s another way? Instead of invoking Invoke-Command and other cmdlets directly, you can leverage PSRemoting by using implicit PSRemoting.
Implicit PSRemoting may looks like you are running the commands locally within your PowerShell session, but they are actually running on a remote machine. A good example of this is using a module that is not installed on your system. Instead of installing it locally you can export commands from a PSSession which will allow you to run them as if they were installed locally.
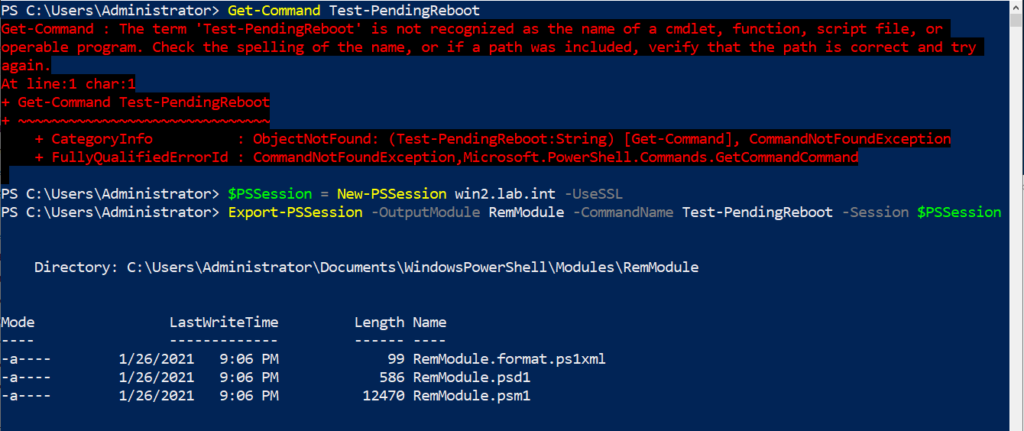
In the below screenshot you can see the that I do not have the Test-PendingReboot command. Then I connected to a remote machine and export that command.
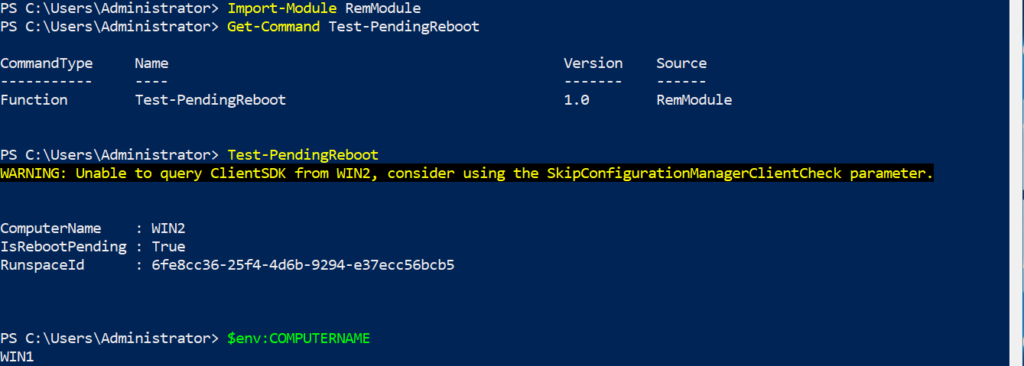
Next if that module is imported, I can then execute the Test-PendingReboot command. This is shown below, but you will notice that it shows that the computer name in the output is not the name of the device that PowerShell is running from, but the device that the command was imported from.
Hate ads? Want to support the writer? Get many of our tutorials packaged as an ATA Guidebook.
More from ATA Learning & Partners

Recommended Resources!
Recommended Resources for Training, Information Security, Automation, and more!

Get Paid to Write!
ATA Learning is always seeking instructors of all experience levels. Regardless if you’re a junior admin or system architect, you have something to share. Why not write on a platform with an existing audience and share your knowledge with the world?

ATA Learning Guidebooks
ATA Learning is known for its high-quality written tutorials in the form of blog posts. Support ATA Learning with ATA Guidebook PDF eBooks available offline and with no ads!
Looks like you're offline!
- IT Administration Forum
- PowerShell Forum
- Community Forum
- PowerShell Group
- Earning as 4sysops member
- Member Ranks
- Member Leaderboard – This Month
- Member Leaderboard – This Year
- Member Leaderboard – All-time
- Author Leaderboard – 30 Days
- Author Leaderboard – 365 Days
- Cloud Computing
- Write for 4sysops
- User rights assignment in Windows Server 2016
4sysops - The online community for SysAdmins and DevOps

Built-in local security principals and groups
Center for internet security, local policies/user rights assignment.
- Recent Posts

- Microsoft Remote Desktop for Mac not working after upgrade (errors 0x3000064 and 0x3000066) - Thu, Aug 15 2024
- UniGetUI (formerly WingetUI): GUI for winget, Chocolatey, and PowerShell Gallery - Wed, Jul 17 2024
- What is Microsoft Dev Home? - Wed, Jul 3 2024
Security policy settings are sets of rules that control various aspects of protection. They include account policies, local policies, user rights assignment, the Windows firewall, software restrictions, and so on. There are several ways to configure security policy settings. The most common are:
- Group policy objects (GPO) – Used in Active Directory domains to configure and regularly reapply security settings to multiple computers.
- Local security policy (secpol.msc) – Used to configure a single (local) computer. Note that this is a one-time action. If another administrator changes these settings, you will need to manually change them back to the required state.
As most organizations use an Active Directory domain, it is preferred to apply security settings via group policies. You should have at least three security baselines created and linked in your domain, based on the following machine types:
- Domain Controllers (DC)
- Member Servers (MS)
- User Workstations

Configuring user rights assignment via Goup Policy
If you have multiple versions of operating systems (OS) running on these machines, you should create separate baselines for each OS version, as some settings might not be available. This also enables stricter configuration for older systems, as they are usually less secure.

Security policies do not support generated group names
The following groups are used throughout this article:
- Administrators – Members of this group have full, unrestricted access to the computer. Even if you remove some privileges from the Administrators group, a skilled administrator can still bypass those settings and gain control of the system. Only add highly trusted people to this group.
- Authenticated Users – A special security principal that applies to any session that was authenticated using some account, such as a local or domain account.
- Local account and member of Administrators group – A pseudogroup available since Windows Server 2012 R2. It applies to any local account in the Administrators group and is used to mitigate pass-the-hash attacks (lateral movement).
- Remote Desktop Users – Members of this group can access the computer via Remote Desktop services (RDP).
- Guests – By default, this group has no permissions. I don't think there is any need to use the Guest account and group today.
The Center for Internet Security (CIS) is a well-known non-profit organization that focuses on cybersecurity. To improve your knowledge of cybersecurity, you can access their free materials:
- CIS Controls – A set of 20 basic and advanced cybersecurity actions (controls). Using these, you can stop the most common attacks.
- CIS Benchmarks – Guidelines with specific configuration steps and detailed explanations. CIS Benchmarks are available for various products such as Windows Server, SQL Server, Apple iOS, and many more.
Both can be downloaded in exchange for your email address. There's no need to worry—there will be no further email, unless you choose to receive them.
Many companies and institutions create their security baselines based on CIS. I recommend you read CIS Controls. It really helped me to understand the importance of various security actions and settings.

CIS Benchmarks example
User rights assignments are settings applied to the local device. They allow users to perform various system tasks, such as local logon, remote logon, accessing the server from network, shutting down the server, and so on. In this section, I will explain the most important settings and how they should be configured.
For each setting, the following format is used:
Name of the setting: Recommended value, or values
Access Credential Manager as a trusted caller: No one (empty value)
Access to the Credential Manager is granted during Winlogon only to the user who is logging on. Saved user credentials might be compromised if someone else has this privilege.
Access this computer from the network: Administrators, Authenticated Users
Required for users to connect to the computer and its resources, such as an SMB share, shared printers, COM+, etc. If you remove this user right on the DC, no one will be able to log on to the domain.
Note : On DCs, you should also add the “ENTERPRISE DOMAIN CONTROLLERS“ group.
Allow log on locally: Administrators
The default configuration includes the Users group, which allows a standard user to log on to the server console. Limit this privilege only to administrators.
Allow log on through Remote Desktop Services: Administrators, Remote Desktop Users
It's common practice that some applications are used via RDP sessions by standard users. This privilege is also frequently required for remote assistance offered by an organization's helpdesk. If a server is running Remote Desktop Services with the Connection Broker role, the Authenticated Users group must also be added to this privilege.
Note: On the DC, it is recommended to allow only administrators to connect via RDP.
Back up files and directories: Administrators
This is a sensitive privilege that allows a user to bypass NTFS permissions (only via an NTFS API interface, such as NTBACKUP). A malicious user could backup and restore data on a different computer, thereby gaining access to it.
Deny access to this computer from the network/Deny log on through Terminal Services: Local account and member of Administrators group, Guests
The default value is only Guests. You should add the second group to prevent pass-the-hash attacks, so if a local elevated user is compromised, it cannot be used to elevate privileges on any other network resource, or access it via RDP.
Force shutdown from a remote system/Shut down the system: Administrators
Only administrators should be able to shut down any server, to prevent denial-of-service (DoS) attacks.
Manage auditing and security log: Administrators
This is a sensitive privilege, as anyone with these rights can erase important evidence of unauthorized activity.
Note: If you are running MS Exchange, the “Exchange Servers” group must be added to DCs.
Restore files and directories: Administrators
Attackers with this privilege can overwrite data, or even executable files used by legitimate administrators, with versions that include malicious code.
Take ownership of files or other objects: Administrators
User having this privilege can take control (ownership) of any object, such as a file or folder, and expose sensitive data.
Deny log on as a batch job/Deny log on as a service/Deny log on locally: Guests
To increase security, you should include the Guests group in these three settings.
Debug programs/Profile single process/Profile system performance: Administrators
This setting allows a user to attach a debugger to a system or process, thereby accessing critical, sensitive data. It can be used by attackers to collect information about running critical processes, or which users are logged on.
Change the system time: Administrators, Local Service
Changes in system time might lead to DoS issues, such as unavailability to authenticate to the domain. The Local Service role is required for the Windows Time service, VMware Tools service, and others to synchronize system time with the DC or ESXi host.
Create a token object: No one (empty value)
Users with the ability to create or modify access tokens can elevate any currently logged on account, including their own.
Impersonate a client after authentication: Administrators, Local Service, Network Service, Service
An attacker with this privilege can create a service, trick a client into connecting to that service, and then impersonate that account.
Note: For servers running Internet Information Services (IIS), the "IIS_IUSRS" account must also be added.
Load and unload device drivers: Administrators
Malicious code can be installed that pretends to be a device driver. Administrators should only install drivers with a valid signature.
I hope this article helped you to understand why it is important to define a security baseline for your systems. Many of the settings are already configured properly following server deployment; however, if they are not controlled by a GPO, they can be manipulated by malicious users. Be careful to whom you grant administrator permissions.
- Windows Server security features and best practices
- Security options in Windows Server 2016: Accounts and UAC
- Security options in Windows Server 2016: Network security
IT Administration News
- August 2024 Patch Tuesday – 90 vulnerabilities, 9 zero day
- Single-command Windows 11 system requirements bypass trick for unsupported PCs blocked – Neowin
- Microsoft is enabling BitLocker device encryption by default on Windows 11 – The Verge
- Ex-Google CEO Says It’s Fine If AI Companies “Stole All the Content”
- Microsoft confirms Office apps crashing when typing, offers a workaround – Neowin
Read All IT Administration News
Join our IT community and read articles without ads!
Do you want to write for 4sysops? We are looking for new authors.

Unifying endpoint management and security: An overview of ManageEngine Endpoint Central

New storage features in Windows Server 2025: NVMe-OF initiator, update for S2D, deduplication for ReFS

E-MailRelay: Free SMTP server for Windows

Receive critical Microsoft security alerts by email

Addressing OpenSSH vulnerabilities CVE-2024-6387 and CVE-2024-6409

Authenticator backup: Microsoft, Google, Amazon, Authy

Delegated Managed Service Accounts in Windows Server 2025

List groups in Linux

Install Let’s Encrypt certificates on Windows with Certbot and export as PFX

Create and remove group in Linux, add user, switch primary group

Audit and disable NTLMv1

Enable FIDO passkey authentication for IAM users in AWS

Enable Microsoft Entra ID passkey authentication

KeePassXC: A free cross-platform password manager for Windows, macOS and Linux

Configuring external authentication methods in Microsoft 365 with Microsoft Entra ID

Integrate Microsoft Graph activity logs for Microsoft 365 with Azure Monitor

Disable Basic Authentication for SMTP AUTH in Exchange Online

Rotate BitLocker recovery passwords, delete used keys from Active Directory

Delegate permission to unlock Active Directory accounts

Partition Windows drive in WinPE using PowerShell

Created a domain account to use as a service account and then tried to run powershell cmdlets against the active RDS management server.
Gave that account local admin access on the broker servers and then was able to get further.
Got the error “Access is denied” when trying to run the invoke-RDUserLogoff(with correct hostserver and unifiedsessionID values) to log off a session using that account.
Need to know what permissions should be granted to the account to provide ability to run this command and where like on the broker or the session host.
I can’t run the RD cmdlets on the RD broker to remove a user session without local administrator privileges on the broker and session host.
I need to know what user permissions are necessary to run these cmdlets as giving local admin is not desired.

Sir we are having user1 in server1. We want to collect logs of server1 from server2 using credentials of user1. Surprisingly even after entering the credentials of user1 in event viewer it is taking loggedin credentials of the user logged into server2.
Leave a reply Click here to cancel the reply
Please enclose code in pre tags: <pre></pre>
Your email address will not be published. Required fields are marked *
Notify me of followup comments via e-mail. You can also subscribe without commenting.
Receive new post notifications

Subscribe to Newsletter
Follow 4sysops.
Please ask IT administration questions in the forums . Any other messages are welcome.
Log in with your credentials
or Create an account
Forgot your details?
Create account.
Windows Remote Management (WinRM) Guide

Windows Remote Management (WinRM) is the Microsoft implementation of Web Services-Management (WS-Management) protocol that provides a common way for systems (hardware and operating systems) from different vendors, to interact to access and exchange management information across an IT infrastructure.
WinRM is an important and useful protocol, especially for Network Administrators managing large windows network infrastructure.
Microsoft started implementing the WS-Management standard when it released WinRM 1.1, available for Windows XP, Windows Server 2003, Windows Vista, and Windows Server 2008. This was followed by WinRM 2.0 found in Windows 7 and Windows Server 2008 R2, which allows PowerShell 2.0 scripts and cmdlets to be invoked on a remote machine or a large set of remote machines. The latest version of Windows Remote Management—WinRM 3.0 was released in 2012 and comes pre-installed out of the box in Windows 8 and Windows Server 2012.
Why is the WinRM protocol important?
Why is the WinRM protocol important and why do we need it? With WinRM protocol, the connection between computers or servers can be easily established, so that remote operations can be performed. You can obtain data or manage resources on remote computers as well as the local computer. Connecting to a remote computer in a Windows Remote Management script is very similar to making a local connection. The WinRM protocol is intended to improve hardware management in a network environment with various devices running a variety of operating systems.
As a command-line tool, WinRM is built into Windows operating systems and based on .NET and PowerShell, which allows scripts and remote PowerShell commands to be invoked on Windows-based machines or a large set of remote machines without RDP or log into the remote machine. This method makes it easier for Windows Administrators to manage multiple machines using scripts and cmdlet, and perform tasks such as:
- Monitor, manage and configure servers, operating systems, and client machines from a remote location.
- Remotely communicate and interface with hosts through readily available channels/ports within your network, including workstations, servers, and any operating system that supports it.
- Execute commands remotely on systems that you are not local to you but are network accessible
The Windows Remote Shell (WinRS) command-line tool relies on WinRM to execute remote commands. It leverages WinRM to let you launch processes on remote machines. WinRM is the server component of this remote management application and WinRS is the client component for WinRM, which runs on the remote computer attempting to remotely manage the WinRM server. However, both computers must have WinRM installed and enabled on them for WinRS to work and retrieve information from the remote system.
WinRM architecture and components
The WinRM architecture consists of components on the client and server computers. The diagram in Figure 1.0 below shows the components on both the requesting client and responding server computers, and how they interact with each other, including the protocol that is used to communicate between them.

Table 1.0 below is a breakdown of the various WinRM components and where they reside.
| Component | Description | Residence |
|---|---|---|
| WinRM application | WinRM command-line tool that uses the WinRM scripting API to make calls to request data or to execute methods | Client-side |
| WSMAuto.dll | The Automation layer that provides scripting support | Client and server-side |
| WsmCL.dl | API layer within the OS | Client and server-side |
| HTTP API | Provides support for HTTP and HTTPS transport | Client and server-side |
| WsmSvc.dll | WinRM listener service | Server-side |
| WsmProv.dll | Provider subsystem | Server-side |
| WsmRes.dll | Resource file | Server-side |
| WsmWmiPl.dll | WMI plug-in that allows you to obtain WMI data through WinRM | Server-side |
| IPMI driver and WMI IPMI provider | Supply any hardware data that is requested using the IPMI (Intelligent Platform Management Interface) classes | Server-side |
Table 1.0 | WinRM components and description
WinRM configuration and commands
For the WinRM command-line tool and scripts to run, and perform data operations effectively, Windows Remote Management (WinRM) must be installed and configured. However, the good news is that WinRM is automatically installed with all currently-supported versions of the Windows operating system, including IPMI (Intelligent Platform Management Interface) WMI (Windows Management Instrumentation) provider components.
By default, WinRM is enabled on Windows Server OS since Windows Server 2012 , but not on Windows 10 operating system. This means that you need to enable it on Windows 10 machines. To enable WinRM on a Windows 10 machine, open PowerShell and run the following cmdlet:
Enable-PSRemoting -force
If you have a single Windows 10 machine that is not part of an Active Directory domain network, you may need to add the machine you are going to connect from to the trusted host of the Windows 10 machine. The reason we need to add trusted hosts is to be able to connect to a Windows machine using WinRM.
However, in situations where you have 100+ Windows 10 machines in an Active Directory domain network, you may need to use a Group Policy (GPO) to get it working with minimal effort. To use a GPO, create a new one or edit an existing one and modify the following settings and set WinRM to “Enabled”:
- Computer Configuration > Policies > Administrative Templates > Windows Components > Windows Remote Management (WinRM) > WinRM Service > Allow remote server management through WinRM
Remember to apply the GPO to the Organizational Units (OU) that have all your Windows 10 machines. Within a few minutes after applying the GPO to the OU, all your hosts will get the policy update. In this case, there is no need to modify the trusted hosts’ list.
The table below is a collection of some WinRM commands you can use to execute remote operations. Please note that these commands work best when you are on an Active Directory domain network. For workgroup machines, the WinRM service may require additional configuration such as modifying the trusted hosts’ list.
| Description | Command | Remark |
|---|---|---|
| Locate listeners and the addresses | winrm e winrm/config/listener | |
| Check the state of configuration settings | winrm get winrm/config | |
| Quickly configure the WS-Man service | winrm QuickConfig | Run from an Elevated Command prompt |
| Quickly delete the WS-Man listener | winrm invoke Restore winrm/Config @{} | Run from an Elevated Command prompt |
| Display your machine’s basic hardware info | winrm enumerate wmicimv2/Win32_ComputerSystem | Run from an Elevated Command prompt |
| Display your operating system properties | winrm get wmicimv2/Win32_OperatingSystem | Run from an Elevated Command prompt |
| Output your OS info in XML | winrm get wmicimv2/Win32_OperatingSystem -format:pretty | Run from an Elevated Command prompt |
Test WS-Man access to a remote machine | winrm id -remote: | Run from an Elevated Command prompt |
| Grab a remote machine’s WS-Man config | winrm get winrm/Config -r: | Run from an Elevated Command prompt |
| Grab a remote machine’s CPU load | winrm g wmicimv2/Win32_Processor?DeviceID=CPU0 -fragment:LoadPercentage -r: | Run from an Elevated Command prompt |
| Grab a remote machine’s free memory | winrm g wmicimv2/Win32_OperatingSystem -fragment:FreePhysicalMemory -r: | Run from an Elevated Command prompt |
| Stop a service on a remote machine | winrm invoke stopservice wmicimv2/Win32_Service?name=w32time -r: | Run from an Elevated Command prompt |
| Start a service on a remote machine | winrm invoke startservice wmicimv2/Win32_Service?name=w32time -r: | Run from an Elevated Command prompt |
| Reboot a remote machine | winrm invoke reboot wmicimv2/Win32_OperatingSystem -r: | Run from an Elevated Command prompt |
| Run a command on a remote machine (this uses winrS, not winrM) | winrs -r: ipconfig /all | Run from an Elevated Command prompt |
| Use PowerShell to grab the WS-Man Win32_OperatingSystem XML output | [xml]$osInfo = winrm get wmicimv2/Win32_OperatingSystem /format:pretty | Run from PowerShell |
| Display the OS version property | $osInfo.Win32_OperatingSystem.Version | Run from PowerShell |
| Display the last boot time | $osInfo.Win32_OperatingSystem.LastBootupTime.DateTime | Run from PowerShell |
| Put free memory metric into an XML variable | [xml]$freemem = cmd /c “winrm get wmicimv2/Win32_OperatingSystem -fragment:FreePhysicalMemory -f:pretty -r:” | Run from PowerShell |
| Display the free memory value | $freemem.XMLFragment.FreePhysicalMemory | Run from PowerShell |
Table 2.0 | Common WinRM commands and description
WinRM security
By default, WinRM uses Kerberos for authentication. This means that Windows never sends the actual credentials to the system requesting validation instead of relying on features such as hashing and tickets to connect.
WinRM listens on TCP port 80 (HTTP) by default , it doesn’t mean traffic is unencrypted. Traffic by default is only accepted by WinRM when it is encrypted using the Negotiate or Kerberos SSP . WinRM also includes helper code that lets the WinRM listener share port 80 with the Microsoft IIS web server or any other application that may need to use that port. Although WinRM listeners can be configured to encrypt all communications using HTTPS, with the use of Kerberos, even if unencrypted HTTP is used, all communication is still encrypted using a symmetric 256-bit key after the authentication phase completes.
You can manually configure WinRM to use HTTPS. The purpose of configuring WinRM for HTTPS is to encrypt the data being sent across the network. This allows for additional security by ensuring server identity via SSL/TLS certificates thereby preventing an attacker from impersonating it. To configure WinRM to use HTTPS, a local computer Server Authentication certificate with a CNAME matching the hostname is required to be installed. To install certificates for the local computer, follow the steps below:
- Select Start and then select Run (or using keyboard combination press Windows key+R)
- Type MMC and then press Enter
- Select File from menu options and then select Add or Remove Snap-ins
- Select Certificates and select Add
- Go through the wizard selecting the Computer account
- Install or view the certificates under Certificates (Local computer) >> Personal >> Certificates.
Once the certificate is successfully installed, use the following command to configure WRM to listen on HTTPS: winrm quickconfig -transport:https
Notable applications of WinRM
- SolarWinds Server & Application Monitor software (SAM) enables remote access for PowerShell with WinRM. It utilizes a WinRM server on monitored servers for its PowerShell integration.
- Thycotic Secret Server—privileged access management (PAM) solution, relies on WinRM components to run PowerShell scripts.
- Ansible—an agentless open-source software provisioning and deployment tool, leverages WinRM to communicate with Windows servers and run PowerShell scripts and commands. Ansible is agentless because of its ability to remotely connect via WinRM, thereby allowing remote PowerShell execution to do its tasks.
- CloudBolt—a hybrid cloud management platform, leverages WinRM as part of Blueprints, Server Actions, and CB Plugins to execute remote scripts on Windows servers using the python pywinrm module.
Windows Remote Management FAQs
Is winrm the same as rdp.
WinRM and RDP are two different systems, although both were developed by Microsoft. WinRM is designed for the remote management of Windows computers. RDP stands for Remote Desktop Protocol and it provides a view of the Desktop of a remote Windows computer. There are also RDP clients available for Linux, Unix, macOS, Android, and iOS.
What is the difference between WinRM and WMI?
WinRM is the Windows Remote Management system. WMI is the Windows Management Instrumentation system. WMI collects status reports on the services that are integrated into the Windows system. WinRM is a remote protocol. In truth, WinRM extracts WMI data from remote computers, so it uses WMI as a local agent.
Is WinRM enabled by default?
WinRM isn’t enabled by default in Windows Server versions up to 2012. From Windows Server 2012 R2, WinRM is enabled by default.
Leave a Reply Cancel reply
This site uses Akismet to reduce spam. Learn how your comment data is processed .
SolarWinds Top 5 Essential IT Tools
Manage and monitor your network in one simple bundle.

- Help desk ticketing and asset management software
- Remote support and systems management solution
- Network configuration and automation software
- Safe file transfer management solution
- Network management and troubleshooting software
DOWNLOAD FREE TRIAL
Fully functional for 14 days
Stack Exchange Network
Stack Exchange network consists of 183 Q&A communities including Stack Overflow , the largest, most trusted online community for developers to learn, share their knowledge, and build their careers.
Q&A for work
Connect and share knowledge within a single location that is structured and easy to search.
Access denied connecting to Windows Server through WMI
I want to connect to windows server 2019 through WMI.
I test the connection by Paessler WMI tester and I get 80070005: Access is denied.
I did the following but the problem is not resolved.
give access the user to root\cimV2 in wmimgmt.msc.
user is the member of Administrators , Performance Monitor Users, Distributed COM Users
user has permissions to DCOM
UAC is disabled by setting LocalAccountTokenFilterPolicy in HKEY_LOCAL_MACHINE\SOFTWARE\Microsoft\Windows\CurrentVersion\Policies\System
Remote client ip is added to trusted host of the server by following command in powershell:
- get-service winrm -enable-PSRemoting -force
- winrm s winrm/config/client '@{TrustedHosts="clientip"}'
- winrm quickconfig
- Grant access to the user to connect from the network by configuring in policy:
- Computer configuration > Windows Settings > Security Settings > Local Policies > User Rights Assignment: add user to Access this computer from the network
- give WMI Access to client in server's firewall
- Most of those actions are unnecessary due to the user is an administrator. You should include results of the local WMI test. – Greg Askew Commented Dec 31, 2023 at 8:51
- moreover it is not advised to disable the UAC for no reason. if its such a buggy application still needs it I wozld really think about it's age – djdomi Commented Dec 31, 2023 at 9:01
- I checked event viewer and following error created when I send a new request. The server-side authentication level policy does not allow the user user_name SID (S-1-5-21-1973546343-3298082641-2350970666-1018) from address 192.168.1.10 to activate DCOM server. Please raise the activation authentication level at least to RPC_C_AUTHN_LEVEL_PKT_INTEGRITY in client application. – mahmood mollaei Commented Dec 31, 2023 at 11:16
- You should consider testing this remotely by using an actual WMI command. Dropping partial information amongst what is mostly irrelevant information isn't a good approach for symptom isolation. – Greg Askew Commented Dec 31, 2023 at 14:13
- Could be that the the user using passler and querying wmi needs to be a member of the the local administrator group. But i also see you setting psremoting,I don't understand why – Turdie Commented Jan 9 at 12:25
The problem solved by updating the client.
https://support.microsoft.com/en-us/topic/kb5004442-manage-changes-for-windows-dcom-server-security-feature-bypass-cve-2021-26414-f1400b52-c141-43d2-941e-37ed901c769c
You must log in to answer this question.
Not the answer you're looking for browse other questions tagged windows wmi ..
- The Overflow Blog
- Scaling systems to manage all the metadata ABOUT the data
- Navigating cities of code with Norris Numbers
- Featured on Meta
- We've made changes to our Terms of Service & Privacy Policy - July 2024
- Bringing clarity to status tag usage on meta sites
Hot Network Questions
- Unexpected behaviour during implicit conversion in C
- Many and Many of - a subtle difference in meaning?
- Discrete cops and robbers
- Why was I was allowed to bring 1.5 liters of liquid through security at Frankfurt Airport?
- What does it mean to have a truth value of a 'nothing' type instance?
- What is the purpose of toroidal magnetic field in tokamak fusion device?
- How to handle stealth before combat starts?
- Using the higrī date instead of the Gregorian date
- If Venus had a sapient civilisation similar to our own prior to global resurfacing, would we know it?
- How did Jason Bourne know the garbage man isn't CIA?
- How to satisfy the invitation letter requirement for Spain when the final destination is not Spain
- What majority age is taken into consideration when travelling from country to country?
- Is there a "simplest" way to embed a graph in 3-space?
- Does the First Amendment protect deliberately publicizing the incorrect date for an election?
- How to turn 2 images, last frame and overlay, into a 5 second end-roll using FFmpeg?
- Guitar amplifier placement for live band
- Questions about best way to raise the handlebar on my bike
- Linear Algebra Done Right, 4th Edition, problem 7.D.11
- Venus’ LIP period starts today, can we save the Venusians?
- How to cite a book if only its chapters have DOIs?
- Enigmatic Puzzle 4: Three Leaf Clover
- Are there jurisdictions where an uninvolved party can appeal a court decision?
- Would donations count as revenue from a free software?
- What is the legal status of the Avengers before Civil War and after Winter Soldier?
- Stack Overflow for Teams Where developers & technologists share private knowledge with coworkers
- Advertising & Talent Reach devs & technologists worldwide about your product, service or employer brand
- OverflowAI GenAI features for Teams
- OverflowAPI Train & fine-tune LLMs
- Labs The future of collective knowledge sharing
- About the company Visit the blog
Collectives™ on Stack Overflow
Find centralized, trusted content and collaborate around the technologies you use most.
Q&A for work
Connect and share knowledge within a single location that is structured and easy to search.
Get early access and see previews of new features.
User rights assignment in Group Policy Object using powershell?
Not able to grant user rights assignment in group policy object using PowerShell Is there any way or command to add user?
Manual steps:
- Open Group Policy Management
- Navigate to the following path in the Group Policy Object
- Select Policy
- Right click & Edit: Computer Configuration\Windows Settings\Security Settings\Local Policies\User Rights Assignment.
- Add/remove the necessary users
Click on image for details
Tried Set-GPPermission but didn't work it adds user in delegation refer to below image Result after using Set-GPPermission
- set-gppermission? – js2010 Commented Oct 7, 2022 at 12:50
- @js2010 also used Set-GPPermission but it give edit, modify, etc rights which are mentioned in delegation tab of policy Added image in post for your reference – Arpit Shivhare Commented Oct 7, 2022 at 13:03
Know someone who can answer? Share a link to this question via email , Twitter , or Facebook .
Your answer.
Reminder: Answers generated by artificial intelligence tools are not allowed on Stack Overflow. Learn more
Sign up or log in
Post as a guest.
Required, but never shown
By clicking “Post Your Answer”, you agree to our terms of service and acknowledge you have read our privacy policy .
Browse other questions tagged powershell or ask your own question .
- The Overflow Blog
- Scaling systems to manage all the metadata ABOUT the data
- Navigating cities of code with Norris Numbers
- Featured on Meta
- We've made changes to our Terms of Service & Privacy Policy - July 2024
- Bringing clarity to status tag usage on meta sites
- Feedback requested: How do you use tag hover descriptions for curating and do...
Hot Network Questions
- I submitted a paper and later realised one reference was missing, although I had written the authors in the body text. What could happen?
- Can I use the Chi-square statistic to evaluate theoretical PDFs against an empirical dataset of 60,000 values?
- What was the reason for not personifying God's spirit in NABRE's translation of John 14:17?
- How to invoke italic correction in ConTeXt LMTX?
- Why does characteristic equation and DC model equation for drain current in JFETs do not agree?
- Applying De Morgans on Product of Sums
- What is the purpose of toroidal magnetic field in tokamak fusion device?
- Non-linear recurrence for rational sequences with generating function with radicals?
- Trace operation as contraction - how can we contract only contravariant indices?
- Function for listing processes holding a specified file open
- Can I use "Member, IEEE" as my affiliation for publishing papers?
- Name of a YA book about a girl who undergoes secret experimental surgery that makes her super smart
- Why do these finite group Dedekind matrices seem to have integer spectrum when specialized to the order of group elements?
- Did the United States have consent from Texas to cede a piece of land that was part of Texas?
- Are all simple groups of order coprime to 3 cyclic? If so, why?
- What's the airplane with the smallest wingspan to fuselage ratio?
- Why was I was allowed to bring 1.5 liters of liquid through security at Frankfurt Airport?
- DIN Rail Logic Gate
- How to read data from Philips P2000C over its serial port to a modern computer?
- Does the expansion of space imply anything about the dimensionality of the Universe?
- How to express degrees of understanding in Chinese:
- Why isn't openvpn picking up my new .conf file?
- Word to classify what powers a god is associated with?
- Power line crossing data lines via the ground plane
This browser is no longer supported.
Upgrade to Microsoft Edge to take advantage of the latest features, security updates, and technical support.
User Rights Assignment
- 1 contributor
- Windows 10
Provides an overview and links to information about the User Rights Assignment security policy settings user rights that are available in Windows. User rights govern the methods by which a user can log on to a system. User rights are applied at the local device level, and they allow users to perform tasks on a device or in a domain. User rights include logon rights and permissions. Logon rights control who is authorized to log on to a device and how they can log on. User rights permissions control access to computer and domain resources, and they can override permissions that have been set on specific objects. User rights are managed in Group Policy under the User Rights Assignment item.
Each user right has a constant name and a Group Policy name associated with it. The constant names are used when referring to the user right in log events. You can configure the user rights assignment settings in the following location within the Group Policy Management Console (GPMC) under Computer Configuration\Windows Settings\Security Settings\Local Policies\User Rights Assignment , or on the local device by using the Local Group Policy Editor (gpedit.msc).
For information about setting security policies, see Configure security policy settings .
The following table links to each security policy setting and provides the constant name for each. Setting descriptions contain reference information, best practices for configuring the policy setting, default values, differences between operating system versions, and considerations for policy management and security.
| Group Policy Setting | Constant Name |
|---|---|
| SeTrustedCredManAccessPrivilege | |
| SeNetworkLogonRight | |
| SeTcbPrivilege | |
| SeMachineAccountPrivilege | |
| SeIncreaseQuotaPrivilege | |
| SeInteractiveLogonRight | |
| SeRemoteInteractiveLogonRight | |
| SeBackupPrivilege | |
| SeChangeNotifyPrivilege | |
| SeSystemtimePrivilege | |
| SeTimeZonePrivilege | |
| SeCreatePagefilePrivilege | |
| SeCreateTokenPrivilege | |
| SeCreateGlobalPrivilege | |
| SeCreatePermanentPrivilege | |
| SeCreateSymbolicLinkPrivilege | |
| SeDebugPrivilege | |
| SeDenyNetworkLogonRight | |
| SeDenyBatchLogonRight | |
| SeDenyServiceLogonRight | |
| SeDenyInteractiveLogonRight | |
| SeDenyRemoteInteractiveLogonRight | |
| SeEnableDelegationPrivilege | |
| SeRemoteShutdownPrivilege | |
| SeAuditPrivilege | |
| SeImpersonatePrivilege | |
| SeIncreaseWorkingSetPrivilege | |
| SeIncreaseBasePriorityPrivilege | |
| SeLoadDriverPrivilege | |
| SeLockMemoryPrivilege | |
| SeBatchLogonRight | |
| SeServiceLogonRight | |
| SeSecurityPrivilege | |
| SeRelabelPrivilege | |
| SeSystemEnvironmentPrivilege | |
| SeDelegateSessionUserImpersonatePrivilege | |
| SeManageVolumePrivilege | |
| SeProfileSingleProcessPrivilege | |
| SeSystemProfilePrivilege | |
| SeUndockPrivilege | |
| SeAssignPrimaryTokenPrivilege | |
| SeRestorePrivilege | |
| SeShutdownPrivilege | |
| SeSyncAgentPrivilege | |
| SeTakeOwnershipPrivilege |
Related topics
- Security policy settings reference
Additional resources
IMAGES
COMMENTS
The following command displays the list of current permissions: Set-PSSessionConfiguration -Name Microsoft.PowerShell -showSecurityDescriptorUI. In this dialog window, add a user or group and grant them Execute (Invoke) permissions. After you save the changes, the system will prompt for confirmation and restart of WinRM service.
When I said above that, by default, you have to be an administrator to work with PowerShell Remoting, I only told you half of the truth. Let's check the default permissions: PS C:\> (Get-PSSessionConfiguration -Name Microsoft.PowerShell).Permission. BUILTIN\Administrators AccessAllowed, BUILTIN\Remote Management Users AccessAllowed.
3. There are two methods (of which I am aware) to achieve this. First (the easiest), you can add the desired accounts to the scope-specific seuciry group "Remote Management Users" group (the domain group if looking to access domain controllers, or the local group if looking to access a member server or workstation).
WinRM then restricts remote access to any user that is not a member of either the local administration group or the WinRMRemoteWMIUsers__ group. You can add a local user, domain user, or domain group to WinRMRemoteWMIUsers__ by typing net localgroup WinRMRemoteWMIUsers__ /add <domain>\<username> at the command prompt.
PowerShell Remoting is a great tool that allows you to connect and run commands on remote computers via WinRM. If computers are joined to the Active Directory domain, then PSRemoting uses Kerberos to authenticate to remote hosts.However, if your computers are in a workgroup, you will have to use NTLM (TrustedHosts) or SSL certificates for authentication.
Configuring WinRM with Group Policy. Use the Group Policy editor to configure Windows Remote Shell and WinRM for computers in your enterprise. To configure with Group Policy: Open a Command Prompt window as an administrator. At the command prompt, type gpedit.msc. The Group Policy Object Editor window opens.
2. Enable WinRM service. Go to Computer Configuration > Policies > Preferences > Control Panel Settings. And right-click Services and choose New > Service. Choose Automatic (Delayed Start) as startup type, pick WinRM as the service name, set Start service as the action. Click OK to save the change.
PowerShell Remoting uses WinRM for communication between computers. WinRM runs as a service under the Network Service account, and spawns isolated processes running as user accounts to host PowerShell instances. An instance of PowerShell running as one user has no access to a process running an instance of PowerShell as another user.
net localgroup "Performance Monitor Users" /add <domain>\<user>. 2. To give the user access to WinRM resources: In the command prompt, execute the following command: winrm configSDDL default. This command will open the Permissions for Default dialog. In the Group or user names section, add <domain>\<user> to the list.
Checking WinRM Settings and PowerShell Connectivity. To check that the WinRM settings on the computer are configured through GPO, run the command: winrm e winrm/config/listener. The command displays the current WinRM listener settings. Note the Listener [Source="GPO"] line. This means that the current WinRM settings are configured through the GPO.
Step 2: Enable WinRM with the WinRM quickconfig Command. The fastest way to enable WinRM and open the necessary Windows Firewall ports is by running the "winrm quickconfig" command. To run this command, open CMD as administrator. Then, proceed with the steps below. Run the "winrm quickconfig" command. winrm quickconfig.
Personal File Server - Get-UserRights.ps1 Alternative Download Link. or. Personal File Server - Get-UserRights.txt Text Format Alternative Download Link. In order to check the Local User Rights, you will need to run the above (Get-UserRights), you may copy and paste the above script in your Powershell ISE and press play.
WinRM authenticates the user by mapping a user on the server within WinRm. The only thing that is passed during the authentication process is the public key so it is a very secure way to authenticate ... User Rights Required to Connect. By default, two local groups of users can connect to a server remotely using PSRemoting; Administrators and ...
They include account policies, local policies, user rights assignment, the Windows firewall, software restrictions, and so on. There are several ways to configure security policy settings. The most common are: Group policy objects (GPO) - Used in Active Directory domains to configure and regularly reapply security settings to multiple computers.
Ensure that the account running WinRM and connecting to the target machine has the permissions to access that machine over the network. Configure the policy value for Computer Configuration > Windows Settings > Security Settings > Local Policies > User Rights Assignment > Access this computer from the network to include the service account or user account that will need access to this computer ...
Windows Remote Management (WinRM) is the Microsoft implementation of Web Services-Management (WS-Management) protocol that provides a common way for systems (hardware and operating systems) from different vendors, to interact to access and exchange management information across an IT infrastructure. WinRM is an important and useful protocol, especially for Network Administrators managing large ...
Add the user(s) in question to the Performance Monitor Users group; Under Services and Applications, bring up the properties dialog of WMI Control (or run wmimgmt.msc). In the Security tab, highlight Root/CIMV2, click Security; add Performance Monitor Users and enable the options : Enable Account and Remote Enable; Run dcomcnfg.
To determine which group policy is configuring your WinRM you can run the following from an administrative command prompt: gpresult /h result.html & result.html. In the displayed result, locate Windows Components/Windows Remote Management (WinRM)/WinRM Service.
winrm quickconfig was necessary part for me.. echo following: The following changes must be made: Configure LocalAccountTokenFilterPolicy to grant administrative rights remotely to local users. - Chuck D
winrm quickconfig. Grant access to the user to connect from the network by configuring in policy: Computer configuration > Windows Settings > Security Settings > Local Policies > User Rights Assignment: add user to Access this computer from the network. give WMI Access to client in server's firewall. windows.
Learn how to use Powershell to execute remote commands on a computer running Windows in 5 minutes or less.
Open Group Policy Management. Navigate to the following path in the Group Policy Object. Select Policy. Right click & Edit: Computer Configuration\Windows Settings\Security Settings\Local Policies\User Rights Assignment. Add/remove the necessary users. Click on image for details. Tried Set-GPPermission but didn't work it adds user in delegation ...
User rights are managed in Group Policy under the User Rights Assignment item. Each user right has a constant name and a Group Policy name associated with it. The constant names are used when referring to the user right in log events. You can configure the user rights assignment settings in the following location within the Group Policy ...