Unsupported browser
This site was designed for modern browsers and tested with Internet Explorer version 10 and later.
It may not look or work correctly on your browser.
- Communication

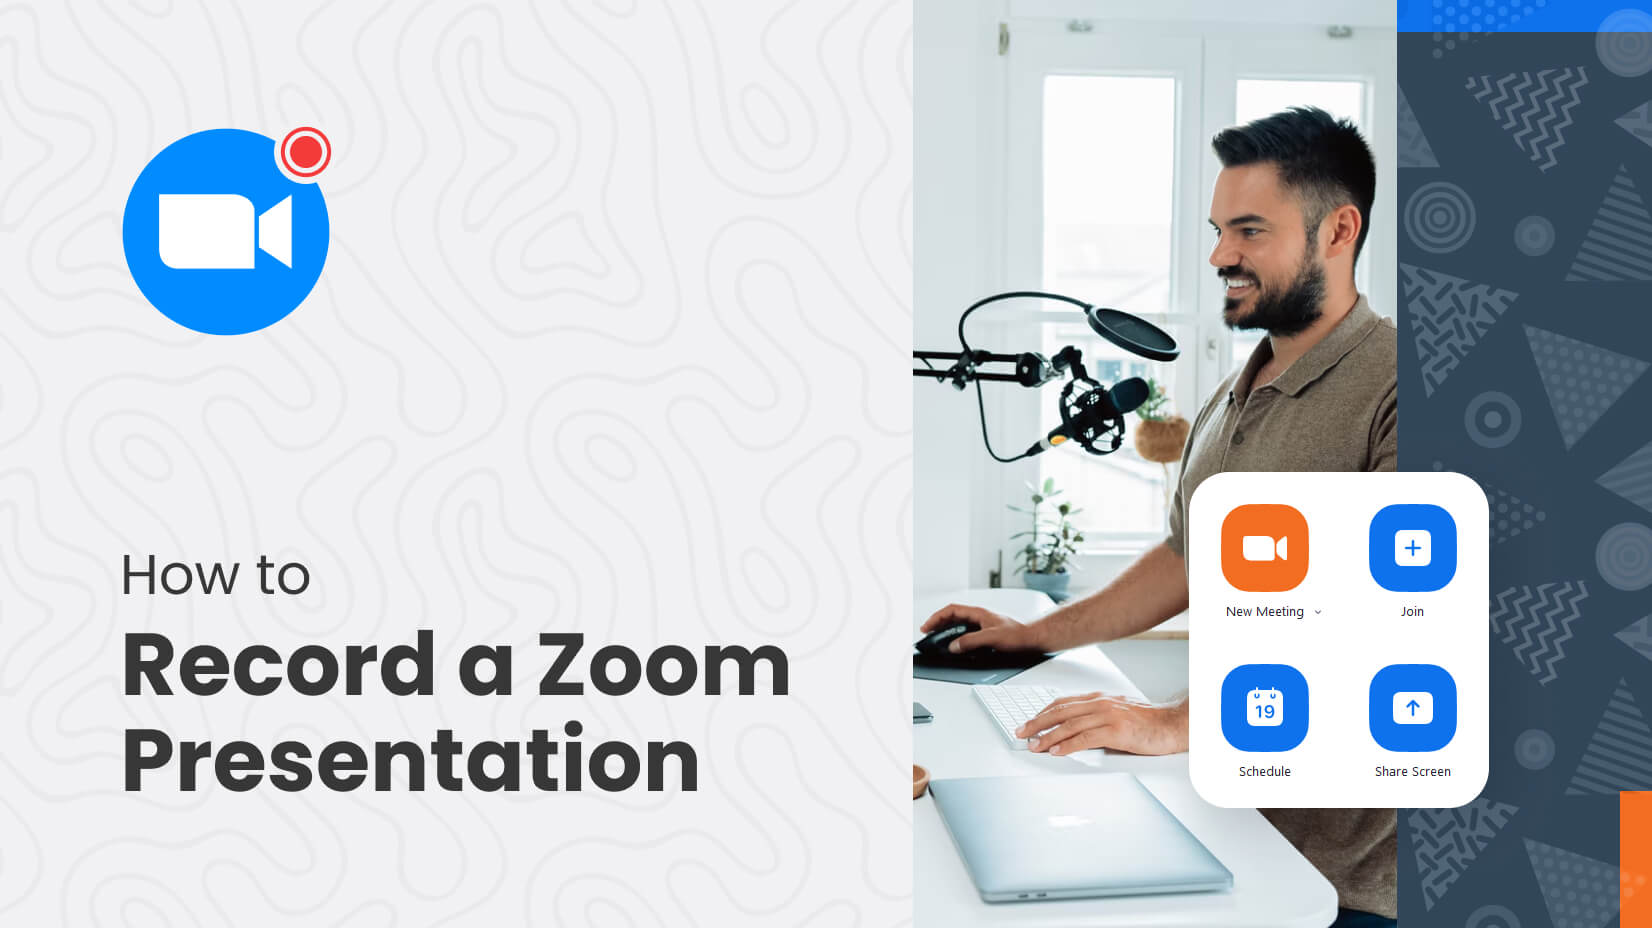
How to Record a PowerPoint Presentation on Zoom (Audio & Video)
In recent years, we’ve seen the rise of virtual meetings. It’s now possible to connect with a global team from anywhere! When you learn how to video record yourself presenting a PowerPoint on Zoom , your content is accessible to all.

Sometimes, not everyone can attend a Zoom meeting in real-time. This is especially true if your team works across the globe. Luckily, there’s an easy solution! Let's learn how to record a PowerPoint presentation in Zoom.
Why You Should Learn To Record PowerPoint Presentations With Audio and Video
Work has changed. More than ever, you need ways to connect for meetings regardless of your team's location. Zoom is one of the most popular tools to do this.
Zoom is video-conferencing software used by millions. It’s popular because it's got a free tier, with options to upgrade to more robust plans. Zoom supports audio and video sharing, allowing you to virtually meet others face-to-face.
You can also share your screen, to show slide decks, text, video, and more. It’s a top option to share PowerPoint presentations with anyone. Learn how to record PowerPoint presentations with audio and video to pair it with Zoom.

With distributed teams, it's not always possible to coordinate a start time that everyone can agree on. Plus, it’s handy to review a meeting later. Perhaps attendees want to listen to what you said again. Luckily, there’s an easy solution! You need to know how to record a PowerPoint presentation in Zoom.
In moments, you've got an MP4 video file ready for sharing. To record PowerPoint with video in Zoom takes only a few quick steps. Let’s dive in.
Build the Perfect PowerPoint for Sharing
Before you learn how to record a PowerPoint presentation with video, you need a slide deck to share. Premium templates are your best option. These offer styling and features that you won’t get with a free option that you might find online.
Envato Elements is a great option for this. At Elements, you’ll find thousands of PPT templates that you can share on Zoom. As a member, you've got unlimited download access. That means that you’re able to download and use as many of those templates as you want.

For this tutorial, I’ll be using the beautiful Virtually PowerPoint template from Envato Elements. It’s a creative modern design with over 50 slides inside.
With your template open, you can start building a slide deck for sharing. As you work, know that PowerPoint slides meant for sharing online should be special. Keep the following design tips in mind to help ensure success:
- Don’t crowd slides. When you’re sharing to record PowerPoint with video, slides will look smaller to your audience.
- Use larger fonts. Fine print is hard to read on a screen, and even more so in a later video playback. Opt for large, readable text styles.
- Illustrate! Photos, charts, and infographics keep things interesting. You need your slide deck to be clear, concise, and engaging.
With these ideas in mind, you’re ready to learn how to record yourself presenting a PowerPoint on Zoom. Learn more about the art of narration in PPT below:
Prepare Your Zoom Meeting
To record PowerPoint presentations with audio and video slides, you need to open Zoom. You can use the Zoom desktop app, which is available for download. Or you can log into your Zoom account inside your favorite web browser.
If you already have a single meeting scheduled, you’ll see a thumbnail for it on the Home tab inside of Zoom. But if you've got many scheduled calls and invites, you’ll want to navigate to the Meetings tab. Here, you’ll find a complete list of Zoom meetings that you’re invited to.

As you can see above, I've got a meeting scheduled for today at 9:30 PM. The invite has been shared with others, and I'll be the host of the meeting. Imagine in this example that we want to share a PowerPoint deck and record it for others.
To make a good first impression with your audience, it’s helpful to prep your slide deck in advance. This helps you be ready to share when the time comes. You won’t have to scramble around for your files in front of viewers. I like to open my PowerPoint, then minimize it, before starting a meeting. This way, it’s ready to roll when it’s time to share.
To begin the meeting, click Start. You’ll see the Join Audio menu appear. This lets you choose the audio source that you want to use to capture your narration. In this case, choose Join with Computer Audio.

Optionally, you’ll have the option to test your speakers and microphone. If you’re working with a new setup, this is a great way to ensure that you’re capturing clear audio.
Now, you’re in your meeting. Watch as other participants appear. You’re ready to get started!
Learn more about PowerPoint Sharing on Zoom below:

Begin Recording
With your meeting underway, your next step is to begin recording it. Optionally, you can start sharing slides before you begin recording. But I prefer to start the recording first. It’s easy to forget to turn on the recording once you've got slides displayed. And there’s nothing worse than reaching the end of a meeting and realizing that you’ve forgotten to record!
To begin a recording of a PowerPoint presentation, move your cursor over the menu bar in Zoom. It’s the series of options and buttons at the bottom of the app’s screen. First, make sure that your microphone isn’t muted. This setting is controlled by the Mute button, found on the left side of the menu bar.

To record your PowerPoint in Zoom, click Record . From this point on, anything you share on-screen or say aloud will be captured in your recording.
This is also true of other attendees. If they speak or ask questions, their voices will be captured in the PPT meeting recording. You also have the option of sharing video from your webcam. This way, viewers can watch you speak as you share your PowerPoint. This can be captured in your recording too.
It's a good idea to mention to attendees if you're recording the meeting. This ensures they're able to consent to the recording. Plus, it lets them know that you'll have a copy available for review later. Do this at the beginning of your meeting so that all are aware of the recording process.
Share Slides on Zoom
With your recording underway, it’s time to share your PowerPoint slide deck in Zoom. Once again, return to the menu bar at the bottom of the screen. This time, you’ll want to choose Share Screen . It’s easy to find, highlighted in green in the center of the menu.
Click on Share Screen, and a settings window opens. On its Basic tab, you’ll see several thumbnail buttons. These control the source that you want to share from. Usually, there will be tabs for every app open on your computer. Plus, there are options for a whiteboard, to connect an iPad, and more.

To see how to video record yourself presenting a PowerPoint on Zoom, click on the Microsoft PowerPoint thumbnail. Then, click Share.
PowerPoint appears on your screen. You can navigate through your slides as usual. You’ll see that a green box has appeared around the border of the PowerPoint window. This signifies that this area of the screen is being actively recorded. Anything outside of the green boundary won't be captured in your recording.
As you can see, it’s easy to learn how to record a PowerPoint presentation in Zoom. It’s a useful way to share and preserve slide presentations for others in the future!
For best results, keep the following tips in mind:
- Narrate clearly and concisely. Remember, you’re being recorded! Speak clearly, at a cadence that’s easy to follow. Talk too fast and your words will be hard to understand.
- Control sources of audio. Try and eliminate background noise from your environment. This keeps extra sounds from appearing in your recording. And be sure to ask other attendees to mute their mics, unless they've got a question.
- Use a clean, readable template. Premium templates like the Virtually PowerPoint deck have neatly-arranged slide layouts. These are easy for your audience to read.
By embracing these ideas, you’re sure to make a winning impression. They help you build useful, enjoyable recordings for meeting participants to watch later.
Save and Share the Finished Recording
When you’re finished presenting, it’s time to end the meeting and ready your recording for sharing. This is easy to do, and only takes a moment.
You’ll first want to stop sharing your PowerPoint slides when you’re finished. To do so, click Stop Sharing . This is highlighted in red on the menu bar. (It’s only visible when you're actively sharing).
Then, end your meeting when you're ready. Click End , then End Meeting for All. Once you end a Zoom meeting, the app saves any recordings that you made during your meeting. For longer meetings, this may take a few moments. You can monitor the progress on the bar shown in the Conversion popup.
When the conversion process is complete, a Finder window opens. Inside it, you’ll see an MP4 video file. This is your converted meeting PowerPoint! You can watch it on your computer or mobile device. And it’s ready for sharing with others.

You’ve learned how to video record yourself presenting a PowerPoint on Zoom. As you can see, it’s amazingly easy to do! It’s the perfect way to ensure that everyone can hear and enjoy what you've got to share. It only takes a few clicks.
The Top Source for Shareable PowerPoint Templates in 2022 (With Unlimited Use)
As we’ve seen, premium templates are the best PowerPoint decks to share on Zoom. With expertly-built layouts and cool designs, they’re sure to help you succeed. The best source for these templates is Envato Elements .
Elements has a powerful offer: unlimited downloads. For a flat monthly rate, you can download and use as many PowerPoint templates as you want.

With a vast library of thousands of custom PPT templates , you’re sure to find one that’s just right for you.
Plus, Elements offers countless other creative assets. Among them, you’ll find custom fonts, stock photos, music, and more. As a PowerPoint presenter, you can make use of all of these. Together, they help you create stunning slide decks ready for sharing.
Explore PowerPoint Templates

Consider the top advantages of Envato Elements:
- Creative flexibility. Each template is fully editable by you. This lets you tailor each slide to your needs.
- Time savings. Instead of building layouts from scratch, you’re simply filling in blanks. This gives you more time to focus on refining your message and preparing to present it.
- Professional designs . Audiences will appreciate the stylish slides in your presentation. You’ll enjoy them as well, finding inspiring layouts in every template.
Envato Elements is the creative offer that you can’t afford to miss. Join today and start exploring the vast library!
Now You Know How to Record PowerPoint Presentations With Audio and Video
You just learned how to record PowerPoint with video. This is a crucial skill for successful online meetings.
Here's a challenge: before you schedule an in-person meeting, convert it to an online meeting instead. Now that you know how to record a PowerPoint presentation with audio and video, you can skip in-person meetings!

How to Record Your Screen with Zoom on Windows and macOS

Nicholas Godwin is a technology researcher who helps businesses tell profitable brand stories that their audiences love. He's worked on projects for Fortune 500 companies, global tech corporations and top consulting firms, from Bloomberg Beta, Accenture, PwC, and Deloitte to HP, Shell, and AT&T. Nicholas loves tech, food, art, travel, and regularly spends his time in hard-to-reach places (as far as there's an internet connection.)

Ashish, Computer Engineer by profession, has been writing about tech for 16 years, with a primary focus on Windows and Smartphones. He has a keen interest in writing about social media, as it constantly evolves, introducing new features to explore.
- You can change the default location of recordings by using Zoom’s preferences before the meeting or set a prompt to ask to save every time.
- Zoom creates both video and audio recordings for a recorded meeting.
- You can record a meeting or record a screen or Whiteboard.
How to Record Your Screen with Zoom on Windows
Here’s how to record your computer screen on Windows and Mac using the Zoom desktop app.
Step 1: Launch the Zoom app, and as a host, start a new Zoom meeting by clicking the New Meeting icon, as indicated in the image below.

Step 2: Click on Share from either the main screen or the toolbar.

However, if you’ve turned your computer’s camera on, your experience will be slightly different. So, you’ll have to use the Share option on the toolbar.

But that’s if you’re not looking to record a video of yourself. Here’s how to do it if you’d instead record yourself before recording your screen, maybe as an introduction or something. On the Zoom toolbar, you’ll see Record . Click on it. You’ll see the video recording, as your Zoom app will indicate ‘Recording.’

Step 3: When you’re done making a recording and want to switch to recording your screen, you can do either of two things. You can click the Share icon on the toolbar and then open the program you want to record on your screen. Alternatively, pause the video and then click on Share . Then, when you’ve selected the file you want to share, click on Resume Recording .

I assume you want to record just your screen for this guide. You can easily use the suggestions above if you ever decide to include yourself in your screen recording.
Step 4: Select any screen, window, or application you wish to share.

You may also select from the list of windows or applications open on your computer.

Step 5: Click on Share at the bottom right of the screen.

Sharing your screen will reveal a toolbar and meeting control that can be dragged around the screen.

Step 6: Tap the More icon to reveal other options.

Step 7: From the drop-down menu, click on Record to start your screen recording.

You may pause, resume, and stop your screen recording.

Step 8: When you have completed your screen recording, go back to More , and then from the drop-down menu, you’ll click on End Meeting .

Step 9: After you have ended the meeting, the software will convert the meeting recordings into audio and video files for storage on your PC.

Step 10: The recorded file folder will automatically open after conversion. The audio/video file (MP4) is usually named ‘Zoom_0.mp4’ by default, while the audio-only file (M4A) has the default name ‘audio_only.m4a’ appended to it.
How to Record Your Screen with Zoom on macOS
Step 1 : Open the Zoom application on your MacOS. If you are the host, start the meeting. If you attend a conference, join the one you want to record.
Step 2 : In the meeting, click the Record button on the bottom toolbar; if it isn’t available, click More to find it there.

Step 3 : Now click Record . As a participant, you will need permission from the host to record.
The recording indicator will appear at the top left-hand side of your window. This indicates that your recording has started. To pause or stop the recording, click the Pause/Stop Recording button on the bottom toolbar.

Step 3: Once the meeting is over or you’ve stopped the recording, Zoom will convert it into a watchable format and save it to your computer.
Step 4: By default, these recordings are captured under a Zoom subfolder in the Documents folder. Each recording is named with the date and time of the meeting.

Step 5: Before the meeting, you can set the default location of the recordings according to Zoom’s preferences. Go to the menu bar, click on zoom.us , then Preferences , and go to the Recording tab.
Step 6 : In the Recording tab, Zoom can prompt you for a save location after each meeting, optimize the recording for third-party video editors, and record separate audio files for each participant.
How to Record Whiteboard Screen in Zoom
The Zoom whiteboard feature allows you to share a whiteboard that the meeting host and other participants can annotate. You can also record your whiteboard screen while giving vocal explanations.
Step 1 : Launch the Zoom app, start a meeting, and click Share from either the main screen or the toolbar. After that, click on Whiteboard .

Step 2: Click on Share at the bottom right of the screen.

Step 3: Tapping on Share will reveal the whiteboard and meeting control that can be dragged around the screen.
Here’s the Whiteboard.

Here are the meeting controls.

Step 4: Tap the More icon to reveal other options.
Step 5: Click on Record to start your screen recording.
Step 6: After annotating on your Whiteboard, Click on Save . That option will save your annotation to your PC’s default Zoom storage folder.

Step 7: When you have completed your screen recording, you may click on End Meeting .
Was this helpful?
Last updated on 26 August, 2024
The above article may contain affiliate links which help support Guiding Tech. However, it does not affect our editorial integrity. The content remains unbiased and authentic.
Leave a Reply Cancel reply
Your email address will not be published. Required fields are marked *

The article above may contain affiliate links which help support Guiding Tech. The content remains unbiased and authentic and will never affect our editorial integrity.
DID YOU KNOW

Nicholas Godwin
More in windows.

4 Ways to Fix VLC Not Playing MKV Files on Windows 11

3 Ways to Fix Google Chrome Installation Failed on Windows
Join the newsletter.
Get Guiding Tech articles delivered to your inbox.
Zoom Recording 101
Updated on September 29, 2022
Published on February 25, 2016

- 01 Local and cloud recording - Jumplink to Local and cloud recording
- 02 Start recording - Jumplink to Start recording
- 03 Your local recording - Jumplink to Your local recording
- 04 Your cloud recording - Jumplink to Your cloud recording
- 05 Recording best practices - Jumplink to Recording best practices
- 06 I’ve made a recording ... what now? - Jumplink to I’ve made a recording ... what now?

Local and cloud recording
Start recording, your local recording, your cloud recording, recording best practices.
- Use a wired internet connection
- Use a headset or directional microphone
- Mute all the non-speaking attendees
- We get a lot of questions about what exactly the recording captures. A good rule of thumb is that your recording generally captures what you’re seeing on your screen. So, if you want the recording to show just one person, pin their video . If you want to show whoever is talking at the moment, use active speaker mode .
I’ve made a recording ... what now?
You might also like.

Your guide to getting started with Zoom Docs
Get to know Zoom Docs with AI Companion — follow our tips for creating collaborative docs using meeting summaries and transcripts, templates, and more.

What’s new: the latest Zoom releases you don’t want to miss
July was filled with several new features and tools, including our Zoom AI Companion ROI calculator, Workflow Automation Tool, and Zoom Events page builder. Get up to speed with the latest Zoom releases.

Tech tips for small businesses: 5 ways to save time and get more done with Zoom Workplace
How small businesses can use Zoom Workplace to foster productivity, streamline operations, and better connect with customers.
Subscribe to the Zoom Blog
Get the latest Zoom posts directly in your email
By entering your email, you agree to our Privacy Policy .
Related Resources

Meet Zoom AI Companion, your new AI assistant!
Boost productivity and team collaboration with Zoom AI Companion, available at no additional cost with eligible paid Zoom plans.

How to build your best hybrid work environment
If you’re facing the challenges of setting up a successful hybrid workplace, here are some tips and strategies you can incorporate.

How to transform your CX
New study shows integrated UCaaS and contact center platforms are among top trends to transform the customer experience.
Our customers love us

Zoom - One Platform to Connect
Using ZOOM to Record a Video Presentation
- August 7, 2018
- Alex Martinez
Our University paid version of ZOOM allows you to record your computer screen and voice to create a video that you can share with others via Canvas or a private web link. In this tutorial, we will illustrate how to use the ZOOM Cloud Recording option to record a presentation and share the video with someone.
This article covers:
- Using Zoom to record a video presentation
- Using the Zoom virtual slides background feature
How to install and log into your DU Zoom account
Zoom recording instructions, end your recording, share your presentation, related resources.
The videos below illustrates a few different ways to per-record a lecture video.
Using the Zoom Virtual Slides Background Feature
The free version of Zoom has limited features. For example, the free version does not allow for cloud recordings and has limited time restrictions. To get the full version of Zoom, go to http://udenver.zoom.us and click the “Download ZOOM” option.
After clicking the Download ZOOM option, you will be taken to the software download page. Select the “ Sign In with SSO ” option, this will allow you to use the fully functional paid university version of ZOOM.
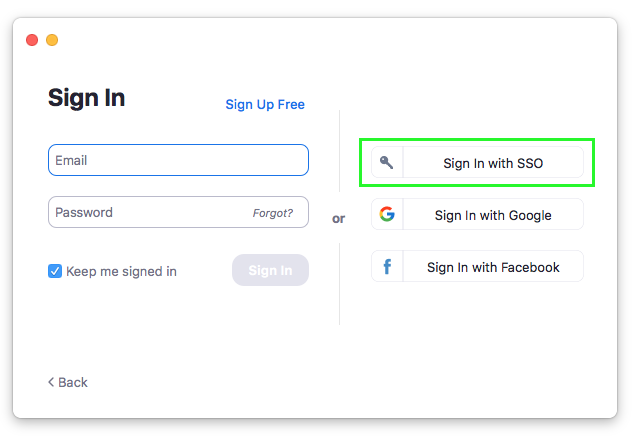
Type in udenver in the box.
Sign In with SSO – Company domain
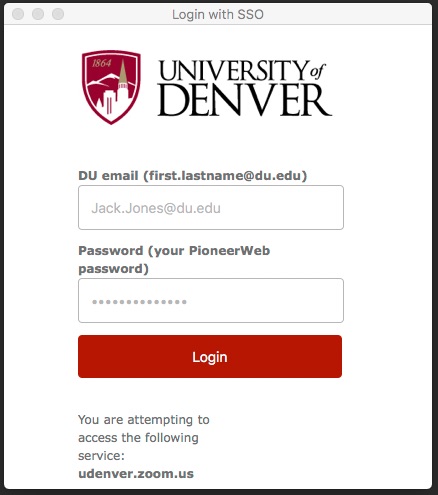
A new window will open in your browser. Type in your DU email and password and click “Login.”
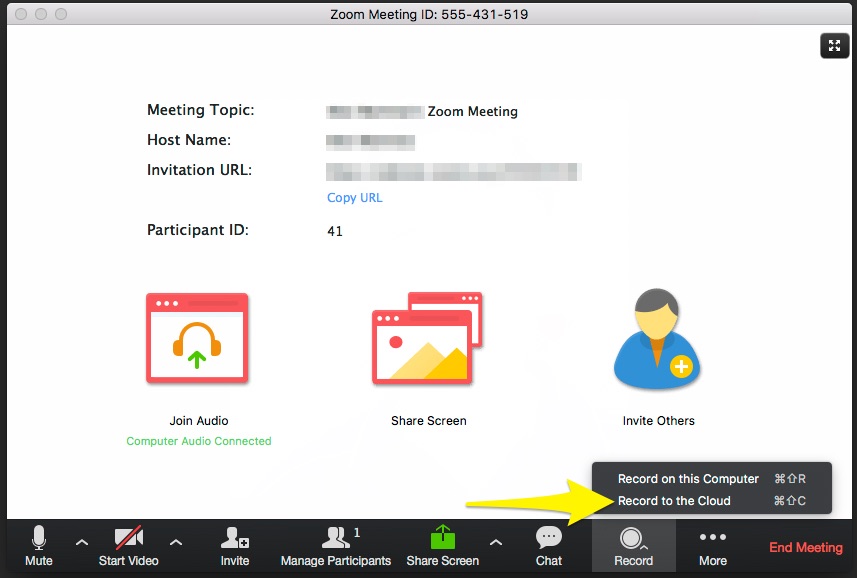
Click “ New Meeting ” This will open a new window and start your webcam video.
Click the Record button and select “ Record to Cloud ” option; you are now recording. If you wish to post your video on YouTube, Vimeo or some other video sharing website, click “ Record on this computer “, ZOOM will make a mp4 file after you end your ZOOM meeting.
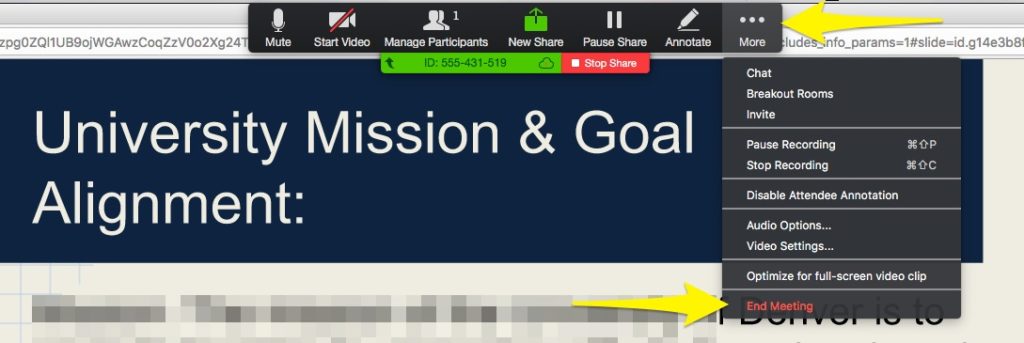
To record your computer screen, click the “ Share Screen ” icon in the middle of the Zoom window. Select your main screen to record and press the “ Share Screen ” button.

To end the recording, press the “ More ” menu option and select “ End Meeting “. Press the “ End Meeting for All ” button. This will end your meeting and start the upload process, so stay connected to the Internet.
If you selected “ Record to Cloud “, after your pressed the End Meeting button, your recording will automatically will be uploaded into your DU MediaSpace and DU Canvas My Media account. You should get an email sent to your University email after 20-30 minutes.
If you selected “ Record to this Computer “, after your pressed the End Meeting button, your recording will be saved on your computer. ZOOM recordings are saved in a folder called ZOOM within your documents folder. You can upload this mp4 file to YouTube, Vimeo or some other video sharing website.
- ZOOM Cloud Recording Settings and Features
- Getting Started with ZOOM Tutorials
- ZOOM Video and Audio Settings
- Sharing you Zoom via Canvas
- Sharing your Zoom recording without any security restrictions as an unlisted video
Related Articles
How to access zoom recordings in mediaspace, how to obtain a transcript file when conducting interviews using zoom, kaltura or a phone, how to use zoom for asynchronous and unmoderated usability testing, zoom – ways to use avatars in your class, zoom – short answer poll questions to gather student feedback, how to access zoom cloud recordings in canvas.
Teaching with Technology
Recording a video lecture of yourself with zoom and powerpoint slidedeck.
There are two different ways to record a video lecture of yourself and your PowerPoint slidedeck using Zoom.

Picture-in-picture View instructions

Video overlay View instructions
If you want to record your screen and PowerPoint without your video image (similar to an audio podcast, but with a visual component of your slides), follow these instructions .
Note: Before doing any recording, make sure to prepare your slidedeck to make room for the video image of yourself, so that your video image won't be overlaid on top of any text or images. Sometimes drawing a rectangular box on each slide helps to "save" a space for your video to go.
- Open the Zoom app and your PowerPoint file. Close all other files and applications.
- In Zoom, click “New Meeting” (orange icon); make sure your microphone and camera are on.

- Go to PowerPoint and launch your slideshow.
- At the bottom Zoom toolbar, choose Record, then choose “Record on this Computer” from the menu that pops up. Your lecture is now recording. Note: if you don't see the Record button, you may need to click on the "More" button in the Zoom toolbar, and then choose the "Record on this Computer" option.
- Start your lecture. Advance your slides with the right arrow key; return to a previous slide with the left arrow key.
- When you are finished, click on the "Stop Recording" button in the bottom Zoom toolbar. Note: if you don't see the Stop Recording button, you may need to click on the "More" button in the Zoom toolbar, and choose the "Stop Recording" option there.

- Trim the beginning and ending of your video (if needed) using QuickTime or another video editing tool, then upload your video to Ensemble, Reed’s media server.
Want to do more? Read how to annotate your PowerPoint slides with Zoom .
How to record a Zoom presentation and present in a virtual meeting?
- Share on Facebook
- Share on Twitter
By Nikolay Kaloyanov
in How-To Tutorials
2 years ago
Viewed 632 times
Spread the word about this article:
Many big companies had to establish home office practices in 2020 and Zoom became the most popular tool for virtual meetings . Virtual meetings are now crucial for business and education and they are here to stay.
If you’re a teacher and have difficulty maintaining class control, recording your lessons is a great way to save time . Instead of spending hours rehearsing your lessons and guiding students every step of the way, you can record a professional presentation for your students to watch at home. They’ll be able to watch it in their own time, over and over again – so you no longer have to answer questions on the spot!
Also, if you’re a business person, your audience can listen to the presentation afterward , thus they can learn more about your subject, and not embarrass themselves in front of other business people if they dare to ask questions.
And this is where Zoom came in. It successfully replaced physical meetings with digital ones. So, if you haven’t worked with Zoom yet, you will sooner or later get more familiar with it. In this guide, we will teach you how to record a Zoom presentation, so you can share with other people in the meeting your recent work or study progress.
Article overview: 1. Should you use Zoom for presentation recordings? 2. What is the difference between video conferencing and video recording tools? 3. How to record a Zoom presentation? 4. Bonus: How to Make a Transparent Camera Background When Presenting?
1. Should you use Zoom for presentation recordings?
Before we get into the essence of the topic, we need to mention a couple of reasons why Zoom is a good choice for recording presentations.
- It’s secure – popularity plays a huge role. Famous apps receive more updates and are more secure since they want to keep their customers behind them.
- The free version is more than decent – the free version allows you to have a video conference with other people for up to 40 minutes and have up to 100 call participants.
- It’s popular – Maybe you already tried Zoom and you are familiar with the software. Also, it is used by many companies and you can ask a colleague or friend for help.
2. What is the difference between video conferencing and video recording tools?
In one of our previous articles, we showed you how to record a presentation using different tools – like Loom, Panopto, QuickTime, and Game Bar. We highly recommend that you dedicate some time for practice at home before presenting to other people. Stuttering and mispronunciation of words are not good signs for how well you are presenting. On the other hand, video conferencing tools like Zoom and Google Meet are made for people who are recording in real-time.
3. How to record a Zoom presentation?
Zoom is a great application for delivering high-quality presentations with ease. The tool enables you to record your screen, camera, and voice with just a few clicks of a button. You need to follow some steps that we’ll show below.
Step 1. Create a Zoom account
The first step is to create a Zoom account . You are assigned to a free plan by default but you can also explore the paid options if you need to. If you’re assigned to present in Zoom but you’re a guest, it’s often the admin who holds a premium account.
Step 2. Download the desktop app
Once you have opened your Zoom account, you have to download the desktop app on your computer and install it.
Step 3. Create a meeting / join a meeting
When you are all set, you are now able to host your meeting. You have two options to start a meeting: New Meeting is the option used for immediate meetings, or Schedule – to plan your next meeting ahead of time. You can also join a meeting if someone shared a meeting link with you. There is a Meeting Id required for some meetings, so the host should provide you with that in advance. It’s a combination of numbers.

Step 4. Select how to join the meeting
Zoom will ask you to confirm which audio and video settings you are going to use. Many people prefer to present only the slides, while others want a more realistic experience – with the camera on. Start without video and Start with video are self-explanatory, so we won’t dig into details.
Step 5. Click on “Share Screen”
The next step is to select Share Screen from the Zoom control bar. You have to also press Record at the beginning of your meeting (or presentation), and just click Pause/Stop recording. Pausing the recording is reasonable when the others are discussing topics nonessential to the presentation (off topics), stopping the recording is the moment you want to end it.

Step 6. Pick the screen you want to share
You can share your screen (you will have two options if you have two monitors). When you have a Keynote or PowerPoint tab open, you will find them as available options. This is when you should click on them. If your presentation is made in Google Slides, or you have it in iCloud or OneDrive, then you have to find the relevant tab and pick a Slideshow mode for the applicable program. We advise you to remove any unrelated tabs beforehand, as they will be visible to your audience and could distract you to find the presentation file fast enough.

A quick tip : If you hold a lot of valuable info on many tabs, you can create a new Google Chrome window to click on it easily.
Step 7. End the recording
If you have presented everything, you can now end the Zoom recording. If there is nothing else to add, you have two options – Leave Meeting if you are invited or you are admin but you want the meeting to remain, or End the Meeting for all in case you want to end the Zoom meeting and kick other participants.
Step 8. Export the recording
When you are ready with the recording, you will have access to it. In order to download (or export) your recording, you should log into your Zoom account, then select My Account , and from the menu on the left click on Recordings . You will now have access to all recordings that you have made. To download them, you have to checkmark the ones you wish to download and click on Export .
4. Bonus: How to Make a Transparent Camera Background When Presenting?

Who wants to clean the entire room, in order to stream their camera? Nobody. Luckily, there is an option in Zoom where you can present with a webcam without any background. It is working with Microsoft PowerPoint, and it is really simple. (Please, have in mind that this works best with clean color backgrounds such as green or white).
- Start a new meeting.
- Then click on the “ Advanced ” tab.
- Select “ Slides as Virtual Background “.
- Pick your PowerPoint presentation.
- Finish the task by clicking on “ Share “
Recording a presentation requires different skills today. While several years ago, you could get away with a decent presentation design and compensate for it with great speaking abilities, nowadays programs give you plenty of options to add creative visuals and impress the audience. Zoom is an amazing app that enables you to present to up to 500 people at the same time. However, knowing how to record a presentation in Zoom is just one part of being successful.
If you find the guide useful, why don’t you check some of our other presentation-related tutorials:
- How to Calm Down Before a Presentation: 10 Practical Tips and Techniques
- How to Start and End a Presentation: 10 Practical Tips to Grab Attention and Make an Impact
- How to Make an Engaging Infographic: The Full Guide

Add some character to your visuals
Cartoon Characters, Design Bundles, Illustrations, Backgrounds and more...
Like us on Facebook
Subscribe to our newsletter
Be the first to know what’s new in the world of graphic design and illustrations.
- [email protected]
Browse High Quality Vector Graphics
E.g.: businessman, lion, girl…
Related Articles
How to create a cartoon flyer template for your business, how to add a gif to google slides and make it look nice, the 25 absolute best adobe xd tutorials in 2022, how to write a killer blog post in 10 easy steps, 30 amazing adobe photoshop tutorials for beginners [2022], enjoyed this article.
Don’t forget to share!
- Comments (0)
Nikolay Kaloyanov
Nikolay is a copywriter with vast experience in Technology, Marketing, and Design. When he isn't playing with words and crafting texts, he watches sports and asks questions. He is a funny person...until you put him on a diet.

Thousands of vector graphics for your projects.
Hey! You made it all the way to the bottom!
Here are some other articles we think you may like:

How-To Tutorials
How to make cartoon animation like ted-ed.
by Lyudmil Enchev

How to Create a Custom Business Card Like a Professional [Tutorials]
by Iveta Pavlova

How to Add and Show Speaker Notes on Google Slides?
by Nikolay Kaloyanov
Looking for Design Bundles or Cartoon Characters?
A source of high-quality vector graphics offering a huge variety of premade character designs, graphic design bundles, Adobe Character Animator puppets, and more.

Want to create or adapt books like this? Learn more about how Pressbooks supports open publishing practices.
Working with Video (Kaltura, Canvas, Zoom, and PowerPoint)
Recording an individual or group presentation with Zoom
These instructions presume you are using a desktop or laptop computer.
Zoom will allow you to record video of yourself, other people in the meeting room, and/or your computer screen.
It is strongly recommended to use the Zoom Client for Meetings app for Windows, Mac, or ChromeOS when recording. Review the instructions at the bottom of this page for downloading and logging into the Zoom app if you do not already have it installed.
Instructions
- Open the Zoom desktop app, make sure you are logged in with your IU credentials , and choose the “ New Meeting ” button. Alternatively, you can go to zoom.iu.edu , log in, and select the “Start a New Meeting” button at the top right.

- You will want to record to Kaltura to share your video with others. If you are using the Zoom desktop app, choose “ Record to Cloud” to save your video to Kaltura. If you are using Zoom in a browser, your recording will automatically go to Kaltura.
- When Zoom is recording there will be a small red dot at the top left of the meeting window.
- When you are done recording, choose the “ Stop Recording ” button in the control bar at the top right and then select “ End ” at the bottom right and then “ End Meeting for All” .
- Once you end the meeting, your video will automatically be sent to your Kaltura account. The transfer is not instantaneous. You will receive an email notification when the video is ready.
- If you would like to edit your video, visit the Editing your Video page .
Group recording with Zoom
Zoom allows you to record a presentation with multiple people at different locations. If your group is available to record together at the same time, you can use Zoom to record as described above.
Inviting group members
One person in the group will start the meeting using their Zoom account and then invite the rest of the participants. To invite others to the room,
- Choose the “ Participants ” button on the control bar at the bottom of the Zoom window
- Select “ Invite ” at the bottom of the participant list that will open to the right of the meeting room
- Select the “ Copy Invite Link ” button
- Send your group members that link and they will be able to use it to join you in the Zoom meeting room.
Recording tips
- The recording will show what the meeting host sees. If you want all participants showing all the time make sure the host’s view is set to show everyone by choosing Gallery View at the top right of the Zoom window. If you only want to record the video of the person talking, make sure the host’s view is set to only show the speaker by choosing “Speaker View” at the top right of the Zoom window.
- Rehearse your presentation to smooth the transitions between presenters.
- If you are using slides, it is easiest to have all the slides in one file and shared by the host instead of having each person share their own slides.
Submit Your Presentation to an Assignment
Once your video is in Kaltura, based on your instructor’s instructions:
- Submit your video by embedding it in a text box in an Assignment or Discussion .
- Submit your video by adding it to the Kaltura: Media Gallery for your course
Other information
A note on video processing.
When a video is first uploaded to Kaltura you will have a “media is being processed” animation where you expect your video to be.
Please be patient. Processing time depends on the length of the video and the number of other videos Kaltura is processing. It will appear once it has completed processing, though you may need to refresh your page. You can embed a video that is still processing in Kaltura .
Downloading and using the Zoom desktop app.
- Go to the Zoom Download Center to download the Zoom Client for Meetings for your operating system.
- After the file downloads, open it and follow the prompts to install. You may need administrator privileges on the computer you are using.
- Choose “ Log in with SSO ” on the right
- Type “ IU ” in the text box and select “Next”
- Log in with your IU login and Duo
Verifying the Automatic Captions on Your Video
All video uploaded to Kaltura is automatically mechanically captioned using speech-to-text technology. If you’ve ever used speech-to-text, you know it’s never 100% accurate so you need to check your captions and edit as needed to make sure they are correct and not saying anything embarrassing. The mechanical captions appear fairly quickly on short videos once they’re uploaded. You can check them either in the Kaltura: My Media tool if it is available in your course, or at Kaltura Mediaspace. Instructions on checking and editing your captions are at Accessible Videos in this book.
A Canvas Semester Checklist Copyright © by Trustees of Indiana University is licensed under a Creative Commons Attribution-NonCommercial-ShareAlike 4.0 International License , except where otherwise noted.
How To Record A Presentation On Zoom

- How-To Guides
- Software Tutorials

Introduction
Recording a presentation on Zoom is a valuable tool for various purposes, whether you want to capture important information for future reference, share a lecture with others who couldn’t attend, or create online courses. Zoom, a popular video conferencing platform, offers a user-friendly interface and robust recording features that make it easy to record and save your presentations.
In this article, we will guide you through the step-by-step process of recording a presentation on Zoom. From downloading and installing the Zoom software to accessing and sharing the recorded presentation, we’ve got you covered. So, let’s get started!
Before we delve into the details, it’s important to note that recording a Zoom presentation requires the host or someone with recording permission. If you’re not the host, make sure to communicate with the host and obtain the necessary permissions to record the presentation.
Recording your presentation on Zoom offers numerous benefits. It allows you to revisit the presentation at any time, ensuring that you don’t miss any important details. You can also share the recording with others who were unable to attend the live presentation, providing them with an opportunity to catch up on the information.
Additionally, recording presentations on Zoom can serve as a valuable resource for creating online courses or training materials. By utilizing recorded presentations, you can create educational content that can be accessed by a wider audience, increasing your reach and impact.
Now, let’s move on to the steps involved in recording a presentation on Zoom. From downloading and installing Zoom to adjusting the recording settings and accessing the recorded presentation, we will guide you through the process, ensuring that you have all the information you need to make the most of this powerful feature.
Step 1: Download and install Zoom
The first step in recording a presentation on Zoom is to download and install the Zoom software on your computer. Follow these simple steps to get started:
- Visit the official Zoom website at zoom.us in your web browser.
- Click on the “Sign Up, It’s Free” button to create a new Zoom account. Alternatively, if you already have an account, you can sign in using your existing credentials.
- Once logged in, navigate to the “Resources” menu at the top of the page and select “ Download Zoom Client” from the dropdown menu.
- On the download page, click on the “Download” button under the “Zoom Client for Meetings” section.
- The Zoom application setup file will now begin downloading. Once the download is complete, locate the file in your computer’s downloads folder and double-click on it to start the installation process.
- Follow the on-screen instructions to install Zoom on your computer. Make sure to read and accept the terms of service when prompted.
- After the installation is complete, launch the Zoom application and sign in using your Zoom account credentials.
Once you have successfully downloaded and installed Zoom, you are ready to move on to the next step of scheduling a meeting for your presentation. Zoom provides a seamless and user-friendly interface, making it easy to navigate and access the various features that will enhance your presentation experience.
It’s worth mentioning that Zoom is available for both Windows and Mac operating systems, ensuring compatibility with a wide range of computers. Additionally, Zoom offers mobile applications for iOS and Android devices, allowing you to access and record presentations on-the-go.
By downloading and installing Zoom, you gain access to a powerful platform that offers not only presentation recording capabilities but also a host of other collaborative features. Whether you’re recording a business presentation or an educational lecture, Zoom provides a reliable and user-friendly environment for capturing and sharing your valuable content.
Step 2: Schedule a meeting on Zoom
After downloading and installing Zoom, the next step in recording a presentation is to schedule a meeting on the Zoom platform . Scheduling a meeting allows you to set a specific date and time for your presentation and invite participants to join. Follow these steps to schedule a meeting on Zoom:
- Open the Zoom application on your computer and sign in using your Zoom account credentials.
- Click on the “Schedule” button located at the bottom right corner of the application window.
- In the “Schedule Meeting” window, enter a meaningful topic for your presentation in the “Topic” field.
- Set the date and time for your presentation by selecting the desired options in the “When” section.
- Specify the meeting duration in the “Duration” field. If you’re unsure how long your presentation will take, it’s better to allocate some extra time to account for any unexpected delays.
- Customize the meeting settings according to your needs. You can enable or disable features such as video, audio, screen sharing, and recording. For recording a presentation, make sure to tick the box next to “Record the meeting automatically on the local computer.”
- Invite participants to join your presentation by entering their email addresses in the “Invite Participants” section. You can also copy the meeting invitation link and share it with participants via email or other communication channels.
- Review the meeting details and settings to ensure everything is correct. Once you’re satisfied, click on the “Schedule” button to finalize and schedule the meeting.
By scheduling a meeting on Zoom, you establish a dedicated session for your presentation and provide a structured environment for all participants. Scheduling also enables you to send invitations to participants and ensure that everyone is aware of the date and time of the presentation.
Moreover, the ability to customize meeting settings allows you to tailor the presentation experience to your specific requirements. For example, you can choose to enable or disable participants’ video and audio, control screen sharing, and even enforce meeting password protection for added security.
Once you have successfully scheduled a meeting on Zoom, you’re one step closer to recording your presentation. In the next section, we will explore how to adjust the recording settings to ensure that your presentation is captured with the desired settings and quality.
Step 3: Adjust the recording settings
Before you start recording your presentation on Zoom, it’s essential to adjust the recording settings to ensure that you capture the desired aspects of your presentation. Zoom offers several recording options and settings that can be customized according to your preferences. Follow these steps to adjust the recording settings:
- If you haven’t already done so, join the scheduled meeting for your presentation by clicking on the “Meetings” tab and selecting the appropriate meeting.
- Once you’re in the meeting room, navigate to the bottom toolbar and click on the “Record” button.
- A menu will appear with different recording options:
- Record on this Computer: This option allows you to record the meeting locally on your computer.
- Record to the Cloud: This option enables you to save the recording directly to the cloud storage provided by Zoom.
- Choose the appropriate recording option based on your needs and preferences. If you have sufficient storage space on your computer and want to have the recording readily available, select “Record on this Computer.”
- If you select “Record on this Computer,” you can further customize the recording settings by clicking on the small arrow next to the “Record” button. Here, you can specify the location on your computer where you want the recording to be saved.
- Additionally, you can select whether to record video, audio, or both by ticking the relevant checkboxes. If you want to include the participants’ video and audio in the recording, make sure to enable these options.
- Once you have adjusted the recording settings to your satisfaction, click on the red “Record” button to start recording your presentation.
By adjusting the recording settings on Zoom, you have the flexibility to choose the recording method (local or cloud) and customize the various aspects of the recording, such as video and audio inclusion. This allows you to tailor the recording to your specific needs, ensuring that you capture all the essential elements of your presentation.
It’s worth noting that Zoom provides high-quality recording capabilities, preserving the visual and audio aspects of your presentation with clarity. This ensures that your recorded presentation maintains its integrity and can be easily comprehended by viewers.
Now that you have adjusted the recording settings, you’re ready to start recording your presentation. In the next step, we will explore how to utilize the Zoom recording controls effectively to capture your presentation smoothly and effortlessly.
Step 4: Start the presentation recording
With the recording settings adjusted, you’re now ready to start recording your presentation on Zoom. Follow these steps to begin the recording:
- Make sure you’re in the meeting room for your scheduled presentation.
- Navigate to the bottom toolbar and locate the red “Record” button.
- Click on the “Record” button to initiate the recording.
- A small indicator will appear on the top-left corner of the meeting window, indicating that the recording has started.
- You can now begin your presentation as usual. Speak clearly and engage your audience, knowing that your presentation is being recorded.
- During the presentation, you can utilize Zoom’s features such as screen sharing, chat, and annotation tools to enhance the experience.
- Remember to pace yourself and allow sufficient time for participants to ask questions or provide input if necessary.
- Keep an eye on the recording indicator to ensure that it remains visible throughout the presentation, indicating that the recording is in progress.
By starting the presentation recording on Zoom, you ensure that every moment of your presentation is captured and saved for future reference. This allows you to focus on delivering your content confidently, knowing that you have a reliable recording to refer back to if needed.
During the recording, it’s important to maintain a steady pace and deliver your presentation with clarity and enthusiasm. Speak slowly and articulate your words to ensure that the recording captures your message effectively. Engage with your audience and make eye contact with the camera to create a more personal connection with viewers who will watch the recorded presentation later.
Remember that while the recording is in progress, you can utilize the available Zoom features to enhance your presentation. Whether it’s sharing your screen to demonstrate slides or utilizing the chat function to engage with participants, these features can add depth and interactivity to your recorded presentation.
Now that you have started the recording, it’s important to be mindful of the Zoom recording controls to ensure a smooth and uninterrupted recording experience. In the next step, we will explore how to effectively use the Zoom recording controls during your presentation.
Step 5: Use the Zoom recording controls
As you progress with your recorded presentation on Zoom, it’s important to familiarize yourself with the available recording controls. These controls give you the flexibility to manage the recording and make adjustments as needed. Here’s a guide on using the Zoom recording controls:
- During the presentation, you can access the recording controls by hovering your cursor over the meeting window. The controls will appear at the bottom of the screen.
- To pause the recording temporarily, click on the “Pause” button. This can be useful if you need to take a break or address any unexpected interruptions.
- To resume the recording, click on the “Resume” button. This will continue the recording from where it was paused.
- If you need to stop the recording completely, click on the “Stop Recording” button. A pop-up message will appear asking for confirmation. Click on “Stop” to end the recording.
- Once you stop the recording, Zoom will process the recording and save it to the designated location on your computer or cloud storage, depending on your chosen recording option.
- After the recording is complete, you can access and manage your recorded presentations in the “Recordings” section of your Zoom account.
- From the “Recordings” section, you can play, rename, delete, and share your recorded presentations as needed.
Utilizing the Zoom recording controls allows you to have control over your recorded presentation. Pausing the recording when necessary or stopping it at the end ensures that you capture only the intended content. This allows you to create a high-quality recording that effectively communicates your presentation message.
In addition, having access to the recorded presentations in your Zoom account gives you the flexibility to manage and share the recordings as needed. You can review the recordings, make any necessary edits, and share them with participants or a wider audience for further engagement.
Remember to review your recorded presentation before sharing it to ensure its quality and consistency. This gives you the opportunity to make any necessary adjustments or edits, ensuring that the final recording accurately represents your presentation.
Now that you have successfully utilized the Zoom recording controls, you’re ready to proceed to the final step, where we will explore how to access and share your recorded presentation.
Step 6: End the recording
Once you have completed your presentation and no longer need to record, it’s important to properly end the recording on Zoom. This ensures that the recording is saved and can be accessed for future use. Follow these steps to end the recording:
- When you have finished your presentation, navigate to the recording controls at the bottom of the meeting window.
- Click on the “Stop Recording” button.
- A pop-up message will appear asking for confirmation to stop the recording. Click on “Stop” to complete the recording process.
- Zoom will process the recording and save it to the designated location on your computer or cloud storage, depending on your chosen recording option.
It’s important to properly end the recording to ensure that all the content from your presentation is captured and saved. Ending the recording triggers the final processing and saving of the recorded file, making it ready for access and further use.
Before ending the recording, take a moment to ensure that you have included all the necessary information and key points in your presentation. Double-check that your recording captured the entire duration of your presentation and that there are no gaps or missing sections.
Once the recording is complete and saved, you can move on to the next step of accessing and sharing your recorded presentation. In the following section, we will explore how to access and manage your recorded presentations for future use and distribution.
Step 7: Access and share the recorded presentation
After you have successfully ended the recording on Zoom, you can now access and share your recorded presentation with others. Follow these steps to access and share the recorded presentation:
- Go to your Zoom account and navigate to the “Recordings” section. This can usually be found in the main menu or sidebar of your Zoom account dashboard.
- In the “Recordings” section, you will find a list of all your recorded presentations. Locate the specific recording you want to access and click on it.
- A playback page will open, allowing you to view and review the recorded presentation. Here, you can play the recording, adjust the playback settings, and make any necessary edits.
- Take the time to review the recorded presentation carefully. Check for any audio or video issues, ensure that all the content is captured correctly, and make any necessary edits if needed.
- Once you are satisfied with the recording, you can share it with others. Zoom provides various sharing options, such as generating a sharing link, downloading the recording, or embedding it in a website or online platform.
- If you choose to share the recording link, copy the link provided and send it to your intended recipients via email, messaging apps, or other communication channels.
- If you prefer to download the recording, click on the “Download” button on the playback page. This will save the recording file to your computer, allowing you to distribute it as needed.
- If you want to embed the recording in a website or online platform, click on the “Embed” button on the playback page. Follow the provided instructions to generate the embed code and integrate it into your desired platform.
Accessing and sharing the recorded presentation is a crucial step in making sure that your hard work reaches a wider audience. Whether you want to share it with participants who couldn’t attend the live presentation or make it available for on-demand viewing, Zoom provides flexible sharing options to suit your needs.
Before sharing the recording, it’s important to review it to ensure its quality and accuracy. Double-check that all the audio, video, and presentation content are captured correctly. This allows you to confidently share a professional recording that accurately represents your original presentation.
Remember to consider the privacy and permissions associated with your recorded presentation. If there are any sensitive or confidential information shared during the presentation, make sure to take the necessary steps to protect and restrict access to the recording as needed.
By accessing and sharing your recorded presentation, you extend the reach of your content and provide an opportunity for others to benefit from your knowledge and expertise. Make the most of the sharing options provided by Zoom to distribute your recorded presentation effectively.
Now that you have successfully accessed and shared your recorded presentation, you have completed the entire process of recording a presentation on Zoom. Congratulations! You can now leverage the power of Zoom to enhance your presentations and provide a valuable resource for your audience.
Recording a presentation on Zoom opens up a world of possibilities for sharing and preserving valuable content. In this article, we have walked you through the step-by-step process of recording a presentation on Zoom, from downloading and installing the software to accessing and sharing the recorded presentation.
By leveraging the features and controls offered by Zoom, you can create high-quality recordings that capture your presentation in its entirety. Adjusting the recording settings, utilizing the recording controls effectively, and ending the recording appropriately ensures that your content is properly captured and saved for future use.
Furthermore, accessing and sharing the recorded presentation allows you to extend the reach of your content and provide a valuable resource to others. Whether you want to share the recording with participants who couldn’t attend the live presentation or create online courses, Zoom provides flexible options for sharing and distributing your recorded presentations.
It’s worth noting that while Zoom provides a user-friendly and robust platform for recording presentations, it’s important to ensure that you have the necessary permissions and adhere to any privacy or confidentiality considerations. Respect the rights and privacy of your participants and take steps to protect sensitive information as needed.
Recording presentations on Zoom is not only a practical solution for archiving and sharing information but also a way to enhance your overall presentation skills. By reviewing the recorded presentations, you can analyze your delivery, identify areas for improvement, and refine your presentation techniques.
Whether you’re hosting a business presentation, conducting an educational lecture, or sharing your expertise with a global audience, Zoom empowers you to capture and distribute your presentations effectively. Embrace the power of Zoom and take advantage of its recording capabilities to elevate your presentations to the next level.
Now that you have the knowledge and tools to record presentations on Zoom, it’s time to put them into practice. Start creating engaging and informative presentations, record them on Zoom, and share your knowledge with the world!
Leave a Reply Cancel reply
Your email address will not be published. Required fields are marked *
Save my name, email, and website in this browser for the next time I comment.
- Crowdfunding
- Cryptocurrency
- Digital Banking
- Digital Payments
- Investments
- Console Gaming
- Mobile Gaming
- VR/AR Gaming
- Gadget Usage
- Gaming Tips
- Online Safety
- Tech Setup & Troubleshooting
- Buyer’s Guides
- Comparative Analysis
- Gadget Reviews
- Service Reviews
- Software Reviews
- Mobile Devices
- PCs & Laptops
- Smart Home Gadgets
- Content Creation Tools
- Digital Photography
- Video & Music Streaming
- Online Security
- Online Services
- Web Hosting
- WiFi & Ethernet
- Browsers & Extensions
- Communication Platforms
- Operating Systems
- Productivity Tools
- AI & Machine Learning
- Cybersecurity
- Emerging Tech
- IoT & Smart Devices
- Virtual & Augmented Reality
- Latest News
- AI Developments
- Fintech Updates
- Gaming News
- New Product Launches
- 12 Best Free AI Image Sharpeners in 2024 WebPCMobile
Sanjuksha Nirgude Soaring High with Robotics
Related post, unveiling the secrets of sls printing and its role in robotics, unleashing efficiency: the role of robotic process automation in industry 4.0, advancing cybersecurity: the integration of robotics with emerging sms phishing alert tools – innovations, challenges, and future perspectives, robotics redefining long-term investment horizons, bridging software development and robotics for enhanced automation, the role of robotics in cnc machining for large part production, related posts.

How To Do A Zoom Meeting On Computer

How To Record A Zoom Meeting On Laptop

How To Zoom In Webcam

How To Share Zoom Recording

How Do I Use Zoom

How To Save Recording On Zoom

How To Use Zoom On A Tablet

How To Start Zoom Meeting
Recent stories.

12 Best Free AI Image Sharpeners in 2024 (Web/PC/Mobile)

OpenStack Backup and Recovery Software

Apple Wallet Availability in the PocketGuard App: Sync your Apple Card, Apple Cash, and Savings from Apple Card Accounts

5 Ways to Improve IT Automation

What is Building Information Modelling?

How to Use Email Blasts Marketing To Take Control of Your Market

Learn To Convert Scanned Documents Into Editable Text With OCR
- Privacy Overview
- Strictly Necessary Cookies
This website uses cookies so that we can provide you with the best user experience possible. Cookie information is stored in your browser and performs functions such as recognising you when you return to our website and helping our team to understand which sections of the website you find most interesting and useful.
Strictly Necessary Cookie should be enabled at all times so that we can save your preferences for cookie settings.
If you disable this cookie, we will not be able to save your preferences. This means that every time you visit this website you will need to enable or disable cookies again.
How to Record a Presentation on Zoom [Step-by-Step Guide]
In recent years, influenced by COVID-19, more and more people are working and learning remotely. In this context, video communication platforms have grown by leaps and bounds. Zoom, one of the popular applications, shows how simple remote work and learning are. The popularity of Zoom has given rise to other demands, such as how to record a Zoom presentation with video.
Presentations are often used in online meetings and courses to showcase your thoughts and ideas on a topic.
If you record a presentation on Zoom, you can collect all the important information for reference or share it with others who are unable to attend the meeting or live session.
In this article, we will go over several ways to record a PowerPoint presentation on Zoom. We also recommend a high-quality screen recorder called FineCam to record Zoom presentations.
Can I Record a Zoom Presentation?
Zoom is a video conference recorder with built-in recording capabilities. Before you learn about how to record a Zoom presentation, it’s necessary to understand your permissions as a participant and host of a Zoom meeting.
To start with, as the host of a Zoom presentation, you can easily record the presentation with Zoom screen-sharing and recording features.
Then, if you are a participant there is no permission for you to record a Zoom presentation directly. You may need to use the built-in screen recording tool on your computer or use other screen recording software.
How to Record a Zoom Presentation Directly?
As the host of Zoom, you can record a presentation quickly and easily. Follow these steps to begin recording a Zoom presentation.
Step 1: Open Zoom and click Settings > Recording . Make sure the Local Recording is turned on and choose where to store the recording.

Step 2: Start a New Meeting . If prompted, select Join with computer audio or select another Microphone .

Step 3: Import or open your presentation materials. You can distribute your presentation resources by using the Share Screen.
Step 4: Before you start recording, check that you have unmuted. And make sure your webcam is on if you need to record a video for yourself.
Step 5: When you are ready, click the Record button at the bottom of the screen to start recording the presentation.
Step 6: When the presentation is complete, you can click Stop Recording > End > End Meeting for all to close the recording. You can also use Alt+P to stop the recording, or Alt+R to end the recording.
If you save files on your computer, you’ll find them on your desktop or in your Documents folder. If you record to the cloud, you will receive an email when the files are ready.
How to Record Group Presentations with Zoom?
We have already discussed how to record your own Zoom presentation directly as a host. You can also use Zoom to record a presentation in a group easily and efficiently.
Here are the steps on how to use Zoom to successfully record a group presentation.
Step 1: Go to zoom.us to download Zoom. Then install and log in.

Step 2: Click Record to begin recording your presentation once all of the participants are ready. You can end the recording by clicking the Pause or End button.
Step 3: Once you have finished your video presentation, you can upload your recorded video presentation.
Many people want to save important information from Zoom meetings and transcribe Zoom meetings. If you want to learn more, you can read this article: How to Transcribe a Zoom Meeting Easily And Effectively .
How to Record a Zoom Presentation as a Participant?
Method 1. use built-in screen recorder.
If you want to record a Zoom presentation as a participant, you must get permission from the host, or as the alternate host. Apart from that, you can use the built-in recording tool on your computer.
If your computer is a Windows 10 PC and higher, you can record Zoom presentations using the built-in Xbox Game Bar.
Here’s how to record a Zoom presentation on Windows without permission.
Step 1: Launch Zoom.
Step 2: Click Windows + G to open the Xbox Game Bar .
Step 3: Press Windows + Alt + R to start the screen recording.
Step 3: If you want to end the recording, please press the Stop button.
Step 4: On your computer, select Video > Capture to view your recorded video.
Don’t minimize or maximize the window while you are recording your screen because it will automatically stop the recording.
There are two ways to record a Zoom presentation on Mac.
#1. Click Shift+Cmd+5 to start screen recording.
#2. Use QuickTime player.
Here are the steps on how to record a Zoom presentation with QuickTime player.
Step 1: Open QuickTime player.
Step 2: Select File > New Screen Recording .

Step 3: Check your settings and select the Internal microphone .

Step 4: Click the red Record button.
Method 2. Record a Zoom Presentation with FineShare FineCam
Zoom recordings occasionally have poor audio quality. This is because Zoom requires an Internet connection to record. If you have a bad network, your Zoom presentation recording will also be affected. By the way, the computer’s built-in screen-capturing tool frequently makes noise.
If you want to find an ideal alternative to Zoom, FineCam is perfect. It’s a powerful, high-quality screen recorder for Windows and Mac. The most important thing is that it’s extremely user-friendly for beginners. With FineCam, you can record Zoom presentations and playback presentation highlights effortlessly
FineCam can record screen and webcam at the same time . You can add a webcam or even use your phone as a webcam. You can also upload images, videos, PowerPoint, web pages, or YouTube videos to change the webcam background. Moreover, you can also add filters and adjust settings like white balance and brightness of the webcam.
FineCam also supports adding multiple cameras and scenes. You can record Zoom presentations in a variety of places and angles through these cameras.
- User-friendly interface, especially for beginners
- Provide up to 4K video resolution
- No recording time limit
- Support recording online meetings, YouTube videos, live streaming, and video tutorials
- Use your iPhone as a webcam
- Add virtual backgrounds
Are you ready to record your upcoming Zoom presentation in FineCam? To begin, simply adhere to these easy guidelines.
Step 1: Launch Zoom, then select New Meeting or Join a meeting.

Step 2: Download, install, and open FineCam.
Step 3: Then you may Choose Other Camera or Use Phone as Webcam . After that connect the camera to your computer.

Step 4: Click to Remove or Blur the webcam background.

Step 5: Select Add Background > App Windows .

Step 6: Then select the Zoom presentation window and click the Apply button.
Step 7: Press the Record button. To Stop or Pause the recording, click the appropriate button.

As you can see above, there are many different ways to record a presentation on Zoom. However, if you are a participant or have no permission from the host, it can be a hassle to record a presentation on Zoom.
Because of this, we recommend FineCam screen recorder, which enables high-resolution video recording simply. If you want to record presentations on Zoom, this program is an unmatched option. Come and download it to have a try!
FAQs on Zoom Presentation Recording
Where do zoom recordings go.
#1. Zoom presentation for cloud recording
Step 1: Download and install Zoom.
Step 2: Click Recordings on the left side of the screen to see what you have recorded in the cloud.
Step 3: Select Local Recording if you can’t find the recording in the cloud recording.
#2. Zoom presentation for local recording
Step 1: Install and log in to Zoom.
Step 2: Click on Meetings > Recorded at the top.
Step 3: Under File Locations , you can see the location of each recording.
Step 4: Click Open to view the Zoom presentation recorded locally on your computer.
How Do I Start a Remote Presentation?
You can use PowerPoint. Here are specific steps.
Step 1: To stream your PowerPoint presentation to remote audiences, select Slide Show > Online Presentation > Office Presentation Service .
Step 2: If you want your audience to download the presentation files, select the box labeled Enable remote viewers to download presentation files . Then click Connect and send your meeting invitation to the participants.

Evelyn enjoys writing and painting, she also likes listening to music.
Related articles

Snagit vs Camtasia: Which Is Best for Your Video Needs?
May 4, 2023

The 5 Best Screencastify Alternatives in 2023
May 3, 2023

Greenshot vs Snagit: How to Pick a Better Screen Capture Tool?
April 28, 2023
How to Record Zoom Meetings With or Without Permission

Whether you’re a host or participant, it’s worth learning how to record a Zoom meeting in high quality.
Maybe you want a recording to send to your guests, or perhaps you’re planning on repurposing the recording into valuable content. Well, luckily, Zoom offers an easy-to-use recording feature. Only hosts have access, and participants can only record if they have permission. It’s also worth tweaking settings to ensure you get the best Zoom recordings.
We’ll show you how! In this article, we provide step-by-step walkthroughs for how to record Zoom meetings from your desktop or mobile device using Zoom’s native recording features. We’ll also explain how to record a Zoom meeting with(out) permission from any device.
Can You Record a Zoom Event?
Zoom offers an excellent option for recording online videos easily when you need to capture a meeting, webinar, or another event. If you're an event host or an event host has granted you recording privileges, recording is as simple as clicking the Record button in the Zoom control bar.
Your Zoom event recordings are saved locally to your device if you’re a free Zoom user. If you’re a paid subscriber, you also have the option of recording and saving to the Zoom cloud.
Anyone can record Zoom events, even if they aren’t the host or a participant with recording permissions. Most modern devices are equipped with screen recording features to record and save a Zoom event. We’ll cover how to record from Zoom on any device whether you have recording permissions or not.
Can You Record a Zoom Meeting as a Participant?
If the host has granted you recording permissions, you can record a Zoom meeting as a participant from within the Zoom app. If you don’t have permission to record, there are ways of getting around Zoom’s recording restrictions. We’ll go over how to screen record on any device without the consent in the article below and provide step-by-step instructions for recording.
Can You Record a Zoom Meeting Without Participants?
You can record a Zoom meeting without participants by changing the Zoom screen layout. If you want to record an event without the participants displaying, choose one of these layouts in the Zoom settings:
- Active Speaker (Desktop and Mobile)
- Shared Screen With Large Active Speaker Thumbnail (Desktop)
- Shared Screen with Active Speaker (Desktop and Mobile)
How to Record a Zoom Meeting as a Host from the Desktop App
Follow these steps to record as host or participant with recording permissions:
Step 1: Open the Zoom desktop app and log in.
Step 2: From the Home tab, click the Settings Gear . This is on the top right, under your profile avatar.

Step 3: Go to the Recording tab and select the folder to which you’d like to save your recordings.

Step 4: Set up and start your Zoom meeting as usual. Then, when you are are ready click the Record button on the control bar at the bottom of the screen.

You will see a Recording message displayed in the upper left corner of the screen.

You can pause or stop your recording by clicking the Pause or Stop icons displayed next to the Recording message.
Step 5: When you’re done recording you should be able to find your recorded files in the location you chose. You can also access past recordings in the Meetings tab which you can navigate to from the home page.
Just like that, you’ve recorded a Zoom meeting.
How To Record Zoom Meeting as a Participant
Recording a Zoom meeting as a participant is a little bit different, depending on the device you’re using. If your host gives you permission to record, then you should be able to do so directly through Zoom.
Although, even without Zoom permissions you can use external software to screen record a Zoom meeting.
How to Record Zoom Meeting as a Participant Without Recording Permission
How to Record Zoom Meeting on a Laptop or PC as a Participant without Permission
Technically you can record a Zoom meeting through PowerPoint’s screen recorder. Although, a much better option is to use your devices built-in recording software to capture your Zoom meeting.
How Do I Record a Zoom Meeting on Windows 10?
The Xbox Game Bar was developed as a Windows 10 feature gamers could easily record and share their gaming sessions online. You can also use the app to record Zoom events if you don’t have recording permissions.
Use the Xbox Game Bar to record your Zoom event by taking the following steps:
Step 1: Close all windows on your screen except the Zoom meeting you wish to record.
Step 2: Access the Xbox Game Bar from the Start menu. You can also press the ‘ Windows logo key+G’ to open the recorder.
Step 3: When the Xbox Game Bar app opens, click the Start Record button or press ‘Windows logo key+Alt+R’ .
Step 4: Start your meeting as usual and in the background, the Windows Game Bar will screen record your Zoom Meeting on your desktop.
Step 5: When you are done stop the recording and click on the pop-up that tell you your recording has been saved. This will take you to the folder your recording is saved in.
How to Record Zoom Meeting on Mac
Macs were designed for creative purposes like video recording and editing, so using them to capture your screen is a breeze. You can record a Zoom meeting with just a couple of taps on your keyboard.
Start recording from your Mac with these simple steps:
Step 1: Open your Zoom meeting and set everything you need to up.
Step 2: On your keyboard, press and hold Command + Shift + 5 .
Step 3: Select whether to record a window on your screen, a portion of your screen, or your entire screen.
Since you’re recording a Zoom meeting, we suggest selecting that Window as what you’d like to record.
Step 4: Your recording will begin after you make your selection.
Step 5: Click Stop to end your recording.
When you finish recording, a thumbnail will appear in the lower corner of your screen. Click the thumbnail and choose where to save your recording.
How Do I Record a Zoom Meeting In Browser?
You can record from a PC or Mac browser window using any methods outlined above. Each recording method provides the choice of recording a single browser window. When prompted, select to record a window or select the portion of your screen where your browser window is open.
How to Record a Zoom Meeting on My Phone as a Participant
Using your phone as a webcam for Zoom meetings is a convenient option when you need to travel or if you don’t have access to a desktop device. If you’re the meeting host or have permission from the host to record, you can start recording in the Zoom app with just a couple of clicks. We’ll cover how to record from within the Zoom app and how to record a Zoom meeting without permission from your phone.
How to Record a Zoom Meeting On an Android:
Step 1: Open Zoom and start your session.
Step 2: While your meeting is in progress, tap More.
Step 3: Tap Record, and a Recording message will appear at the top of the screen.
If you want to pause or stop your recording, tap More and press the Pause or Stop button.
How to record a zoom meeting on iPhone
Step 1: Open Zoom and begin your session.
Step 2: After starting your Zoom Meeting , tap More (...)
Step 3: Select Record to the Cloud . A Recording message will appear on your screen.
You can locate all recordings made from a mobile device in the Zoom Web Portal under Recordings .
How to Record a Zoom Meeting on Android Without Permission:
Follow these steps to record a Zoom event without permission using the screen recorder on your Android 11 device:
Step 1: From your home screen, swipe down twice to access your Quick Settings and click on the Screen Recorder button.
Step 2: Select your video and audio settings, and then choose Start Recording .
Step 3: A count down will appear and then your screen will start recording.
A screen recording bar will also appear so you can add annotations, add a small video avatar of yourself and more.
Step 4: Start your Zoom Meeting as usual. When you are done, click on the Stop button from this recording toolbar.
You’ll get a notification that your recording is saved. Go to your gallery where you can find your recorded Zoom Meeting in the Screen recordings album.
How to Record a Zoom Meeting on My iPhone with Audio Without Permission
Use this step-by-step guide to record from Zoom on an iPhone without permission:
Step 1: Open the Settings menu and go to Control Center .
Step 2: Find Screen Recording and tap on the + icon.
Step 3: Return to the Home screen and open the Control Center .
Step 4: Hold down the Record button.
Step 5: Tap the Microphone icon to enable your mic.
Step 6: Select where your recording is saved.
Step 7: Press Start Recording . You’ll have three seconds before your screen recording begins. A clock should appear on the upper left of your screen.
Step 8: Start your Zoom meeting and when you’re ready to stop recording, click on the clock and then select Stop Recording .
You’ll then be able to find your Zoom Recording in the folder you chose for it to be stored in.
Learn more: How to Record a Zoom Meeting on Your Phone (iPhone & Android)
How to Record a Zoom Meeting on Chromebook
You can use the screen recording features included on a Chromebook to record a Zoom meeting without permission from the host. You can also edit and share your recording with others using a Chromebook.
Take the following steps to use your Chromebook to record a Zoom meeting:
Step 1: Hold Shift + Ctrl + Show Windows simultaneously until a menu appears.
Step 2: Click Screen Record on the menu that displays.
Step 3: Start your recording by selecting if you want to record your whole screen, just a portion of your screen, or what’s displaying in a browser window.
How to Record a Zoom Meeting on iPad
iPads come with a built-in recording feature that captures Zoom meetings from anywhere with an internet connection. The screen recording features are available on iOS 14 systems, and later can record a Zoom meeting easily with just a couple of clicks.
Follow these steps to record a Zoom meeting on your iPad using the screen recorder feature:
Step 1: Access the Settings menu and select Control Center . Locate Screen Recording and tap the + icon that’s next to it.
Step 2: Return to the Home screen and open the Control Center again.
Step 3: Find the Record button. Press and hold the button.
Step 4: Tap the Microphone button to activate your mic for audio recording.
Step 5: Select where on your device you’d like your recording to save to.
Step 6: Begin your recording by tapping Start Recording . You’ll have three seconds before your screen recording starts.
Stop recording at any type by tapping the status bar at the top of the screen and then choosing Stop.
How to Record a Zoom Meeting on Tablet
You can record a Zoom meeting on a tablet even if you aren’t the host or you don’t have recording permission. Android tablets made by Samsung have a Screen Recorder app to capture the audio and video.
Use these step-by-step instructions to record a Zoom meeting on an Android tablet with the latest Android software:
Step 1: Swipe down from the top of your tablet’s screen to open the Quick Panel .
Step 2: Tap on the Screen Recorder icon.
Step 3: Choose your audio input from the Sound Settings menu that opens up. You can opt to record no sound, media sounds, or media sounds + the mic. Select Media Sounds .
Step 4: Tap Start Recording . Your screen recording will begin after a three-second countdown.
A gray bar featuring a pencil, person icon, and stop button will display in the upper right corner of your screen while recording. The pencil icon allows you to draw or write on the screen. Tapping the person icon enables or disables picture-in-picture, which you can use to display a video of yourself on the screen (this is an excellent feature for recording a reaction video ).
The screen recorder does not have a pause feature, but you can stop your recording by tapping the Stop button.
How Do I Record a Zoom Meeting With Split-Track Audio?
Zoom records automatically and saves audio and video together as an MP4 file. It also saves audio separately as an audio-only M4A file. You can also record multiple audio files during a meeting to capture each participant’s audio.
Follow these instructions to record on Zoom with multiple audio sources or files:
Step 1: Open Zoom , select Settings and then go to the Recording tab.
Step 2: Find the Record a separate audio file for each participant feature and enable it.

* Separate audio track recording on Zoom is only available for local recordings.
Can you record locally on Zoom?
Zoom can store recordings locally, but it doesn't offer the same local recording as other remote platforms, where video and audio are directly captured from your participants' devices instead of relying on the Internet. Participants also can't choose to record without permission, and if they choose to save files locally the host will not receive these recordings. In this case, participants will have to send the host their locally saved recordings, creating quite a bit of extra work.
Saving your files locally with Zoom has other limitations as well. For example, this is not available on the mobile app and you'll also have limited control of your recording layout if you plan to share your screen.
In order to save recordings locally on Zoom, you’ll have to adjust your account settings and enable local recording in the Recordings tab. When recording you may also have to select ‘Record on this Computer’.
Alternative to Record Video Meetings in HD
Video recording software is a great alternative to Zoom, especially if you’re looking for an all-in-one solution for recording, editing, and publishing. While Zoom has many great features, the program is limited in recording quality, video editing, and social sharing. We recommend using a recording software program like Riverside.fm if you want to capture high-quality content you can use on YouTube or other online platforms.
Riverside has all of Zoom’s features, plus many more. This remote content creation platform records audio and video in up to 4K resolution. Because it uses local recording, you don’t have to worry about the strength of your internet connection affecting recording quality. Instead, all files record directly on yours and your participants’ devices.
Big companies such as Spotify, Netflix, and Marvel use Riverside. It’s no wonder why.
“Riverside is far better than Zoom for recording interviews.” - Seth Godin , author, entrepreneur and marketing leader.
With Riverside you can:
- Capture studio-quality recordings with up to 7 remote guests
- Record separate audio and video tracks for each participant so you can have more post-production editing flexibility.
- Simultaneously live stream across platforms including YouTube, Facebook, and LinkedIn.
- Seamlessly edit recordings with our text-based video editor , which makes it quick and easy to remove unwanted sections, fine-tune audio, and create short shareable clips .
- Easily collaborate with your crew using our shared production workspace for Business plans.
- Invite a behind-the-scenes producer to assist you in sessions without accidentally capturing their video or audio as part of your recording.
- Invite guests to a meeting with a single link.
Learn more , or start experiencing these benefits today! Start recording meetings professionally with Riverside.
How to Record on Zoom With Any Desktop or Mobile Device
Recording a Zoom meeting without permission can be confusing at first but becomes simple once you understand how to access the built-in recording features of your device. Because most modern devices have native screen recorders, it’s easy to get around Zoom’s recording restrictions.
Recording video meetings through Zoom can be convenient, but the quality isn’t the greatest, and sharing your recordings online can become a hassle. We recommend an all-in-one recording, editing, and sharing platform like Riverside.fm when you need to record and publish high-quality video content.
Zoom Recording FAQs
Do you have questions about recording on Zoom? Check out our frequently asked questions section to get more answers about recording a meeting on Zoom and how to record on Zoom using a screen recorder program.
When You Record a Zoom Meeting Where Does it Go?
Paid subscribers of Zoom can use cloud recording or the program’s local recording option. Your recorded files are easy to access, no matter which option you choose. Cloud storage provides the advantage of easy sharing and doesn’t take up any of your system’s memory. We’ll provide instructions for how to find your Zoom recordings on your computer or in the Zoom cloud.
To access Zoom recordings in the cloud :
- Open Zoom and log in to your account.
- Click Recordings from the navigation bar on the left side of the screen.
- All recordings saved to the cloud are listed under the Cloud Recordings tab.
To access Zoom recordings on your system:
- Open the Documents Folder on your PC or the Finder on your Mac.
- Type Zoom in the search bar.
- Locate the folder called Zoom Meetings in the search results.
- Open the folder to view your saved Zoom meetings.
Why Can't I Record My Zoom Meeting?
You can’t record a Zoom meeting if you aren’t the host or haven’t been granted recording permission from the meeting’s host. If you want to know how to record a Zoom meeting without permission, reference the sections above on how to record a Zoom meeting on any device. You can use your device’s screen recording features or a screen recording app.
Can I Record a Zoom Meeting on a Phone?
Phones and Android devices can record Zoom meetings. If you’re a meeting host or have recording permission, you can record a Zoom meeting within the app. The steps for recording without permission are different for Android and iPhone devices. Reference the sections in the article above to learn how to record a Zoom meeting on your phone.
How Do I Convert a Zoom Recording to MP4?
Zoom will automatically convert your meeting recording to an MP4 file when you opt for local recording. However, this conversion process is sometimes interrupted if your meeting ends abruptly due to a poor connection or technical issue.
You can convert a Zoom recording to an MP4 file manually with the following steps:
- Open the Zoom app.
- Click Meetings in the navigation bar at the top of the screen.
- Choose Recorded from the navbar that appears.
- Locate the recording you need to convert from the list of meetings on the left side of the screen.
- Click Convert .
How Do I Record a Meeting on Zoom?
If you’re a Zoom meeting host, you can record your session by clicking the Record button on the navigation bar at the bottom of the Zoom window. If you’re an attendee, you can record a meeting if you’re granted recording privileges from the meeting host.
Can You Record a Zoom Session?
It’s possible to record Zoom sessions in a couple of different ways. You can use a third-party recorder app or your device’s built-in recording features to record a Zoom session if you’re not the host or don’t have permission from the host to record. If you’re the meeting host or have permission from the host to record, you can capture a Zoom session within the app. The sections above cover how to record a meeting on Zoom from any device.
Why Is There No Record Button on Zoom?
You can only record Zoom sessions with the permission of the host. If you don’t have recording options available in Zoom, it means the host hasn’t permitted you. Ask the meeting host for permission, and they can change the settings so that you may record the Zoom session.
Can We Record Zoom Using a Screen Recorder?
Yes, you can record Zoom using third-party screen recording software or screen recording features that come with your device. If you aren’t the host and don’t have recording permission, you’ll have to use one of these options for recording on Zoom. See the sections in our article above for recording Zoom from any device.
How Do I Record Free Zoom?
Free Zoom meetings can be recorded from within the Zoom app (if you’re the host or have permission from the host to record), with a screen recording app you download to your device, or with the built-in recording features on your desktop or mobile device. How you record a free Zoom will depend on your meeting permissions and the device you’re recording from.
How Do I Record a Zoom Without G Suite?
You can record Zoom using your device’s native screen recording features or with a third-party screen recording app if you don’t want to use G Suite and save your recording to Google Drive. Almost all desktop and mobile devices now have built-in screen recording apps for capturing audio and video.
Where is the Record Option in Zoom?
The Record button in Zoom is on the bottom bar of the program window, located between the Screen Share and Reactions options. If you do not see the button there, it’s because you don’t have permission to record. If you wish to record, you can request that the meeting host grant you recording permission, or you can use a screen recorder.
Which App Can Record Zoom?
If you are not a host but wish to record a Zoom meeting, you can use the built-in features on your device or a third-party recording app. See the sections in our article above with step-by-step instructions on how to record using the device of your choice.
How Do I Know if My Zoom is Being Recorded?
If a Zoom call is being recorded from within the program, you’ll receive an announcement that says, “This meeting is being recorded.” If you join a meeting in progress and are being recorded, you’ll hear a notification stating the meeting is being recorded.
While Zoom records the meeting, a blinking recording message will display in the upper left corner of the screen. However, there is no way of knowing if someone uses a third-party program or native screen recording features on their device to record a Zoom meeting.
Ortal Hadad
is Riverside’s content specialist and blog editor. Although she was the top student in her Journalism degree, she transitioned to marketing. With almost three years of experience in organic marketing, her strength is optimizing content to increase online visibility and traffic.
Table of contents:
How to Record on Zoom With Any Desktop or Mobile Device
Try Riverside today
Record in studio quality without the studio. Transcribe, clip, and edit within seconds.

Keep reading

Riverside resources
Virtual webinar platform.
Expand your reach and engage with your audience using Riverside’s easy webinar tools for live call-ins, repurposing content, and quick webinar branding.

Video Recording Software
Capture video and screen-sharing online with up to 4k resolution, and get ISO tracks for all participants.
Start creating with Riverside

Podcast guides
© 2023 RiversideFM, Inc.
How-To Geek
How to record a zoom meeting.

Your changes have been saved
Email is sent
Email has already been sent
Please verify your email address.
You’ve reached your account maximum for followed topics.
The Internet is Not Forever, So It's Time to Preserve What You Can
5 things i never back up to the cloud, why you shouldn't sign in with google or facebook, quick links, how to provide recording permission to participants, how to view recorded meetings.
If you're hosting a meeting on Zoom, you might want to record it for future reference. If you're a participant in the meeting, you will need permission from the host before you're able to record. Here's how to do both.
Before jumping into the guide, it should be noted that every account level can record Zoom meetings, even the Basic free tier. Free accounts can record a video meeting locally to their computer, Pro and Business plans include 1GB of cloud storage in addition to the local option, and the Enterprise tier includes unlimited cloud.
By default, only the host of the video call is allowed to record the meeting in Zoom. When you're ready, open Zoom and set up a meeting . You can do this by selecting the "New Meeting" button on the home page and then inviting the relevant participants to join the meeting .
Once the meeting is set up and the participants are present, you can start recording the meeting by selecting the "Record" button at the bottom of the window. Alternatively, you can use the Alt+R shortcut key.

The recording will now begin. You can pause the recording by (1) selecting the Pause button (or use Alt+P) or end the recording by (2) selecting the Stop button (or use Alt+R).
Related: How to Hide Your Background During Video Calls in Zoom

When the meeting is over, stop recording and select the "End Meeting" button in the bottom-right corner of the window.

If you're the host and would like to allow one of the participants to record the meeting, provide the necessary permissions to do so.
During the video conference, select the "Manage Participants" option at the bottom of the window.

A list of participants will appear in the right pane. Hover over the name of the participant you want to give recording permissions to, and a "More" button will appear. Select the "More" button.

A drop-down menu will appear. Here, select "Allow Record."

The guest will now be able to record the meeting.
If you've recorded a meeting you'd like to watch, open the Zoom app and select the "Meetings" tab.

In the left pane, select the "Recorded" option. You'll now see a list of recorded meetings. Select the meeting you'd like to view from this list.

In the right pane, you now have the option to play the recording (with or without video), delete it, or open the file location in File Explorer (Windows) or Finder (Mac).

Related: How to Set Up a Zoom Meeting
How to Record a Zoom Meeting

Table of Contents
What is zoom.
Zoom is a versatile video conferencing tool that allows users to connect, communicate, and collaborate efficiently from anywhere in the world. It provides a reliable platform for virtual meetings, webinars, and online events. Learn more about Zoom by visiting the Zoom website .

Who is Zoom best suited for?
Zoom is excellent for various professionals, such as Product Marketers . It is also beneficial for educators, remote workers, and sales teams. Product marketers can employ Zoom for virtual product launches, webinars to engage customers, and team collaborations. Its ease of use and robust features make it a powerful tool for conducting smooth, productive meetings and presentations.
Common FAQs on Zoom
You can join a Zoom meeting by clicking on the meeting link provided or by entering the Meeting ID into the Zoom app.
Yes, Zoom offers a free plan with basic features. There are also paid plans with advanced options.
You can schedule a Zoom meeting through the Zoom app or via the web portal. Click on 'Schedule a Meeting' and fill in the details.
You need a device with an internet connection, a microphone, and optionally a camera for video conferencing.
During the meeting, click the 'Share Screen' button on the meeting toolbar, and select the screen or application you want to share.
Enjoyed this interactive product demo of Zoom?
Create your own interactive product demo in minutes. Drive growth, scale enablement and supercharge product led-onboarding with Supademo.
Sign up for free here with no credit card required.
Create beautifully interactive product demos in minutes.
Start a 14-day free trial, no credit card required.
Related articles

How to use the SEMRush keyword gap tool

How to Create a Zoom Account

How to create a campaign in MailerLite
Get the fastest, easiest interactive demo platform for teams.
IMAGES
VIDEO
COMMENTS
Getting started with recording
to the top of the screen. Hover over the minimized control bar to reveal the full set of Zoom controls. RECORDING IN ZOOM . 1. To begin recording, click …More in the Zoom control bar at the top of the screen. 2. Click Record to the Cloud in the dropdown menu that appears. (or press Alt+C on Windows or ⌘+Shift+C on Mac)
To begin a recording of a PowerPoint presentation, move your cursor over the menu bar in Zoom. It's the series of options and buttons at the bottom of the app's screen. First, make sure that your microphone isn't muted. This setting is controlled by the Mute button, found on the left side of the menu bar.
Another option is to use external recording software. To record your Zoom presentation using an external screen recorder, follow these steps: Step 1: Choose your software system. Step 2: Launch your Zoom meeting, and set up your presentation. Step 3: Follow your software's instructions to record your screen.
In this step-by-step tutorial, learn how to record your computer screen using the free Zoom Video Conferencing app. Zoom is entirely free to download and ins...
In this Zoom tutorial, I'll teach you three different ways you can record in Zoom: 1. How to record yourself in Zoom2. How to record your screen in Zoom3. Ho...
Easily record a presentation using zoom for free // This is how to use zoom to record a presentation & it's part of my 'Zoom For Dummies' series. Watch the f...
Here's how to record your computer screen on Windows and Mac using the Zoom desktop app. Step 1: Launch the Zoom app, and as a host, start a new Zoom meeting by clicking the New Meeting icon, as ...
Getting Started with Recording on Zoom. Record a Zoom meeting or webinar audio, video and chat for training, legal or other purposes. Learn how to start recording meetings locally to your device or to the cloud with a getting started guide and additional recording resources.
Recording - Zoom ... Recording
Zoom Recording 101. Every Zoomer at one time or another will probably want to record their meeting or webinar, so let's all take a quick lesson in Recording 101. Ok class, attention please! The number one topic our support team gets questions about isn't complicated firewall traversals, encryption, or other deeply technical issues. It's ...
ZOOM Recording Instructions. Click " New Meeting " This will open a new window and start your webcam video. Click the Record button and select " Record to Cloud " option; you are now recording. If you wish to post your video on YouTube, Vimeo or some other video sharing website, click " Record on this computer ", ZOOM will make a ...
Step 1. Launch Zoom on your computer and click the Settings icon. Then click the Recording tab, in this page, you should toggle on the Local Recording option. Also, you can choose a destination ...
Click the "Share Screen" button on the bottom toolbar. Choose your open PowerPoint file from the options; Click "Share". Go to PowerPoint and launch your slideshow. At the bottom Zoom toolbar, choose Record, then choose "Record on this Computer" from the menu that pops up. Your lecture is now recording.
A quick tip: If you hold a lot of valuable info on many tabs, you can create a new Google Chrome window to click on it easily.. Step 7. End the recording. If you have presented everything, you can now end the Zoom recording. If there is nothing else to add, you have two options - Leave Meeting if you are invited or you are admin but you want the meeting to remain, or End the Meeting for all ...
This is a quick guide on how to use the free version of zoom to record a presentation with picture in picture of both your slides and your webcam.
Choose the " Participants " button on the control bar at the bottom of the Zoom window. Select " Invite " at the bottom of the participant list that will open to the right of the meeting room. Select the " Copy Invite Link " button. Send your group members that link and they will be able to use it to join you in the Zoom meeting room.
Navigate to the bottom toolbar and locate the red "Record" button. Click on the "Record" button to initiate the recording. A small indicator will appear on the top-left corner of the meeting window, indicating that the recording has started. You can now begin your presentation as usual.
Here's how to record a Zoom presentation on Windows without permission. Step 1: Launch Zoom. Step 2: Click Windows + G to open the Xbox Game Bar. Step 3: Press Windows + Alt + R to start the screen recording. Step 3: If you want to end the recording, please press the Stop button.
Follow these steps to record a Zoom meeting on your iPad using the screen recorder feature: Step 1: Access the Settings menu and select Control Center. Locate Screen Recording and tap the + icon that's next to it. Step 2: Return to the Home screen and open the Control Center again. Step 3: Find the Record button. Press and hold the button.
If you've recorded a meeting you'd like to watch, open the Zoom app and select the "Meetings" tab. In the left pane, select the "Recorded" option. You'll now see a list of recorded meetings. Select the meeting you'd like to view from this list. In the right pane, you now have the option to play the recording (with or without video), delete it ...
Switch back to Powerpoint and click the Slide Show tab. Begin the presentation by selecting the Play from Start or Play from Current Slide options. PowerPoint will display the slide show in a window. In Zoom, start or join a meeting. Click Share Screen in the meeting controls. Select the PowerPoint window and then click Share.
In this video, you will learn 2 effective methods on how to record a presentation on zoom.📌Directly record a zoom presentation without the host permissions ...
Its ease of use and robust features make it a powerful tool for conducting smooth, productive meetings and presentations. How to Record a Zoom Meeting. Common FAQs on Zoom ... During the meeting, click the 'Share Screen' button on the meeting toolbar, and select the screen or application you want to share.