
How to Change Transparency of a Shape in Google Slides (Easy Guide)

Google Slides allows users to enhance presentations by adjusting transparency. To alter a shape’s transparency, select the shape, click the paint bucket icon, press + under Custom, and slide to desired transparency. This adds depth and visual appeal to presentations.
Google Slide is becoming a popular way to give presentations. You can use many different features to make your presentation more visually appealing, including transparency. In this article, we’ll show you how to change the transparency of a shape in Google Slides. Keep Reading!
Why Would I Want to Change the Transparency of a Shape?
Can i change the transparency of text in google slides.
Adjusting the transparency of shapes in Google Slides offers multiple benefits. For instance, during a presentation, using semi-transparent shapes can:
- Add more depth to your presentation
- Create an interesting visual effect
- Highlight another element in your presentation
These are just a few examples – there are endless possibilities for how you can use transparency to enhance your presentation.
How to Change Transparency of a Shape in Google Slides
If you’re interested in tweaking the transparency of a shape in your slide deck, the process is straightforward. Follow these steps to expertly modify the opacity of your chosen shapes:
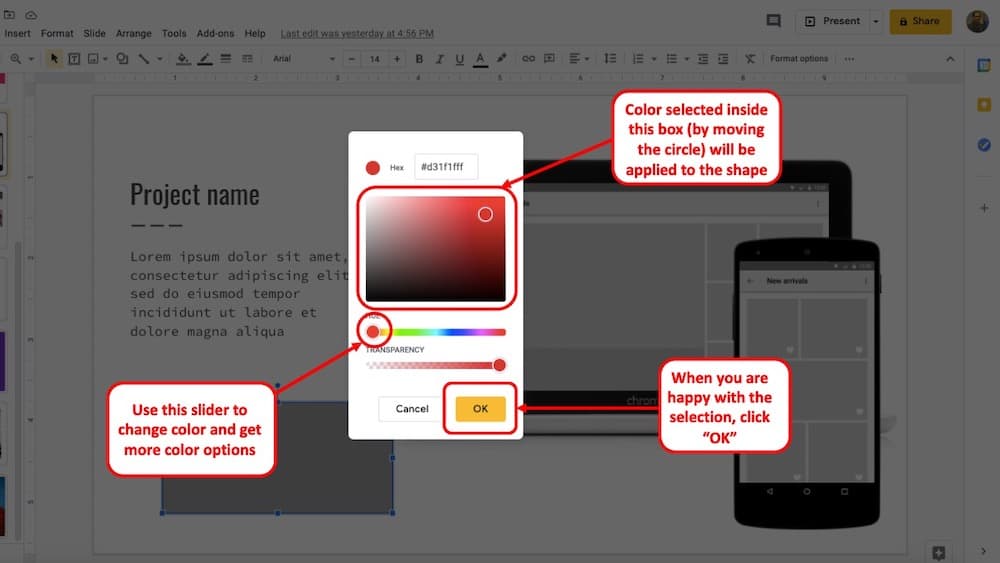
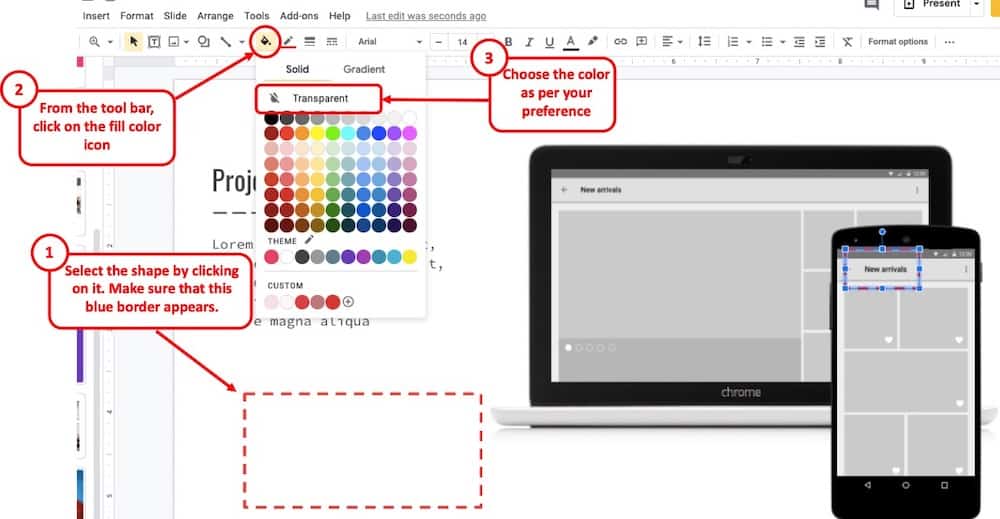
Launch the desired Google Slides presentation. Select the shape whose transparency you wish to modify.

Click on the paint bucket icon in the toolbar. This action will bring up the “Fill color” choices.

Click the + symbol located under the Custom section in the Fill color tab.
In the opened window, slide the transparency adjuster left or right . Sliding it further to the left increases the shape’s transparency. After achieving the desired transparency level, click “OK”.

That’s all you need to do! You’ve now successfully changed the transparency of a shape in Google Slides.

Yes, it is possible to change the transparency of text in Google Slides. First, press on Insert > WordArt .

Then, type out the text that you want to use.

You will find something like this:

Afterward, press the Paint bucket icon and follow the same steps as outlined above. Your text will now have the transparency that you typed.

Can I Change the Transparency of Image in Google Slides?
Beyond shapes, you might wonder if Google Slides allows transparency adjustments for images. Let’s delve into the process of altering the opacity of images in your presentation:
Open the Google Slides presentation that you want to edit. Click on the image that you want to change the transparency for.

Now press the “Format options” icon in the toolbar.
In the “Adjustments” tab, adjust the transparency by moving the slider to the left or right. The further you move the slider to the left , the more transparent the image will become. Once you’re happy with the transparency, click “Apply” .

That’s it! You’ve now successfully changed the transparency of the image in Google Slides.
We hope this article helped you learn how to change the transparency of a shape in Google Slides. You can use these features to enhance your presentations and make them more visually appealing. As always, if you have any questions or comments, please feel free to leave a comment below!
Related Posts:
")
How-To Geek
How to make an image transparent in google slides.

Your changes have been saved
Email is sent
Email has already been sent
Please verify your email address.
You’ve reached your account maximum for followed topics.
The Internet is Not Forever, So It's Time to Preserve What You Can
I paid for google's drive storage. here's why i don't regret it, why is my chrome tab indicator a smiley face, quick links, how to adjust image transparency in google slides.
If you want to put text in front of an image in Google Slides , you may want to increase the transparency of that image to make the text easier to read. You can do it in just a few clicks.
To get started, open your Google Slides presentation and navigate to the slide that contains the image you want to make transparent. If you haven't already inserted the image, you can do so by clicking Insert > Image and then choosing the location you want to upload the image from.
Related: How to Edit Images in Google Slides
Once the image is inserted, select it by clicking it with your mouse. A blue box will appear around the image when selected.

Once selected, right-click the image and then choose "Format Options" from the context menu.

Alternatively, you can click "Format" in the menu bar and then choose "Format Options" from the bottom of the drop-down menu.

Either way, the Format Options pane will appear to the right of the window. Click the right arrow to the left of the "Adjustments" option to expand the menu.
You should now see an option to adjust the transparency of the selected image. To do so, click and drag the box across the slider. Dragging the box to the right increases the transparency, while dragging it to the left reduces it. Transparency is set to 0% by default.

Adjust the slider until you get the image transparency exactly as you want it.
That's all there is to adjusting the transparency of your image in Google Slides. While extremely useful for most cases, it does lack some of the fine-tuning you may find when making images transparent in PowerPoint ---like adjusting specific parts of the image instead of the entire thing.
Related: How to Make an Image Transparent in Microsoft PowerPoint
- Google Slides
Making Shapes Transparent in Google Slides: A Step-by-Step Guide
Making shapes transparent in Google Slides is a neat trick that can add a professional touch to your presentation. By adjusting the transparency of shapes, you can layer objects, create custom designs, or emphasize certain elements. Here’s a quick guide to help you achieve this effect: select the shape, click on the ‘Fill color’ tool, and adjust the transparency slider. That’s it! Now let’s dive into the details.
Step by Step Tutorial on Making Shapes Transparent in Google Slides
Before we start, it’s important to know that making shapes transparent in Google Slides can elevate your presentation by allowing you to create overlays, highlight text, or simply add a unique design flair. Follow these steps, and you’ll be a pro in no time!
Step 1: Open your Google Slides presentation
First, you’ll need to access your Google Slides presentation where the shape you want to make transparent is located.
Once you’ve opened your presentation, navigate to the slide that contains the shape you wish to modify. If you haven’t added a shape yet, simply go to the slide where you want to add one.
Step 2: Select the shape
Click on the shape you want to make transparent. If you haven’t added a shape yet, you can insert one by clicking on the ‘Shape’ tool in the toolbar and selecting your preferred shape.
After inserting your shape, click on it to ensure it is selected. You will know it’s selected when you see the blue border around the shape.
Step 3: Click on the ‘Fill color’ tool
With the shape selected, look for the ‘Fill color’ tool in the toolbar – it looks like a paint bucket. Click on it to reveal the color options.
In the color options menu, you’ll see a range of colors to choose from. At the bottom of this menu, there’s a slider that will adjust the transparency of the shape.
Step 4: Adjust the transparency slider
In the ‘Fill color’ menu, drag the transparency slider to the left to increase transparency, or to the right to decrease it.
As you move the slider, you’ll see the shape become more transparent or more opaque, depending on the direction you’re dragging. Adjust it until you reach the desired level of transparency.
After completing these steps, your shape will have the transparency level you’ve chosen. It’s as simple as that! Now, you can experiment with layering shapes or creating interesting design elements with this newfound skill.
Tips for Making Shapes Transparent in Google Slides
- Use transparency to layer shapes and create depth in your slides.
- Adjusting transparency is also useful for dimming the background of text boxes to make text stand out.
- Remember that too much transparency might make elements hard to see, so find a balance.
- Use the transparency tool to create watermarks or subtle background images.
- Save your original shape in case you need to revert back to a non-transparent version.
Frequently Asked Questions
How do i reset the transparency of a shape.
To reset the transparency, simply select the shape, click on the ‘Fill color’ tool, and move the transparency slider all the way to the right to make it fully opaque.
Can I make images transparent as well?
Yes, you can adjust the transparency of images by clicking on the image and following a similar process using the ‘Adjustments’ option in the image formatting tools.
Will the transparency effect show up when I print my slides?
Transparency effects will be visible in printouts, but keep in mind that printers may render colors and transparency differently than on-screen displays.
Can I apply transparency to only part of a shape?
No, transparency settings apply to the entire shape. If you need different transparency levels within a shape, consider breaking it into multiple shapes.
Is there a shortcut to adjust transparency more quickly?
There isn’t a specific keyboard shortcut, but accessing the ‘Fill color’ tool quickly by right-clicking on the shape can save some time.
- Open your Google Slides presentation.
- Select the shape.
- Click on the ‘Fill color’ tool.
- Adjust the transparency slider.
Making shapes transparent in Google Slides is a breeze once you know where to find the right tools. With just a few clicks, you can add a professional and polished look to your slides. Whether you’re aiming to enhance the aesthetics of your presentation or draw attention to certain areas, adjusting shape transparency can be a game-changer. The key is to experiment with different transparency levels to see what works best for your design. Try layering shapes, creating intriguing backgrounds, or highlighting text with these simple, yet effective techniques. Remember, the goal is to make your presentation not just informative but visually compelling, and mastering the art of transparency is a step in the right direction. So, go ahead and give it a try – your audience will surely notice the difference!

Matthew Burleigh has been writing tech tutorials since 2008. His writing has appeared on dozens of different websites and been read over 50 million times.
After receiving his Bachelor’s and Master’s degrees in Computer Science he spent several years working in IT management for small businesses. However, he now works full time writing content online and creating websites.
His main writing topics include iPhones, Microsoft Office, Google Apps, Android, and Photoshop, but he has also written about many other tech topics as well.
Read his full bio here.
Share this:
Join our free newsletter.
Featured guides and deals
You may opt out at any time. Read our Privacy Policy
Related posts:
- Can I Convert My Powerpoint to Google Slides?
- How to Make a Picture Transparent in Powerpoint 2010
- How to Make a Transparent Background in Photoshop CS5
- How to Make an Image Transparent in Google Slides on iPad: A Guide
- How to Add a Border to a Picture in Google Slides
- How to Insert Text Box in Google Docs
- How to Change the Font on All Slides in Google Slides
- How to Delete Multiple Slides in Google Slides
- How to Make an Image Transparent in Google Docs
- How to Drag Slides From One PowerPoint to Another: A Step-by-Step Guide
- How to Make a Shape on Microsoft Word 365: A Step-by-Step Guide
- How to Make an Image Transparent: a step-by-step guide
- How to Make a Microsoft Word Group of Shapes: 2024 Guide
- How to Place Shapes in a Semi-Circle in PowerPoint: A Step-by-Step Guide
- How to Change the Shape of an Image in Google Slides: A Step-by-Step Guide
- How to Place Transparent Images in Word: A Step-by-Step Guide
- How to Save a Slide from Google Slides as a Picture
- How to Make All Columns the Same Width in Excel 2013
- How to Access Google Slides: A Step-by-Step Guide
- How to Insert a Circle in Google Slides
How to Make Images Transparent in Google Slides

A good way to change how images and shapes look in your Google Slides presentation is to make them transparent. Here’s how.
Google Slides is a powerful tool for creating and presenting presentations, but the images you want to use may not necessarily fit in with your design.
One solution to this problem is to make the image transparent, allowing text and other elements of your presentation to show through it. This can be used to incorporate images into the presentation design, create a more cohesive look, or highlight certain elements of the slide.
If you’re unsure how to make an image transparent in Google Slides, follow the steps below.
How to Change the Transparency of an Image in Google Slides
Google Slides allows you to make small changes to images. You can use the Format Options menu in Google Slides to alter the transparency levels for any images you’ve inserted.
To make an image transparent by using the Format Options menu in Google Slides:
- Open your existing Google Slides presentation or create a new one .
- Select an existing image in your presentation on one of your slides.

- The Format Options menu will appear on the right—open the Adjustments section.

This method allows you to easily adjust the transparency level of an image, but you’ll need to play with the slider to find the right level for your image.
How to Make a Shape Transparent in Google Slides
If you’ve inserted a shape into Google Slides, you can also change its transparency using the built-in formatting tools.
To make a shape transparent in Google Slides:
- Open your Google Slides presentation and select the shape that you want to make transparent.
- Locate the Fill Color drop-down menu on the taskbar.

- At this point, the shape will be completely transparent, but you will still see a border. If you want to change the size and color of this border, select the Border Color drop-down menu on the taskbar and choose your preferred color.
- To change the size of the border, select the Border Weight drop-down menu and choose the size.

At this point, the shape should now be transparent, allowing the background or other objects behind it to show through.
Making Engaging Google Slides Presentations
Making images transparent in Google Slides is a great way to enhance the visual appeal of your presentations. By following the steps above, you can easily add a layer of transparency to any image or shape in your Google Slides presentation.
There are other ways you can enhance your presentations, however. For example, you can group objects together to create more complex graphics, create a custom template to give your presentations a consistent look and feel or add your own audio to bring your presentations to life.
Your email address will not be published. Required fields are marked *
Save my name and email and send me emails as new comments are made to this post.
Recommended for you

How to Make a Picture Transparent in Google Slides
Google Slides is a versatile presentation software that offers a wide array of tools to help you create engaging slides. One such tool is the ability to adjust the transparency of images.
Making a picture transparent in Google Slides can help you blend images with the slide background, overlay images for a layered effect, or simply reduce the prominence of an image.
In this article, we’ll walk you through the steps on how to make a picture transparent in Google Slides and provide some tips to help you effectively use this feature.
19+ Million Google Slides Themes, Presentation Templates + More With Unlimited Downloads
Download thousands of Google Slides themes, and many other design elements, with a monthly Envato membership. It starts at $16 per month, and gives you unlimited access to a growing library of over 19+ million presentation templates, fonts, photos, graphics, and more.

Ciri Slides Template
Clean & minimal.

Kloe Minimal Template
Clean & simple design.

Alloyz Business Template
Google slides.

Delica Google Slides
133+ unique slides.

Creative Template

Company Profile Template
Explore Google Slides Themes
How to Make A Picture Transparent in Google Slides
Google Slides doesn’t provide a built-in tool to adjust the transparency of an image directly. However, there’s a workaround that allows you to achieve the desired effect. Here’s how you can do it:
1. Open Your Google Slides Presentation
First, launch Google Slides and open the presentation that contains the image you want to make transparent.
2. Insert an Image
If you haven’t inserted your image yet, go to the menu bar and click on “Insert”, then select “Image.” You can upload an image from your computer, search the web, or choose an image from Google Drive or Photos.
3. Duplicate the Slide
Once you’ve added the image to your slide, right-click on the slide in the left panel and select “Duplicate slide.” This creates a copy of your slide with the image.
4. Adjust the Image on the Duplicate Slide
On the duplicated slide, click on the image. Then, click on “Format Options” in the toolbar. Under the “Adjustments” section, you’ll find the “Opacity” slider. Slide it to the right to increase the transparency of the image. Adjust until you achieve the desired level of transparency.

5. Download the Transparent Image
After adjusting the transparency, download the slide as a PNG or JPEG image by going to “File” > “Download” > “PNG image/JPEG image.” This will download the entire slide, including your transparent image.
6. Insert the Transparent Image into the Original Slide
Go back to your original slide and delete the initial image. Then, insert the image you just downloaded. This image will now be transparent.
Tips for Using Transparent Images in Google Slides
Here are some tips to help you enhance your presentations with transparent images:
1. Create Layered Visuals
You can create layered visuals by overlaying transparent images. This can give depth to your slides and make them visually interesting.
2. Blend Images with Background
Transparent images can blend smoothly with the slide background. This is particularly effective if you want the image to subtly complement the textual content without drawing too much attention.
3. Use Transparent Images for Watermarks
If you want to add a watermark or logo to your slides, using a transparent image can be a great way to do this without distracting from the content of the slide.
4. Experiment with Transparency Levels
Don’t hesitate to experiment with different transparency levels. Depending on the background color and other elements on the slide, you might need to adjust the transparency level to achieve the best result.
5. Be Mindful of Readability
While transparent images can enhance the visual appeal of your slides, be careful not to compromise readability. Make sure that text overlaying transparent images is still clear and easy to read.
In conclusion, while Google Slides doesn’t offer a direct tool for adjusting image transparency, the workaround can effectively serve the purpose. With the ability to adjust image transparency, you can create visually engaging presentations that captivate your audience’s attention. Happy designing!
How to Format Shapes in Google Slides? The ULTIMATE Guide!
By: Author Shrot Katewa

When working with presentations, formatting a shape is a key skill to have as it allows you to use shapes creatively! However, when it comes to Google Slides, formatting shapes is not quite as straightforward as you may expect it to be.
Here’s how you can format shapes in Google Slides –
- Select the shape by clicking on it.
- Right-click on the Shape, and choose “Format Options”.
- A new window pane will open on the right with various options to format the selected shape.
The above method will help you access most shape formatting options. But, it won’t really provide you with all the various shape formatting options available in Google Slides.
So, in this article, I’ll share with you everything you need to know on how to format shapes in Google Slides . Plus, watch out for the ninja tips throughout the article!
Adding Shapes in Google Slides
For making a presentation that looks professional and appealing, knowing how to add various shapes on your presentation is always very useful.
Here’s a detailed step-by-step process to adding shapes in Google Slides –
Step 1 – Open the specific slide in Google Slides
For adding a shape to a slide, first, open Google Slides.
You can open the respective Google Slides presentation from your Google Drive or click here and log in to your Google account.
Step 2 – Insert a Shape on the Slide
To insert a shape on Google Slides, go to the slide on which you want to insert the shape.
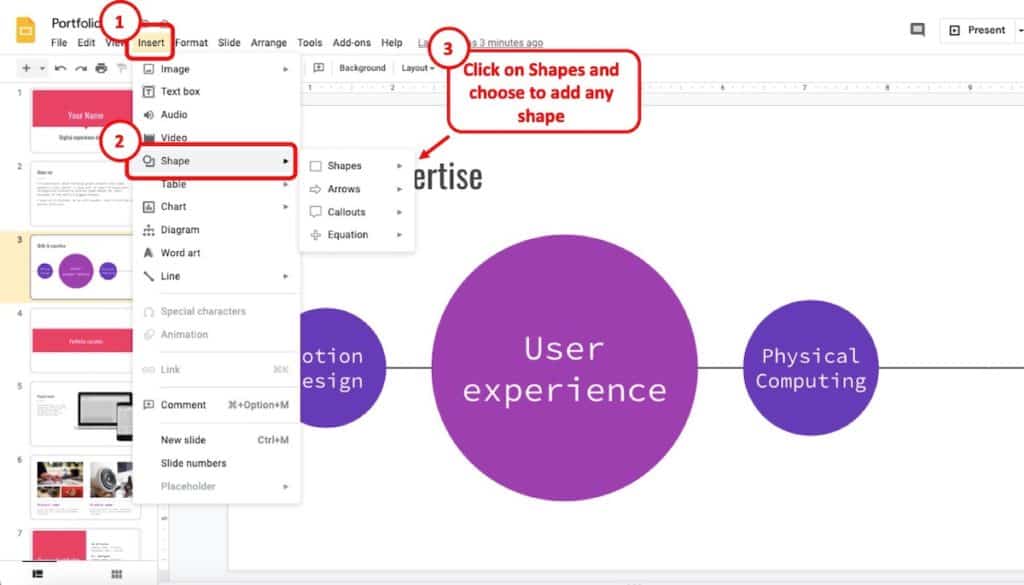
Then, click on the “ Insert ” menu. A dropdown menu will appear. From the dropdown menu, click on “ Shape “. Another menu will appear on the right. Choose the type of shape you want to insert from this menu.
If you want to insert a standard shape such as a rectangle or a circle, then click on “ Shapes ” and choose the appropriate shape.
Another method of inserting shape is directly from the toolbar.
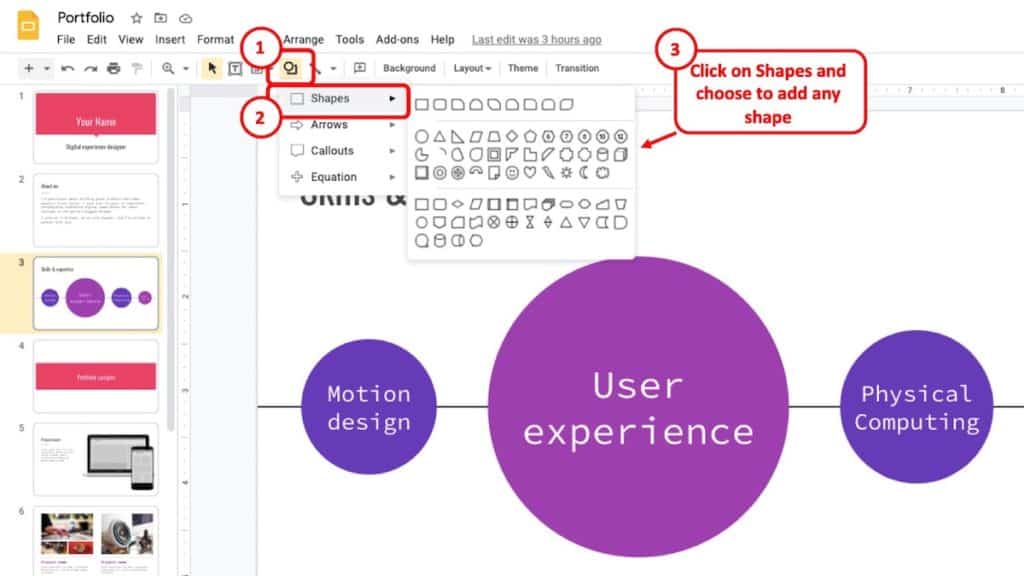
After opening the slide on which you want to insert a shape, go to Slides, you will see an option called “ Shapes ” at the top right corner of the screen. It may be difficult to locate but you identify it with its icon. There should be a square and a circle drawn on the button (as indicated on the image above). Click on it.
After clicking, you will see four options popping up. The option “ Shapes ” should be at the top of all others.
Just click on it and you will find different shapes that you can add to the slides. If you want, you can also add different types of arrows, different callouts, and various equation syntax. The whole process is pretty simple and easy.
Step 3 – Create the shape on the slide
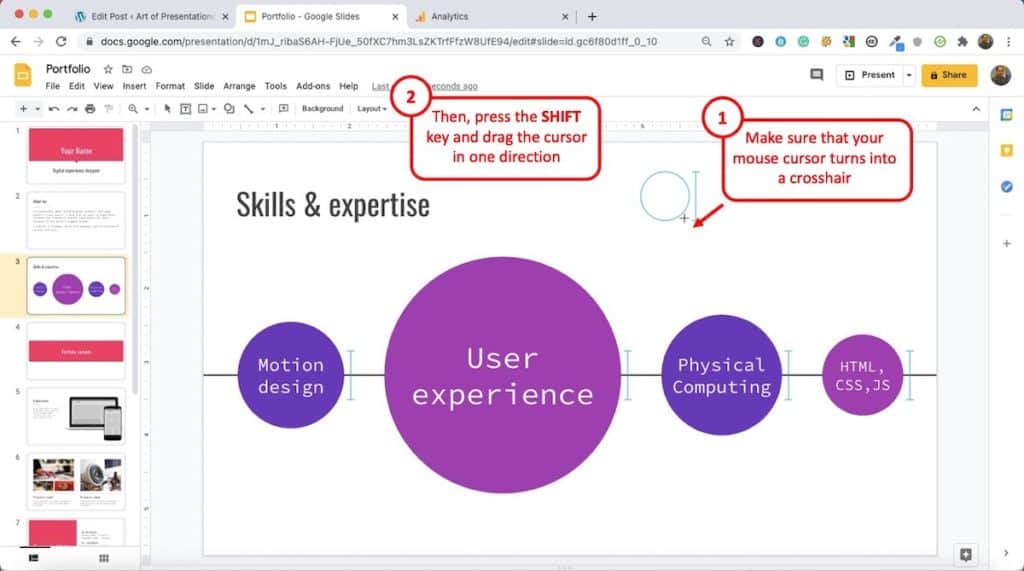
If you need a perfect circle or rectangular, then just select one of those shapes. You will notice that your mouse cursor turns into a crosshair or a plus sign.
Then, while holding the “ Shift ” key, click and hold on the left mouse button and drag it as much as you need.
By holding the shift key, you will notice the shape maintains its aspect ratio. This means you will get a perfect circle or a perfect square while inserting the shape on the slide.
How to Resize Shapes in Google Slides?
Once you’ve understood how to add a shape on Google Slides, resizing it is quite similar. That said, knowing how to resize a shape is quite important.
Here’s how to resize a shape in Google Slides –
- A blue border with dots around the shape will appear.
- Move your cursor over the blue border.
- Then, click and drag the mouse in any direction to resize the shape.
Here’s a pictorial description of the above mentioned steps –
Step 1 – Select the shape
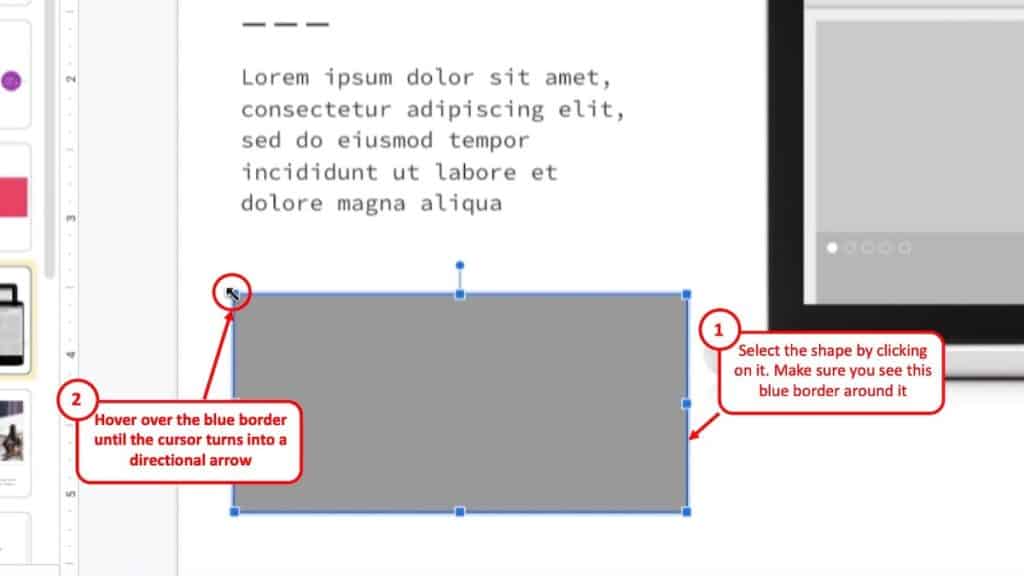
First of all, click on the shape to select that you want to resize. You will see a blue line at the border around the shape.
Move your cursor over the blue border around the shape. You will notice that the cursor turns into a directional arrow as shown in the image above.
Step 2 – Drag the shape resize it
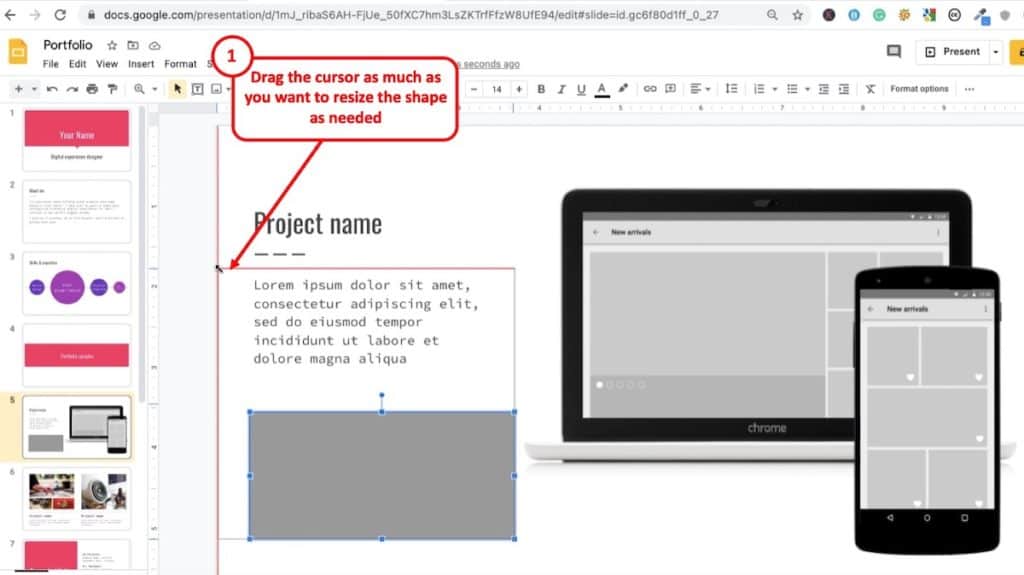
Click and drag the shape in the direction you want to resize it (as shown in the image above)
You can resize the shape in all directions. For changing it sideways, click and drag on the middle dot. For changing it from an angle, click and drag on the corner dot.
How to Rotate a Shape in Google Slides?
Apart from resizing the shape, you can even change the angle of any shape in Google slides. The steps are somewhat similar to resizing the shape.
Here’s how to rotate a shape in Google Slides –
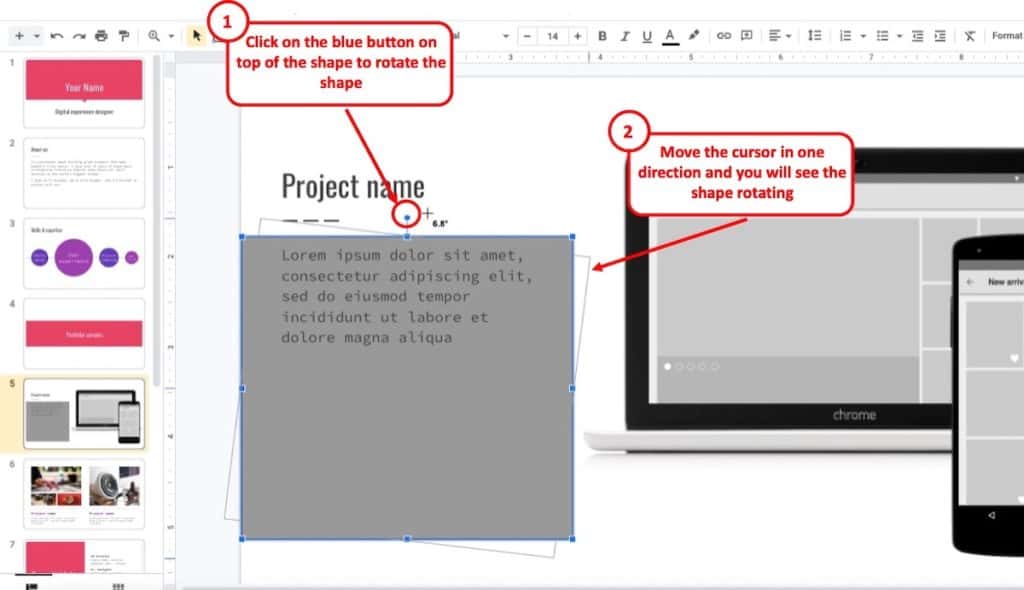
Select the shape by clicking on it. Now, you might see a dot at the top of the shape followed by a line.
Step 2 – Rotate the shape
Click and hold on the dot and rotate your mouse and adjust the angle as you wish. You will see a popup text near the shape and it will change as you move your mouse (as indicated in the image above).
You can rotate the shape in different directions.
How to Format Shapes in Google Slides?
There are several different ways you can change the way your shape looks. For instance – you can change the color, you can change the border size or border color. You can even add transparency or a shadow to a shape and much more.
So, let’s go through various options presented by Google Slide under the format shape settings.
How to Fill a Shape with Color on Google Slides
Adding color can be crucial for making a point valid in your presentation.
For example, if you are recommending something, you might want to put the color “green” in the shape, and you can put red otherwise.
Step 1 – Select the Shape
For adding a color, first, you have to left-click on the shape. Again, a blue line will appear at the border of it.
Step 2 – Click on the Color Option
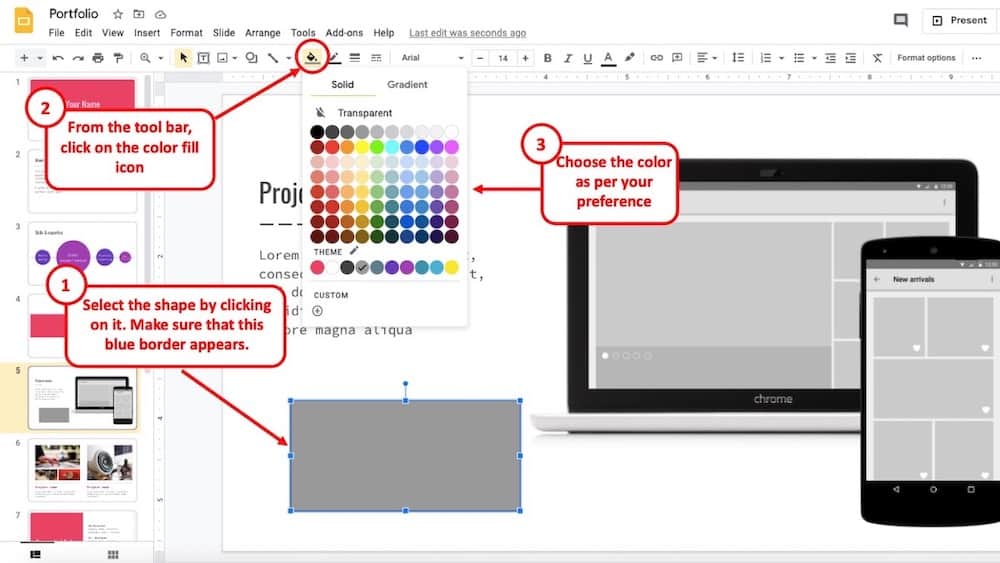
After clicking, go to the toolbar. You should see a small icon to fill color. Just click on it and you will find various color options that you can use on the shape.
There are solid and gradient colors available for you to directly use. But you can also tweak and make a particular color yourself.
Step 3 – Using non-standard color options
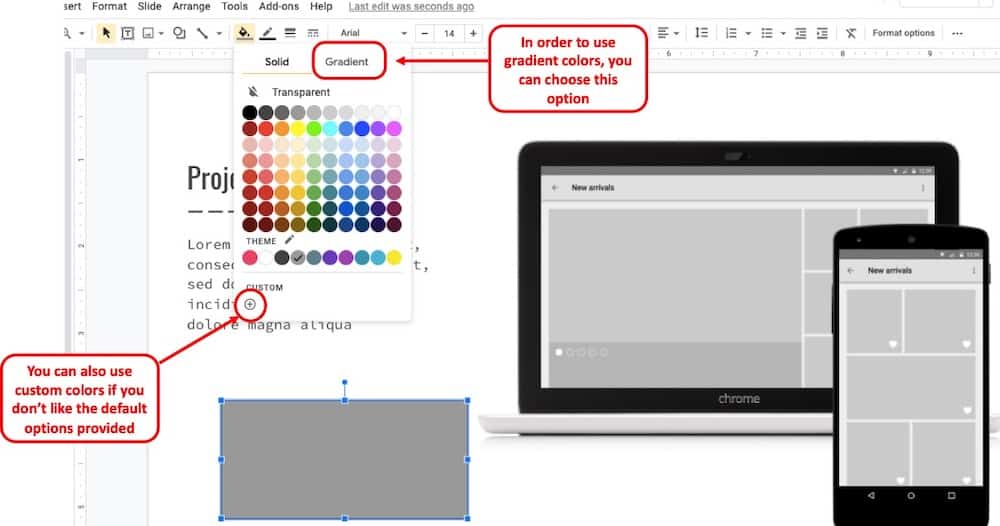
In the “Fill color” option, you will find a section called “custom”. This user-controlled option has a rounded plus sign.
Click on it and a new pop-up will open with options to choose colors from. On this window, you can tweak the color as you like.
The first box on the top indicates the final color that will be displayed on your shape in Google Slides.
However, you can change the colors in this top box by moving the sliders down below. Moving the “Hue” slider below will change the color options totally and allow you to choose a different color in the box above.
Moving the transparency slider will, as the name suggests, add transparency to the color chosen.
How to Change the Color of the Shape Border
Another thing that you may want to understand is that the color of the border is different from the color of the shape itself. This means, a border of a shape can have a different color from the shape itself. Thus, there are different options to choose the color of the shape border.
Here’s how to change the border of the shape –
- Choose the “border color” option from the toolbar.
- Click on the color of your choice from the dropdown.
Changing the border color is similar to how you would change the color of the shape. Nevertheless, lets look at the steps in detail below –
Click on the shape to select it and to enable the color options. As mentioned above, you will see a blue color border around the shape. When you see this, you know that the shape is selected.
Step 2 – Click on the Border Color option
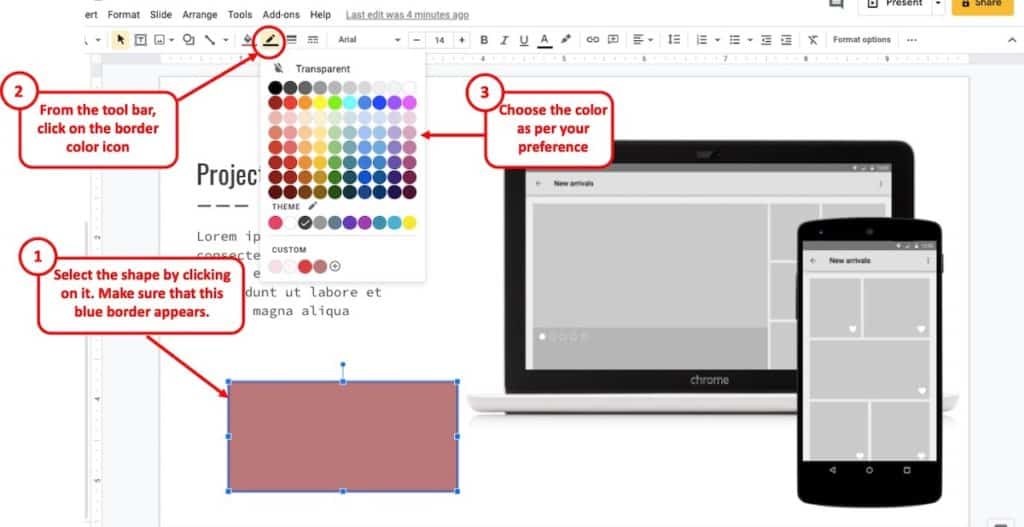
Once the shape is selected, click on the “Border Color” option in the tool bar on the top. You will see this right next to the color fill option (as indicated in the image above).
When you click on the icon, a dropdown menu will appear with a lot of different color options to choose from.
Step 3 – Choose the Shape Outline Color
Next, when you see the color options provided, click on the color of your choice and you will notice that the color of shape border changes.
Changing the Shape Border Width and Dash Type
When you change the color of the shape outline, you may or may not even notice the change in color. That is probably because the thickness of your shape outline is very little.
Google Slides also provides you with an option to adjust the thickness of the shape border or otherwise known as the “ Border Width “. You can also change the type of line (otherwise known as the “Dash Type”) for the shape border.
Let’s look at how to adjust the border width and dash type of a shape in Google Slides –
Changing the Shape Border Width –
If you wish to change the width of the border for a particular shape in Google Slides, you need to follow the below mentioned steps –
First, make sure you have selected the shape before going through the below steps. You will see the border width icon only when you have selected the shape.
To select the shape, simply click on it. You’ll see a blue border around the shape. This means, that the shape is selected.
Step 2 – Click on the “Border Width” icon
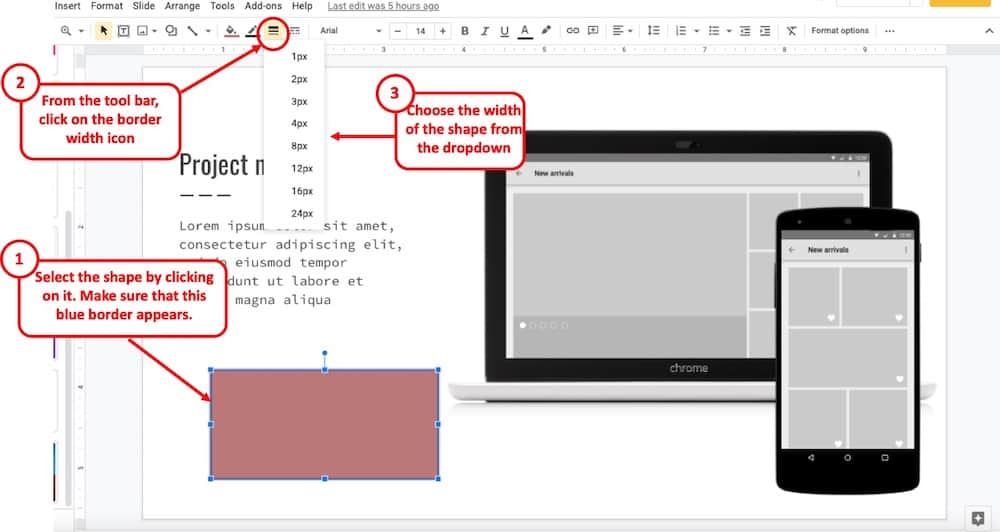
Once the shape is selected, locate the border width icon on the toolbar (as shown in the image above). Click on it.
You will be presented with a dropdown with a few different options to increase the width of the shape border.
Click on any one of the options presented in the dropdown. Once you’re done, you will notice that the width or the thickness of the shape outline has increased.
Changing the Type of Shape Outline in Google Slides
Apart from increasing the width of the shape outline, you can also change the dash type used for the shape border. Let’s take a look at how you can change the outline of the shape –
As mentioned above, you first need to make sure that you select the shape. You will not be able to see the option to format the shape outline type without selecting the shape first.
Step 2 – Click on the “Border Dash” icon
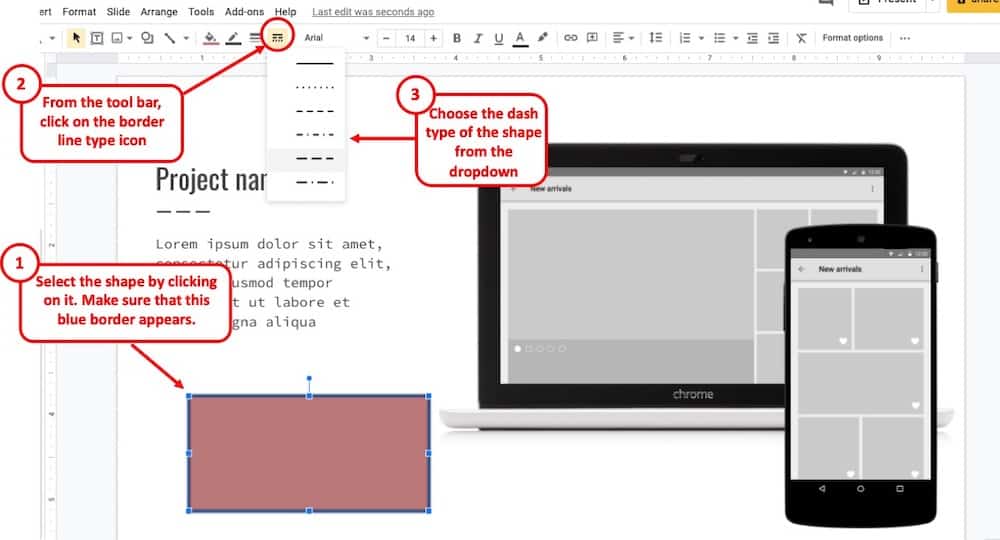
Once you have clicked on the shape to select it, you will see an option to change the “border dash” type on the toolbar (as indicated in the image above).
Click on it. You will then be presented with a dropdown with a few different border dash types. Select the option based on your preference. You’ll now notice that the border type around your shape has changed.
Add Shape Transparency in Google Slides
Now, there are times when you want to add a shape to your slide but you want to make it transparent. This could be to highlight something on an image or perhaps some part of the slide. So, let’s understand how we can do that.
Here’s how you can add transparency to a shape in Google Slides –
As usual, the first thing that we need to do is select the shape. To do that, simply click on the shape. You will notice a blue-colored border around the shape.
Step 2 – Click on the Fill Color Icon
Next, click on the “ Fill color ” option from the toolbar. You will notice a dropdown menu that appears with a few different color options.
However, we will not be choosing any of the colors this time around.
Step 3 – Make the Shape Transparent
In order to make the shape transparent, simply click on the “Transparent” option above all the colors presented in the dropdown menu.
Make sure that the shape has some border that is not transparent. Otherwise, you will not be able to see the shape at all even though it is present on the slide. You can choose any color for the shape outline as described above.
Add Shadow of a Shape in Google Slides
The Shadow effect on a shape can make it look much more professional and neater. Adding the shadow effect is very simple and straightforward.
First, click on the intended shape or the image. Make sure it is properly selected. You’ll see a blue border around the shape.
Step 2 – Click on Format Options
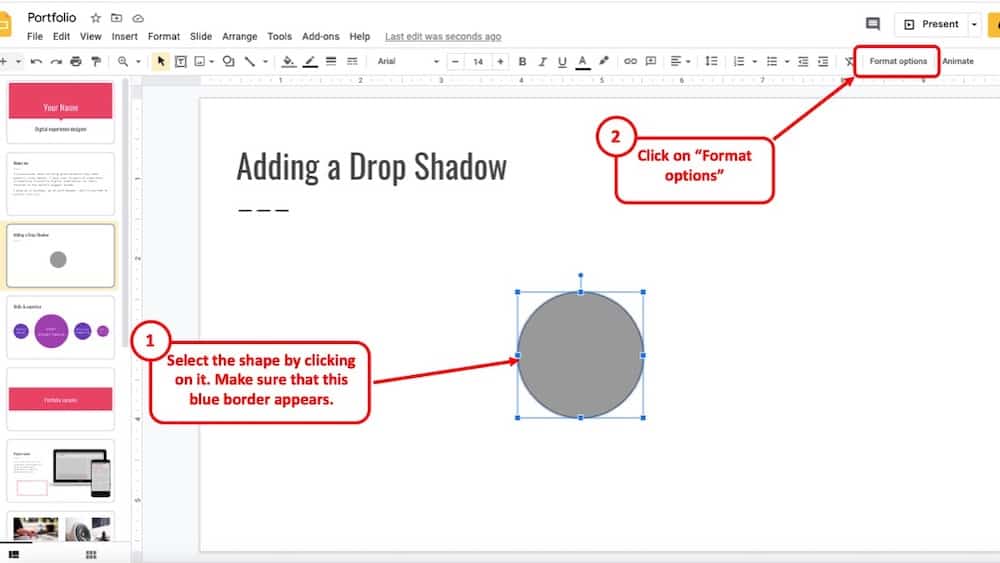
Click on the “format options” on the top right corner of your window (as indicated in the image above).
Step 3 – Add Drop Shadow from the Format Options window
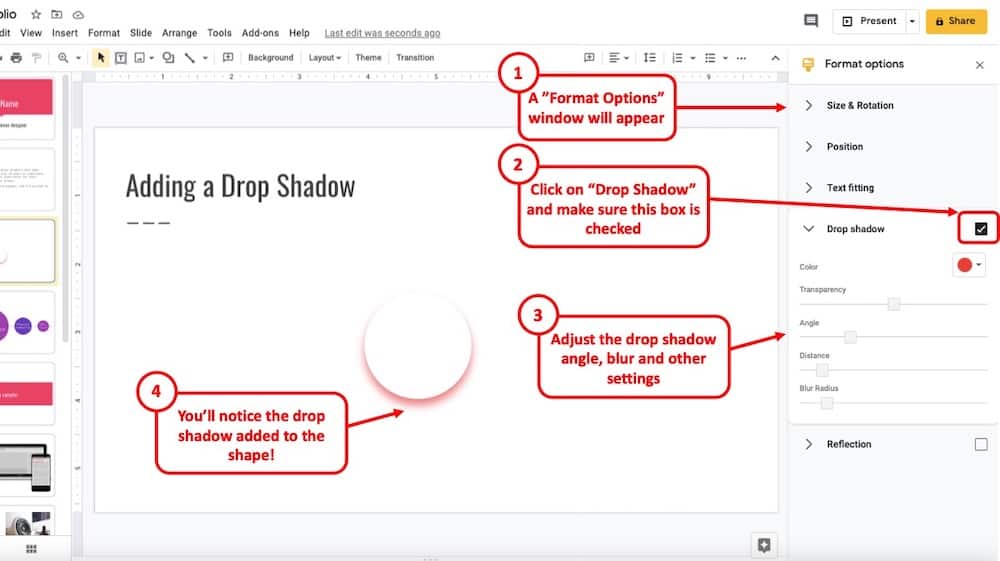
When you click on the “Format Options” button, you will notice a new window pop-up on the right side of your screen with several different options to choose from.
Click on “Drop Shadow”. Make sure the check box is checked.
You can also adjust the angle, radius, and length of the drop shadow as per your preference. Upon changing the settings, you will notice that the drop shadow has been added to the shape.
How to Lock Aspect Ratio of a Shape in Google Slides
When working with shapes or images, it is important to know how to lock the aspect ratio as it can help you avoid distorting a shape or even an image.
Here are the detailed steps if you want to lock the aspect ratio of a shape or an image in Google Slides –
Step 1 – Click on the Format Menu
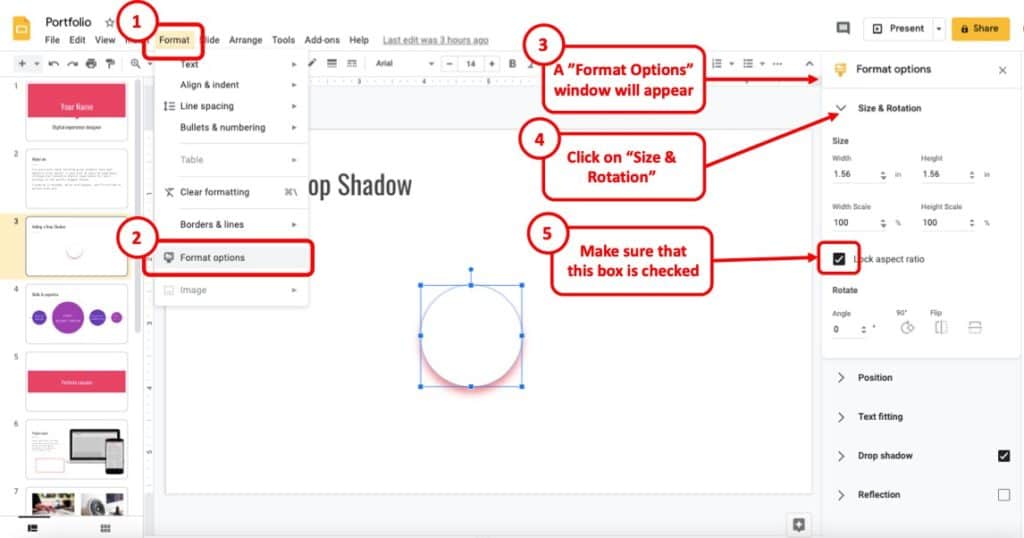
First, make sure that the shape is selected. To do that, simply click on the shape until you see a blue border around a shape (as shown in the above image).
Then, click on the ‘ Format ‘ menu from the menu bar. A dropdown menu will appear. Click on the “ format options ”.
Step 2 – Lock the Aspect Ratio from Format Options
You will notice a new window will appear on the right side of your screen. Click on the “ Size and rotation ” option which should be right at the top of the new screen.
Just check the “ Lock Aspect Ratio ” option and you can change the size of any image or shapes without reducing the visual quality.
How to Provide Reflection Effect to a Shape
A reflection effect can make an image or shape look much more professional. Again, adding a reflection effect is very straightforward.
To insert the option, tap the ‘Format’ button from the menu bar as shown in the image above.
A drop-down menu will display. For seeing the reflection option, click on the “ Format option ” and you will see a new window pop up.
The “ Reflection ” option is right at the bottom of that new pop-up screen. Just click on it and the reflection effect will be added.
You can even customize the effect as you like. You can change the transparency of the reflected shape, change the distance between the actual shape and the reflected shape, and you can also change the size of the reflection.
Adding Text to a Shape in Google Slides
Adding texts inside a shape is a fundamental necessity for making it meaningful. The steps are given below.
Step 1 – Adding Text to a Shape
Firstly, select the shape. Then, right-click on the shape for adding text inside a shape.
A menu will pop-up. Simply select “Edit Text” option from the pop-up menu.
You will now notice that you are able to type inside the shape.
Step 2 (Customizing the Text)
There are various ways to customize the text inside a shape. First, make sure that you highlight the text inside the shape to begin the process of customizing it.
Then, you can adjust the font type, font size, make the text bold, italics, underline or even change the color of the font using the various options available in the toolbar (as shown in the image above).
Furthermore, you can also change the alignment of the text inside the shape, along with adding bullets and numbering and vertical spacing.
How to Put a Picture in a Shape in Google Slides
One of the coolest things that you can do in Google Slides is put a picture inside a shape!
On the face of it, this may sound quite plain and simple, but when used creatively, this feature can make your slide really stand out!
So, let’s learn how to put a picture in a shape in Google Slides –
Step 1 – Insert an Image
You don’t have to have an image on your computer to insert images. Here are the steps to insert an image –
First of all, go to the “Insert” option in the menu bar. Then, from the dropdown, click on “Image”. Then, click on “ Search the Web ”.
You can directly search and add an image to your presentation by searching the topic for your image and then selecting and inserting the image that you like.
Step 2 – Put the Picture in a Shape
After inserting the image, you can give it any shape that you prefer. For doing that, follow the steps provided below.
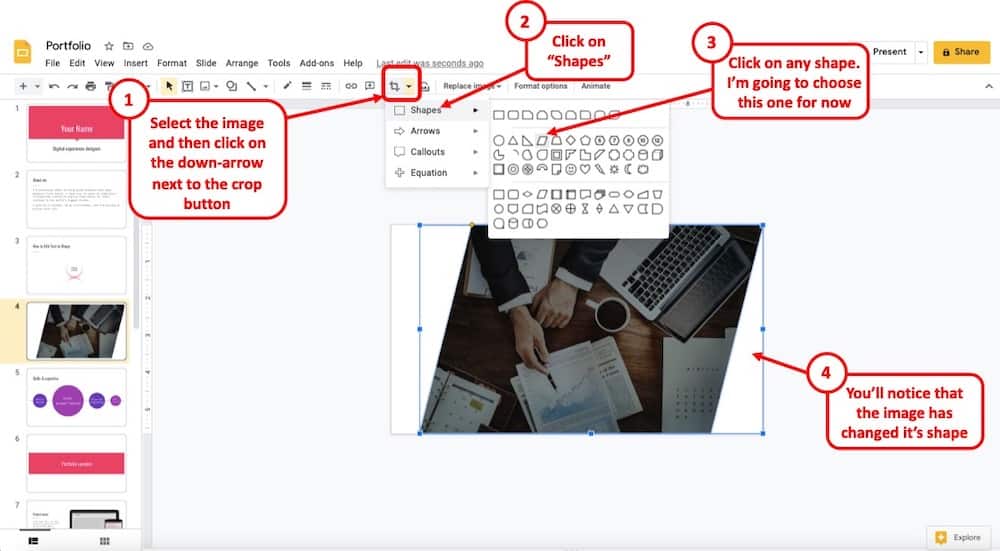
Click on the image that you want to convert to a shape. On the toolbar, you will see an option named “crop image”.
The crop image icon will also have a small downward-facing arrow. Click on it. You will see several options to mask an image into a shape.
Click on any shape of your choice. For the purpose of this example, I decided to go with a parallelogram.
Step 3 – Finishing Touches

Once, you’ve put the image in a shape, move it around and adjust it as per convenience. Add some text and you can very well create a visually appealing slide quite quickly!
How to Make Freeform Shapes in Google Slides
There are more than 120 shapes available in Google Slides for you to use in your presentation. But in some cases, the shape you are looking for might not be available and you might have to create that particular shape yourself. Fortunately, creating custom shapes on Google Slide is very easy and straightforward.
There are two ways that you can use to make a custom shape. You can merge different shapes available in the app for making a new one, or you can draw one yourself. In most cases, merging shapes work best as drawing a new one is a bit complicated and time-consuming.
Merging Shapes in Google Slide
For merging different shapes, just add a few of them like I have explained before. Then, put some appropriate color onto them and put them in a logical order.
After doing all of that, select all the shapes at the same time and go to arrange. You will find it at the right-top corner of the screen.
Then click on the group option. Now, you can change the angle, size, and color of that merged shape at the same time. Observe how I made an ice cream cone by following this method.
Creating a Custom Shape Using Lines
If the previous method is not fulfilling your need, then you can draw a custom shape yourself. For Doing that, follow the steps provided below.
Click on the “Select line” option which is situated at the top left corner of the screen, just beside the “Shape” option. You will see a drop-down menu popping up which has various drawing options.
Using the “Select line” option, you can make almost any shape you need. It might take a bit more time and patience.
But if you keep on trying, this could be an even better method for you to make custom shapes.
Observe how I made a random shape using the “curve” option from that drop-down menu.
For making a professional presentation, knowing how to make custom shapes is a must. There will be times when you will need shapes that are not available on Google Slide.
But, making them on this platform is very simple and easy.
Some Important Tips on Using Shapes in Google Slides
For making a professional looking presentation, you must use some other features provided by Google Slides. Some of those features are given below.
How to Arrange Various Shapes
Arranging shapes after creating them is a crucial part of making presentations. You can easily arrange them by clicking on the “arrange” button which is at the top-middle corner of the screen. After clicking, you will see a drop-down menu. Using that menu, you can easily adjust various aspects of that shape.
Aligning a Shape
If you need to adjust the alignment of that shape with a different one, just use the “Align” parameter of the previously discussed drop-down menu. You can also move the shape as you need for making a neat presentation. For example, if you need a shape right in the middle of the slide, just use the “Center on page” option. This feature is particularly useful when you are using many shapes on a single page.
Rotating a Shape
In your presentation, you might need to rotate a shape for making it look more professional. For a free form rotation, left-click on the shape and click and hold on the small circle which is placed right at the top of it.
But if you need a quick 90-degree move, just right click on a shape and go to the rotate option. You can rotate the shape both clockwise and anti-clockwise. Using this option will speed up your presentation making process.
Flipping a Shape
You might also need to flip a particular shape while making a presentation. Again, just right-click on it and you will see the flipping option on the “rotate” section. You can flip it on both horizontally and vertically. If there is a text inside the shape, it won’t change in horizontal flip. But the letters will also flip when you will use the vertical flip option.
Changing the Order of a Shape
If you are using more than one shape in a single slide, then you might need to order them correctly. For example, if you need a shape in front of another one, then you can easily do it by using the “Order” option. Using this feature, you can perfectly merge various shapes into a particular shape.
Final Thoughts
As you can see, adding shapes and formatting them in Google Slides is a piece of cake. In this article, I have vastly discussed how to format shapes in Google slides. Hopefully, you will be able to perfectly format the shapes of your presentation after reading through the whole article. Until next time, bye.
- PC & Mobile
- Google Slides
How to Make a Shape Transparent in Google Slides
Lee Stanton Lee Stanton is a versatile writer with a concentration on the software landscape, covering both mobile and desktop applications as well as online technologies. Read more March 22, 2023
Google Slides has an amazing feature that allows users to easily insert, edit, and manipulate shapes in their slides. One of the best ways this can be done is by making a shape transparent and providing the perfect graphic to whichever slide you are trying to build.
Users can use shapes for various design elements, including the framing of text or images. This would be a prime reason to render a shape either fully transparent or semi-transparent on the slide. If you’re looking for how to make a shape transparent in Google Slides, this is where you need to be.
Turning a Shape Transparent
Unfortunately, no easy shortcut or hotkey will turn a shape transparent in Google Slides. Knowing the full steps of the process will be the only way in which you can achieve the effect you want. Thankfully, Google has made the task very straightforward and quick to do.

The above feature is an on-off setting for making shapes in Google Slides transparent. However, this is not the only transparency setting available to you.
Google Slides Turn a Shape Semi-Transparent
Rendering a fully transparent shape can be useful and exactly what’s needed in the slide design. However, there are times when you may need a more advanced tool to add additional customization. This is when making a shape semi-transparent could easily work for you.

Your shape will now look semi-transparent, and the slider in the settings will allow you to change it as much as you need for your design.
Turn a Shape Semi-Transparent With a Color Gradient
In addition to simply making a shape transparent or semi-transparent, Google Slides also allows you to make a shape transparent along a color gradient.

This process will give your shape a semi-transparent color instead of giving your image a fully transparent look. This is an excellent option for editing shapes to fit a set presentation theme.
Additional FAQs
Can you make an image transparent in google slides.
Yes, just as with a shape, you can make an image transparent in Google slides. The process is similar to how you handle making a shape transparent.
1. Click on the picture you want to edit.
2. In the toolbar of Google Slides, click “Format Options.”
3. Click “Adjustments” in the menu.
4. Navigate to the transparency option and use the slider to adjust the image.
Making an image transparent in Google slides is a simple way to enhance an image without first requiring a user to change a picture in editing software.
Can I make a shape from a pre-made Google Slides template transparent?
Yes, once you have picked and loaded a Google Slides template into the presentation you want to work on, you can edit any template element to suit your presentation. This includes changing the shapes to be transparent.
Google Slides – Fully Transparent
Google Slides provides a fast and easy way to make shapes transparent, letting you set up your design as quickly as possible without sacrificing your vision of the presentation. After all, the visuals are half the battle!
Have you used or planned to use transparent shapes in Google Slides? Let us know in the comments below!
Related Posts

Disclaimer: Some pages on this site may include an affiliate link. This does not effect our editorial in any way.

Lee Stanton September 29, 2023
Lee Stanton September 27, 2023
Lee Stanton September 14, 2023
Send To Someone
Missing device.
Please enable JavaScript to submit this form.
Home Blog Google Slides Tutorials How to Make an Image Transparent in Google Slides
How to Make an Image Transparent in Google Slides

Designing slides with overlay text over images can help highlight important information while adding some visual appeal for the audience. However, some images or slide backgrounds can affect the legibility of the text when editing Google Slides Templates . Making it necessary to adjust image transparency.
How to Make a Picture Transparent in Google Slides
Google Slides image transparency is easy to adjust through Format Options . To get started, add an image to your slide via Insert > Image .

Simply select the image to adjust its transparency and go to Format > Format Options . Alternatively, right-click on the image to select Format Options .

From the right sidebar, expand the Adjustments menu. This will allow you to adjust the image’s transparency, brightness, and contrast by moving the slider for each. To increase transparency, move the slider towards the right. To reduce transparency, move the slider towards the left. You can adjust the brightness and contrast the same way.

Once your image transparency is according to your liking, you can make the required changes to the slide accordingly. For example, you can insert a text box over the image to add related information, such as your presentation title, subtitle, or other information associated with the image.

Reducing image transparency can help you make your slide designs exciting and provide the space to accommodate more information by using parts of the inserted image or slide background more efficiently, without compromising on legibility.
How to Make a Shape Transparent in Google Slides
You can also make shapes transparent in Google Slides by adjusting the transparency of an added shape or making it completely transparent.
Custom Shape Transparency in Google Slides
To adjust the transparency level of a shape in Google Slides, follow the steps below:
Insert a shape to Google Slides via Insert > Shape > Shapes .

To adjust transparency for a shape, select the shape and click the Fill Color (paint bucket icon) option, and select Custom .

From the menu that appears, move the slider to increase or reduce the transparency. You can also change the color and pick a specific color by adding the HEX color code. Moving the transparency slider towards the right will increase the shape transparency, whereas moving the slider back towards the left will reduce transparency.

Once you have achieved the desired transparency, you can add overlay text to make necessary adjustments to the shape according to need.

Make Shape Completely Transparent in Google Slides
To make a shape completely transparent in Google Slides, such as to adjust it according to the slide’s background color, select the shape, followed by Fill Color > Transparent .

How to make background transparent in Google Slides
Having a transparent background can be particularly useful when you want to blend your slide content with an image without the original background taking away the focus. One way to do this is by using an image as a slide background and then adjusting its transparency. Here’s how to make background transparent in Google Slides:
- Start by selecting Insert -> Image -> Upload from computer (or any other source where your image is stored).
- Once the image is on your slide, resize it so that it covers the entire slide. You can drag the image corners to ensure it fits the slide perfectly.
- After positioning the image, right-click on the image and select “Order” -> “Send to back”. This will ensure that the image is in the background, allowing other slide elements like text boxes and shapes to appear above it.
- With the image selected, navigate to Format > Format Options. Alternatively, you can also right-click the image and choose Format Options.
- On the right sidebar that appears, expand the Adjustments menu.
- Find the transparency slider. Dragging the slider towards the right will increase the image transparency, making it more see-through, while dragging it to the left will make it more opaque.
- Adjust the slider until the background image is transparent to your liking.
With the background image now transparent, you can overlay text, shapes, or other objects on the slide and also apply the concepts seen before.
Adjusting the transparency of images and objects in Google Slides can help you make the most of your slides and it is also a way you can make your Google Slides look cool. It can be an excellent method to accommodate more information in fewer slides while making overpowering slide elements transparent or partially transparent.
Like this article? Please share
Design, Google Slides, Presentation Tips Filed under Google Slides Tutorials
Related Articles

Filed under Presentation Ideas • August 29th, 2024
How to Make a Presentation Longer: 7 Strategies to Master
Extend your talk in style. Join us to discover how to make a presentation longer while providing a high-end experience to your audience.

Filed under Google Slides Tutorials • August 29th, 2024
How to Insert an Equation in Google Slides
Make your math-related slides stand out by learning the different methods for how to insert an equation in Google Slides.

Filed under Google Slides Tutorials • August 20th, 2024
How to Insert an Emoji in Google Slides
Add a creative touch to your slides by learning how to insert an emoji in Google Slides. Step-by-step instructions and third-party extensions list.
Leave a Reply

Instantly remove the most complex backgrounds from multiple images at once - directly in the app or with our API.

Discover the power of the Photoroom API and how it can help streamline visual content across different industries.
2 simple ways to make a background transparent in Google Slides

I finally figured it out. I recently designed a presentation for a creative project and needed to create transparent backgrounds for my pictures. After some testing, I realized that there are two ways to make backgrounds transparent in Google Slides:
Use the opacity slider in Google Slides to adjust the picture’s transparency.
Use a reliable background remover to erase the photo’s background — which I used since there’s no feature for this in Google Slides.

Let’s get into it.
Everything you’ll learn:
How to make an image transparent using Google Slides
How to remove an image background in google slides using ai, how to make multiple image backgrounds transparent for google slides, how to make shapes transparent in google slides.
Design tips for creating transparent pictures in a Google Slides presentation
Remove your image background for Google Slides
Make a background transparent in google slides faqs.
Google Slides comes with a transparency slider for adjusting the transparency of your image. But remember, you can’t use it to remove image backgrounds.
Here’s how to fade the background image or any other picture in Google Slides:
Open Google Slides on your browser and launch the presentation you want to edit.
Choose the slide where you want to edit your image.
Click the Insert image icon on the toolbar to upload your picture from your device or Google Drive if you haven’t already.
Tap on the image and select Format options on the toolbar (might be nestled in the three dots beside ‘Replace image’).
Click the Adjustments tab from the drop-down menu, then move the Opacity slider to the left to change the image's transparency, until you’re satisfied with the transparency level.
If you want to turn the transparent image into the background of your slide, tap on the photo, use the handles to expand it over the entire background, then click Arrange in the menu bar, and select Order > Send to back to make it the background.
💡 PRO TIP: To use the same picture as the background for all slides, right-click on the image, click Copy, choose the next slide, click Edit in the menu bar, click Paste , then click Arrange and select Order > Send to back .

Google Slides has a feature called background remover. But it’s only available in Google Workspace Labs, and it's not the most flexible background remover since you can’t correct any errors the tool might make.
So, if you want to erase the background of a picture in Google Slides, you’ll need an online background remover that’s fast and reliable. This is where Photoroom’s Instant Background Remover comes in. You can use the AI-powered tool to make white background transparent or remove the background from a logo , portrait photo, animation, and any simple or complex image.
Here’s how to remove the background of an image using the free tool in Photoroom:
Sign up or log in to Photoroom on the website.
Click Remove Background in the dashboard.
Upload the image you want to use for your presentation and the tool will automatically remove the background. If you still want to touch up any part of the image, click on the object’s icon on the right-hand side of the editor, select Edit Cutout , leave the brush in Erase mode and Guided , brush the area you want transparent and the tool will work on it, then click Confirm to return to the editor and see the final changes.
Click Download to save your image as a PNG file.
To insert the new transparent image into your Google Slides presentation, open the file, choose a slide, then click the Insert image icon on the toolbar to upload the picture.
💡 PRO TIP: Before downloading your picture, use other editing tools in Photoroom to enhance its quality. You can use the Resize tool (upper corner) to change your image to landscape to fit the Google Slides dimension, improve lighting with the Light On feature, turn on the Shadows button to add shadows, or use the Adjust toggle to refine several aspects of the image and give your photo a professional look.

Expand the photo: Tap on the picture, use the handles to expand it over the entire background, then click Arrange in the menu bar, and select Order > Send to back to make it the background.
Apply new background: First, use the Resize tool (upper corner) in Photoroom to change your photo’s dimension to 960 (w) by 540 (h), which is the default size of a Google Slide. Next, go to your presentation and click Slide on the menu bar, choose Change background , and select Choose image to upload the transparent image. Finally, click Done to apply it to the current slide, or Add to theme to apply it to all slides.
I already showed you how to expand your photo to use it as your slide's background in the first walkthrough. Here’s a visual guide for the second method: Apply new background:

If you’re creating with your phone, you can follow this step-by-step guide for removing image backgrounds on mobile devices, or watch this video walkthrough on background removal .
📘 Other tools
Remove a background in Photoshop
3 best ways to remove backgrounds in Illustrator
How to make a background transparent in MS Paint and Paint 3D
If you’re using several images for your presentation and want to edit them all at once, let’s look at how you can make multiple images transparent using Google Slides or remove backgrounds in bulk using the Instant Background Remover in Photoroom.
Change the transparency of multiple images in Google Slide
Start by uploading the images into one slide. First, pick a slide or add a new one. Then click the Insert image icon on the toolbar to upload the pictures. You can crop or re-arrange the images in the slide after uploading.
Select all images by dragging your cursor over them, right-click on the selection, and click Group to group them.
Click Format options on the toolbar, click Adjustments , then adjust the Opacity slider to your desired level, and the same effect will apply to all images.
To ungroup the photos, right-click on the selection and click Ungroup . You can then move or copy and paste each image into other slides.

Batch remove backgrounds from pictures with AI
Click Batch in the dashboard. Click Select up to 50 images , upload your pictures, and the tool will automatically remove backgrounds in a few seconds.
Click Download your images to save your photos. Before downloading, you can use the other batch-editing tools to resize, add shadows, or even add a new background to all pictures.
Insert the new transparent images into your Google Slide presentation. Simply open the presentation, choose a slide, then click the Insert image icon on the toolbar to upload the images.

You can also make a shape transparent in Google Slides. Here’s the step-by-step guide for that:
Open Google Slides and select the shape.
Click on the Fill color icon in the toolbar, then click Transparent , and the shape will become transparent.
If your shape doesn’t have a border weight, you can add that by selecting Border weight in the tool area and picking from the options. If you want to add or make the border color transparent, simply click on the option in the toolbar to add a color or transparency.

Design tips for creating transparent pictures in Google Slides presentations
When done right, transparent images can help capture attention and engage your audience. But when done wrong, they can weaken communication and hurt your audience's experience.
Here are some tips for creating and using transparent images in your presentations, to help you make clean visuals and save time in the design process:
Make it useful: Use transparency to ensure your image serves a purpose. If your image is meant to support text or other elements, adjust the transparency so it doesn't compete with the main text or content. Your audience should easily read and understand the primary message.
Enhance aesthetics: A transparent image can add depth and sophistication to your slide. Experiment with different levels of transparency to find what looks best without overwhelming the slide.
Align for balance: Align your transparent images with other objects on the page for a balanced look. Good alignment helps your presentation look organized and professional, guiding the viewer’s eye through your content.
Maintain consistent styles: Try to be consistent with your transparency levels across all your slides, particularly when using the same image background on all slides. This way, everything feels cohesive and well thought out.
Check cross-platform compatibility: To ensure design consistency across different viewing platforms, use universally supported formats for transparent images (like PNG), check transparency settings during export, and preview the presentation in each format (PDF and PowerPoint) to confirm that all elements, including transparency, render correctly.
As you get into the process of creating transparent backgrounds, start by asking yourself what you need. Do you want to make your image transparent in Google Slides with the Opacity tool, remove your picture’s background with the Instant Background Remover, or both? The method you choose depends on the type of transparency you’re looking to create.
But it’s always a great move to completely remove the background of your image as it offers more flexibility in the long run, making it easier to use your picture across various designs and platforms. You can use the AI Background Remover in Photoroom ( iOS , Android , or Web ) for that since it’s fast, easy to use, and creates accurate results.
How do I remove the background image in Google Slides?
Visit the page with the image. Select Slide from the menu bar and click Change background . Open the Color tab, scroll down, click Transparent , and the entire image background will change to white.
How do I change my background on Google Slides?
To change the background of an image, click Slide on the menu bar in Google Slides, then choose Change background . You can select a gradient, upload an image, or change it to a white background or any other solid color. After choosing your background, click Done to apply it to the current slide, or Add to theme to apply it to all slides.
How do you make an image background transparent in Google Slides?
To turn an image background transparent in Google Slides, you need to first use an external tool. Edit your image in an online editor like Photoroom to remove the image background and add a transparent background. After editing, download the image with a transparent background in PNG format and then insert it into your Google Slides presentation.
How do I apply gradients in Google Slides presentations?
To add a gradient effect, first, select the shape or text box you want to fill in your presentations. Then, click the Fill color icon in the toolbar and choose Gradient . You can pick from the preset gradients or create a custom gradient by clicking Custom and adjusting the colors and directions. You can also add more transparency gradients if you want.
How to make a GIF transparent in Google Slides?
Google Slides doesn't support transparency for GIFs directly. But you can make your GIF transparent before adding it to any of your presentations in Google Slides. Use an online tool like Ezgif to edit your GIF and make the background transparent. Once done, download the edited GIF, then insert it into your slide.
Related reading
How to remove background in Powerpoint
How to make background transparent with GIMP
How to remove a watermark and other objects from photos for beginners
How artists can elevate their work with AI-powered photo editing
Keep reading

How to Change Transparency of Shape in Google Slides

Transparencies are an essential part of digital design, allowing you to create visually appealing and dynamic presentations. In Google Slides, you can easily change the transparency of shapes to add depth and emphasis to your slides. This article will guide you through the process of changing shape transparency in Google Slides, from understanding transparency in digital design to troubleshooting common transparency issues.
Understanding Transparency in Google Slides
Before we dive into the step-by-step guide, let's first grasp what transparency is in the context of digital design. Transparency refers to the degree to which an object, such as a shape or text, allows background elements to show through. By adjusting the transparency of a shape, you can make it partially see-through, allowing other elements or background images to shine through. This technique can greatly enhance the visual impact of your slides.
Transparency is a powerful tool in the world of design, offering a way to create depth and visual interest in your presentations. It allows you to layer elements, creating a dynamic composition that draws the viewer's eye and adds a modern touch to your slides. By mastering the art of transparency, you can elevate the overall look and feel of your Google Slides presentations.
What is Transparency in Digital Design?
In digital design, transparency is achieved by altering the opacity of an object. Opacity refers to the level of visibility or "opaqueness" of an element. Lowering the opacity of a shape allows it to become more transparent, revealing the content beneath it. On the other hand, increasing the opacity makes the shape more solid and less transparent.
Understanding how opacity and transparency work hand in hand is essential for creating visually compelling designs. By playing with these settings, you can control the mood and tone of your slides, guiding your audience through the information you're presenting in a clear and engaging manner. Transparency adds a layer of sophistication to your design, making your slides more memorable and impactful.
The Role of Transparency in Google Slides
Transparency in Google Slides plays a crucial role in conveying information effectively. By adjusting the transparency of shapes, you can highlight important points on your slide while still maintaining a clear view of supporting content or background visuals. This technique can help you guide your audience's attention to specific areas of your presentation.
When used strategically, transparency can create a sense of hierarchy and emphasis in your slides, ensuring that key information stands out while maintaining a cohesive and polished look. By incorporating transparency into your design process, you can elevate the quality of your presentations and leave a lasting impression on your audience.
Preparing Your Google Slides for Transparency Changes
Now that we have a good understanding of transparency in Google Slides, let's prepare our slides for changing shape transparency. Before you start, make sure you have a shape or object selected on your slide.
Transparency in Google Slides can be a powerful tool to enhance the visual appeal of your presentations. By adjusting the transparency of shapes, you can create overlays, highlight specific content, or add a subtle touch of creativity to your slides.
Selecting the Right Shape
To change the transparency of a shape, you need to select the shape first. Google Slides offers a variety of options, including rectangles, circles, arrows, and more. Choose the shape that best matches your design aesthetic and the message you want to convey.
Each shape brings its own unique characteristics to the table. Rectangles exude stability and structure, while circles symbolize unity and continuity. Arrows can signify direction or progression, adding a dynamic element to your slide design. Consider the symbolism behind each shape to ensure it aligns with the tone of your presentation.
Positioning Your Shape
Consider the positioning of your shape on the slide. Placing it strategically can have a significant impact on its visibility and the overall visual flow. Experiment with different locations until you find the perfect spot that enhances the content without overpowering it.
Furthermore, the size and orientation of your shape can influence how it interacts with other elements on the slide. A larger shape may draw more attention, while a smaller one can serve as a subtle accent. Rotating the shape can add a dynamic angle to your design, guiding the viewer's eye across the slide.
Step-by-By Guide to Changing Shape Transparency
Now that you have prepared your slide, let's proceed with the step-by-step guide on changing the transparency of a shape in Google Slides.
Changing the transparency of a shape can add depth and visual interest to your presentation. By adjusting the opacity of a shape, you can create overlays, highlight specific elements, or blend shapes seamlessly into your design.
Accessing the Format Options
To modify the transparency of a shape, begin by selecting the shape you want to adjust. Once selected, navigate to the top menu and click on the "Format" tab. A drop-down menu will appear, providing you with various formatting options.
Within the "Format" tab, you will find a plethora of customization tools to enhance your shapes, including options for fill color, outline, shadows, and more. These tools allow you to fine-tune the appearance of your shapes to align with your overall design aesthetic.
Adjusting the Transparency Slider
Within the format options, locate the "Transparency" option. Click on it to reveal a slider bar that controls the opacity of the shape. Slide the transparency slider to the right to decrease opacity and make the shape more transparent. Slide it to the left to increase opacity, making the shape less transparent. Observe the changes in real-time until you achieve the desired level of transparency.
Experimenting with different levels of transparency can help you create dynamic visual effects and emphasize key points in your presentation. Remember to strike a balance between transparency and visibility to ensure that your message is effectively communicated to your audience.
Tips for Effective Transparency Use
While changing shape transparency can enhance the visual appeal of your slides, it's important to use transparency effectively to avoid overwhelming your audience.
Transparency in design can be a powerful tool when used thoughtfully. It can create depth, add sophistication, and guide the viewer's eye to key elements on a slide. However, it's crucial to strike a balance between transparency and clarity to ensure that your message is effectively communicated.
Balancing Transparency and Visibility
When using transparency, strive for a balance between transparency and visibility. It's essential to ensure that the content remains clear and readable. Adjust the transparency of shapes to a level that visually enhances your slides without sacrificing legibility.
Consider the overall color scheme of your slide when adjusting transparency levels. A subtle transparency effect can complement the color palette and create a cohesive visual experience for your audience. Experiment with different levels of transparency to find the right balance that enhances your design without overshadowing the content.
Using Transparency to Highlight Information
One effective way to utilize transparency is by using it to emphasize specific information on your slides. By making supporting elements slightly transparent, you can draw attention to the key points you want your audience to focus on. This technique can make your slides more engaging and help your message resonate with your audience.
Another strategy is to use transparency to create visual hierarchy. By adjusting the transparency of various elements, you can establish a clear order of importance, guiding the viewer's eye through the content in a structured manner. This can help prevent information overload and ensure that your audience grasps the main takeaways from your presentation.
Troubleshooting Common Transparency Issues
While changing shape transparency is typically a straightforward process, you might encounter a few common issues along the way. Let's discuss how to troubleshoot these issues.
Transparency Changes Not Saving
If you find that your transparency adjustments are not saving, double-check that you have selected the shape before making changes. Ensure that you are editing the transparency of the intended shape rather than another element on your slide, such as text or an image. Additionally, make sure you have the latest version of Google Slides to avoid any compatibility issues.
Inconsistent Transparency Across Slides
In some cases, you may encounter inconsistencies in transparency settings when working with multiple slides. To resolve this issue, it's crucial to check the transparency settings on each slide individually. Make sure the transparency of shapes is uniform across your presentation to maintain a cohesive and polished look.
When adjusting transparency, it's essential to consider the overall design and visual hierarchy of your slides. Transparency can be a powerful tool to emphasize certain elements or create a sense of depth in your presentation. By strategically applying transparency to shapes, you can guide the viewer's attention and enhance the overall impact of your content.
Another factor to keep in mind is the contrast between transparent elements and the background. Ensure that the transparency levels you choose maintain readability and clarity in your slides. Experiment with different combinations to find the right balance that complements your content and enhances the overall aesthetic of your presentation.
Enhancing your Google Slides with the perfect transparency settings is just the beginning. If you're looking to take your presentations to the next level, consider Bricks—the productivity suite that revolutionizes the way you work with data and design. Say goodbye to the frustration of disconnected spreadsheets and outdated information. With Bricks, you can effortlessly integrate live data into your presentations, ensuring accuracy and saving valuable time. Embrace the power of AI to streamline your workflow and collaborate seamlessly with your team. Ready to transform your presentations and boost your productivity? Get started for free with Bricks today and experience the future of presentation design.
Get the spreadsheet powered by AI
You shouldn't have to be a spreadsheet expert to get your work done. Bricks makes it easy to create & share reports, presentations, charts, and visuals — all backed by your data.

Share this post:
Other posts you might like..., how to add gif in google slides, how to remove background from image in google slides, how to edit theme colors in google slides, how to add subscript in google slides, how to move slides in google slides, how to make a calendar in google slides, how to embed tiktok video in google slides, how to make text go over a picture in google slides, how to insert a border in google slides, inspiration for every use case.
Get started fast with pre-built templates made by industry experts.

Spread sheets

Project Management
How to Make a Shape Transparent in Google Slides
- Last updated May 3, 2023
Presenting your ideas in informative and visually appealing ways is always important. By learning how to make a shape transparent, you can add depth and contrast to your slides, making them more engaging and memorable.
Whether you’re creating a business proposal, a school project, or a personal presentation, the ability to make a shape see-through in Google Slides will definitely enhance your presentations.
In this article, we will provide you with a step-by-step guide on how to make a shape transparent in Google Slides, as well as update images and text. Keep reading to make your presentations stand out!
Table of Contents
Why Should You Make a Shape Transparent in Google Slides?
Creating an opaque or transparent shape in Google Slides can improve the design and visual impact of your presentation. By reducing the opacity of a shape, you can highlight and draw attention to the content behind it. This is especially useful when you have a busy background or multiple elements on a slide.
Adjusting the transparency of shapes can also create aesthetically interesting effects, such as layering different shapes with varying levels of transparency to produce unique visual effects. Adjusting the transparency of shapes can create overlays that add context or additional information to an image or graphic, such as adding a transparent shape with text on top of an image to provide a caption or explanation.
How to Make a Transparent Shape in Google Slides
To change the opacity of shapes in Google Slides, open the presentation you want to edit.
- Click on the shape you want to alter the transparency by clicking on it. From the toolbar, click on the paint bucket icon to open “color fill options.”

- Click on the “plus (+)” from the “Custom” tab.

- Use the slider from the new window to adjust transparency. By shifting the slider to the left, you can increase the transparency of the shape (and vice-versa).

You’ve now successfully changed the opacity of a shape in Google Slides!

How to Change the Transparency of an Image in Google Slides
As opposed to shapes, you cannot change the transparency of an image using the fill color option. Instead, you have to select format options to be able to change the opacity of an image. Here’s how you can change the transparency of an image in Google Slides:
- In your Slides presentation, click on the specific image you want to adjust, then click on the “Format options” button.

- Use the slider in the “Adjustments” tab to edit the appearance of your image. Moving the “opacity” slider to the left will make the image more transparent. Once you’re content with the level of transparency, click on the “Apply” button.

That’s all! You’ve successfully altered your image’s transparency in Google Slides.
How to Change the Transparency of Text in Google Slides
Changing text transparency is the same as changing the transparency of a shape. Follow the steps listed below to easily change the transparency of text in Google Slides:
- From the toolbar, click on “Insert” and “WordArt.”

- Type in the text you want to use.

- To make the text transparent, select the text and click on the “Paint bucket” icon to pull up the transparency setting. Then, move the “transparency” slider to the left to choose your desired selection.

This is what the final result should look like:

You have now successfully changed the opacity of text using Google Slides !
Are There Other Ways to Make My Google Slides Presentation Stand Out?
If you’re looking for other ways to make your Slides presentation stand out for the right reasons, here are two ideas:
Gifs can be a great way to add life to your Slides presentation. Check out how to add GIFs to Google Slides .
Google Sheets Tables
Adding Google Sheets data to your Google Slides presentation is another great way to demonstrate statistical data (or any other type of data that is better understood in this format).
Frequently Asked Questions
Can images be semi-transparent in google slides.
Yes. In Google Slides, images can be semi-transparent (and even completely transparent!). Open the Format Options panel by clicking on the image. Open the Adjustments option in the panel, then increase/decrease the transparency of the image by moving the slider to the left or right.
Can I Copy & Paste a Shape to Another Slide?
Yes, you can paste a shape from one slide to another in Google Slides. Click the shape, then select “Copy” from the “Edit” menu ( “CTRL + C” on Windows/ “CMD + C” on macOS ). Select paste from the menu that appears when right-clicking on a blank area on another slide. You can also use “CTRL + V” on Windows or “CMD + V” on macOS to paste the shape. The same procedure applies to text boxes and images that are copied and pasted.
In addition to providing brief explanations, most businesses prefer to give well-designed presentations that fully illustrate project concepts.
Depending on a platform’s capabilities, including high-quality images can increase the reception of your presentation. We sincerely hope that this article has helped you understand how to make a shape transparent in Google Slides!
To help you gain a professional edge in your daily life, be sure to check out these amazing GSuite courses !
- How to Change Slide Size in Google Slides [Easy Guide]
- How to Add a Video to Google Slides [Complete Guide]
- How to Make Google Slides Play Automatically
Most Popular Posts

How To Highlight Duplicates in Google Sheets

How to Make Multiple Selection in Drop-down Lists in Google Sheets

Google Sheets Currency Conversion: The Easy Method
A 2024 guide to google sheets date picker, related posts.
How to Zoom Out in Google Sheets and Zoom Back In [Easy]
- Sumit Bansal
- July 3, 2024
- May 16, 2024
- May 2, 2024
How to Insert a Google Sheets Hyperlink in 5 Seconds
- Chris Daniel
- April 15, 2024
Thanks for visiting! We’re happy to answer your spreadsheet questions. We specialize in formulas for Google Sheets, our own spreadsheet templates, and time-saving Excel tips.
Note that we’re supported by our audience. When you purchase through links on our site, we may earn commission at no extra cost to you.
Like what we do? Share this article!
- Shop Now: Amazon Labor Day Tech Sale
- Get These 12 Student Discounts!
How to Make an Image Transparent in Google Slides
Format Options allow you to make an image somewhat or fully transparent
:max_bytes(150000):strip_icc():format(webp)/JonMartindaleheadshot2021-145018ccd03741b59f83e20327315e9a.jpeg "google presentation transparency")
- Saint Mary-of-the-Woods College
- Make Images Transparent
- Make Shapes Transparent
- Make an Image Background Transparent
- Frequently Asked Questions
What to Know
- Right-click or tap and hold on the image and select Format Options .
- Use the Transparency slider to set the image's transparency to 100%, or whatever you want.
This article will explain how to change an image's transparency on Google Slides.
How to Make Google Slides Images Transparent
Google Slides has its own transparency slider for all images, so if you want to make an image transparent, that's the best way to do it.
Insert the image into the slide if it isn't there already, then select the image by clicking or tapping it. Then right-click or tap and hold on the image and select Format Options from the menu.
Select Adjustments from the right-hand menu.
Use the Transparency slider to set the transparency to whatever percentage you like. To make the image turn completely transparent, move the slider all the way to the right.
How to Make a Shape Transparent in Google Slides
Changing the opacity of shapes on Google Slides is a little different, but the process is still quick and easy. Insert the shape you want to change to transparent if you haven't already, then follow these steps:
Select the shape you want to make transparent, then select the Fill icon in the toolbar. It looks like a half-full paint pot tipping to the right.
Select the Transparent button at the bottom of the Fill window.
The shape will become completely transparent. There is no transparency slider with shapes.
How to Make an Image Background Transparent
Google Slides has the ability to make entire images transparent, as per the steps above. If you want to make a background image transparent in Google Slides, you can use those same steps and it'll make that image as transparent as you want.
However, if you want to make the background of an image transparent (as opposed to the whole image in its entirety), delete a background, or make the backdrop disappear, that's a whole different process. You'll need to use specialized background removal services and tools.
There's also a tool to remove the background of an image using Microsoft Word .
To embed a video in Google Slides , select where you want the video and go to Insert > Video . It defaults to YouTube Search. Search for and select the video you want, or select By URL and paste a video's URL into the text box. Click Select to insert the video, and then drag it to its location.
To insert a GIF into Google Slides , copy its URL from a source like GIPHY, and click the slide where you want to add the GIF. Go to Insert > Image > By URL , paste the GIF's URL, and click Insert . Or, click Insert > Upload From Computer and add the GIF from your hard drive.
To change the slide size in Google Slides , open the presentation and select File > Page Setup . Click on the drop-down menu displaying Widescreen 16:9 and choose your preferred slide size. Select Apply . Or, go to File > Page Setup > Custom and enter a size.
Get the Latest Tech News Delivered Every Day
- How to Use Google Slide Animations and Transitions
- How to Add Bullet Points to Google Slides Presentations
- How to Wrap Text in Google Slides
- How to Put a Spreadsheet in Google Slides
- How to Add a Border in Google Slides
- How to Group Objects in Google Slides
- How to Link Slides in Google Slides
- How to Make Google Slides Portrait
- How to Do a Hanging Indent in Google Slides
- How to Change Theme Colors in Google Slides
- How to Print Google Slides With Notes
- How to Change a Google Docs Background to a Picture
- How to Make a Timeline on Google Slides
- How to Use Google Duet in Slides
- How to Superscript and Subscript in Google Slides
- How to Use Google Drive Offline
How to change opacity in Google slides
learn the trick behind how to change opacity in google slides here in few simple steps
Step 1: Access Your Google Slides Presentation

Step 2: Select the Object

Step 3: Access the Format Options

Step 4: Adjust Transparency

Step 5: Set the Opacity Level

Step 6: Fine-Tune the Opacity

Step 7: Review and Repeat
Conclusion:, frequently asked questions:, how can i change the opacity of an object in google slides, can i change the opacity of text in google slides, what is the purpose of changing opacity in google slides, can i animate objects with changing opacity in google slides, will changing the opacity affect the visibility of my presentation in presentation mode, is it possible to revert the opacity changes in google slides, create ppt using ai.
Just Enter Topic, Youtube URL, PDF, or Text to get a beautiful PPT in seconds. Use the bulb for AI suggestions.
character count: 0 / 6000 (we can fetch data from google)
upload pdf, docx, .png
less than 2 min
Sanskar Tiwari
Founder at MagicSlides
How to see unsaved PowerPoint files
22 April 2024
How to change bullet color in PowerPoint
How to edit a PowerPoint template
21 April 2024
How to fade a picture in PowerPoint
How to redo changes in PowerPoint
19 April 2024
How to mirror an object in PowerPoint
How to undo changes in PowerPoint
How to bend text in PowerPoint
How to remove footer in PowerPoint
Stunning presentations in seconds with AI
Install MagicSlides app now and start creating beautiful presentations. It's free!

Get AI-Generated Presentations Ready in Seconds
Free AI PPT Tools
How to Make Text & Shape Semi Transparent in Google Slides

Adding transparency to text and shapes in your Google Slides presentations can help make them more visually appealing. Although Google Slides doesn’t have a built-in transparency feature, there are a few easy workarounds you can use.

Make Text Semi Transparent
Make a shape semi transparent.
Making a shape semi transparent works much the same way:
Google Slides Transparency Tips
Faqs about transparency in google slides.
Is there a transparency feature in the new Google Slides?
The same process applies – insert Word Art, open the formatting options, select custom fill color, and adjust the transparency slider to make your Word Art semi-transparent.
Yes, you can group shapes and text boxes that have transparency effects applied. This allows you to move them together as one object on your slides.
Adding transparency in Google Slides takes just a few simple steps. Adjust text, shapes, images and Word Art using the custom fill color transparency slider to give your presentations a visual upgrade.
Hopefully this gives you some new ideas for creating cool effects in your next Google Slides presentation!
About The Author
Vegaslide staff, related posts.

3 Steps to Add Audio to Google Slides

How Do You Duplicate a Slide in Google Slides
How to check version history in google slides.

How to Make Half Circle in Google Slides
All Formats
How To Make/Create a Shape Transparent in Google Slides [Templates + Examples] 2023
Shapes are visual elements that help enhance any document or graphic through combinations, pairs, and groups to make compelling and outstanding designs when presented to other entities. Choosing how these elements appear on different documents becomes an advantage, affecting the mood and reception of your audiences, especially when you alter their shapes , size, and appearance.

Make a Transparent Shape in Google Slides – Step-by-Step Instructions
Step 1: browse for google slides templates.

Step 2: Choose Your Slides Template

Step 3: Open and Revise the Google Slide Template

Step 4: Insert a Shape into the Presentation

Step 5: Use the Fill Option

Step 6: Gauge the Opacity of the Shape

Step 7: Save Revisions to the Presentation

Google Slides Templates & Examples
Workflow process chart template.

Product Presentation Template

Digital Marketing Plan Mind Map Template

Sales Pitch Deck Template

Online Courses Presentation Template

How do you fade shapes using Google Slides?
Can you mask a shape using google slides, how do you make images fade, more in google.
Check Mark Shape Vector
Shark shape vector, broken heart shape vector, heart shape frame vector, lightning shape vector template, star shape vector template, love heart shape clipart template, arrow shape vector template, star shape vector, flower shapes element.
- How to Make a Dropdown in Google Sheets
- How to Custom Sort in Google Sheets
- How to Delete Cells in Google Sheets
- How to Delete Columns in Google Sheets
- How to Open an XLSX File in Google Sheets
- How to Delete Duplicates in Google Sheets
- How to Pin a Row in Google Sheets
- How to Make a Stacked Bar Chart in Google Sheets
- How to Press Enter in Google Sheets
- How to Pin Columns in Google Sheets
- How to Make a Schedule in Google Sheets
- How to Make a Scatter Plot in Google Sheets
- How to Sum Checkboxes in Google Sheets
- How to Delete Blank Rows in Google Sheets
- How to Open an Excel File in Google Sheets
File Formats
Word templates, google docs templates, excel templates, powerpoint templates, google sheets templates, google slides templates, pdf templates, publisher templates, psd templates, indesign templates, illustrator templates, pages templates, keynote templates, numbers templates, outlook templates.
Android Police
5 gemini tricks i use to transform my google slides presentations.

Your changes have been saved
Email is sent
Email has already been sent
Please verify your email address.
You’ve reached your account maximum for followed topics.
Google Slides is a go-to solution for creating presentations. While you can make a presentation from scratch or explore templates to get a head start, the latest Gemini AI integration takes the experience to the next level. You can create compelling slides, generate relevant visuals, and summarize a long presentation with a single click.
Whether you are a student looking to impress your class and professor, an educator aiming to go over key takeaways from received presentations, or a professional seeking to deliver an impactful presentation to potential customers or investors, Gemini is your secret weapon to get the job done in style. Let's check it in action.
Since Google Slides is a web solution, the trick below works on Windows desktops, MacBooks, and affordable Chromebooks .
Accessing Gemini in Google Slides: Requirements
While Google offers a free Gemini AI on the web and mobile, accessing the same in Google Workspace apps requires a paid Google One AI Premium plan . It's priced at $20 per month and offers a 30-day free trial for new subscribers.
Aside from unlocking Gemini in Google Workspace apps, the Google One AI Premium plan offers access to the next-gen Gemini AI model and 2TB of Google Drive space. After completing the sign-up process, Gemini AI appears in your Google Slides account. Let's check it in action.

Google Gemini tips and tricks: Put Google's most capable AI model to good use
Not sure what's up with Gemini? Here are the goods
1 Create a slide using Gemini
The ability to create a unique slide based on a text prompt is an effective way to explore and use Gemini in Google's presentation software. You can create a new presentation or open an existing one and select the Gemini icon in the upper-right corner to access the prompt text box. Now, type a text prompt and press Enter to generate a slide.
I entered Create a slide about buying an electric vehicle , and here is what Gemini generated. Google's AI model did a good job by adding a relevant heading, sharing the advantages of EVs, and generating a necessary image. Quite neat, right? Gemini is also smart enough to use the same text style as my existing presentation.

If you are satisfied with the results, select Insert . Or else, click Retry to give Gemini another shot. When I clicked Retry , it came up with the following:

Here are other prompts you can try with Gemini in Google Slides:
- Create a slide about the best activities in Paris Disneyland.
- Create a slide to thank my team members.
- Create a slide about a birthday party checklist.
Don't trust and use Gemini answers in your presentation. Give it a personal touch based on your requirements and preferences.
2 Generate original images
Coming up with unique images for your Google Slides presentation can be challenging. Instead of browsing the web for your images, ask Gemini to generate one.
I was stuck with a bland birthday checklist slide for one of my presentations. I ran this prompt to create an image: Generate an image of a birthday party with ballons and celebration items . Look at the results:
Gemini generates around four images. Select the image you want to use and click Insert . Gemini is good at generating images of objects and items. It doesn't create new images with people.
Be creative and descriptive with your text prompts for generating images. For example, when I ran Create an image of birthday party , Gemini didn't create and show suggestions. However, when I used the prompt above, Gemini did the job in style.
3 Brainstorm slide ideas
Aside from creating slides and images, you can use Gemini to brainstorm ideas. I was working on a wedding presentation and asked Gemini to brainstorm a list of ideas to manage a successful wedding . You can check the screenshot below for the outcome.

Gemini quickly created several headings with a detailed bullet list that I can use in my slides:
- Planning and Organization
- Guest Experience
- Ceremony and Reception
- Vendor Management
- Contingency Planning

8 ways to use Gemini in Google Sheets
Google Sheets with Gemini is guaranteed to make your day easier
4 Summarize selected slides
Gemini AI can summarize selected slides in Google Slides and enhance efficiency. You can highlight specific slides and request summaries from Gemini, receiving brief and precise overviews. You'll save time and effort when reviewing extensive content.
You can select relevant slides from the left sidebar and ask Gemini to summarize them. In my experience, Gemini did a good job extracting key points from the selected slides.

5 Generate key takeaways from a presentation
This is another time-saving Gemini feature in Google Slides. Instead of summarizing selected slides, ask Gemini to generate key takeaways from the presentation. Here are some of the prompts you can use:
- What are the key takeaways from the first section of this presentation?
- What are the key dates mentioned in this presentation?
- What are the key takeaways mentioned in this presentation?
- According to the presentation, what are the potential benefits of buying an electric vehicle?
- Show me the benefits of using a Personal Knowledge Management system according to the presentation.
- Get me the final guest list for Mr. David's ring ceremony.

The possibilities are endless. You must be specific and use the right keywords to get the required information quickly. You no longer need to switch between slides.
Supercharge your slides
Whether you want to design a presentation from scratch, add flair to your existing slides, or find the best way to convey your message, Gemini helps you with a few clicks or commands. What are you waiting for? Sign up for the Google One AI Premium free trial and try it in your workflow.
Aside from Google Slides, your active subscription unlocks the AI chatbot in other Workspace apps like Gmail and Google Drive . Refer to our detailed guide on integrating Gemini with Google's productivity applications.
- AI & Machine Learning
- Google Gemini
- Google Slides
IMAGES
VIDEO
COMMENTS
To alter a shape's transparency, select the shape, click the paint bucket icon, press + under Custom, and slide to desired transparency. This adds depth and visual appeal to presentations. Google Slide is becoming a popular way to give presentations. You can use many different features to make your presentation more visually appealing ...
You should now see an option to adjust the transparency of the selected image. To do so, click and drag the box across the slider. Dragging the box to the right increases the transparency, while dragging it to the left reduces it. Transparency is set to 0% by default. Adjust the slider until you get the image transparency exactly as you want it.
Create a new look for any project by adding transparency to your shapes. Click the shape, then go to Tools in the menu bar. You will see the Fill Color icon below the menu bar. If you want to make a transparent shape, click on the shape and go to Tools in the menu bar. Click the Fill Color icon and adjust the opacity to make it transparent.
Click to Subscribe: http://bit.ly/19vzAMHIt's possible to create a transparent shape by adjusting its colour preset!
Step 1: Open your Google Slides presentation. First, you'll need to access your Google Slides presentation where the shape you want to make transparent is located. Once you've opened your presentation, navigate to the slide that contains the shape you wish to modify. If you haven't added a shape yet, simply go to the slide where you want ...
To make an image transparent by using the Format Options menu in Google Slides: Open your existing Google Slides presentation or create a new one. Select an existing image in your presentation on ...
First, select the shape you want to edit, then click on the Fill color icon on the toolbar. This opens up the color palette. In the Gradient tab, select the option. Custom at the very bottom. The Custom Gradient settings panel will now open. Select a Gradient Stop and click on the color circle. Then choose the Custom option.
Step-by-Step Guide to Changing Transparency in Google Slides: → Open Your Google Slides Presentation: Start by opening the presentation in Google Slides that contains the object (text, shape, image, etc.) you want to change the transparency of. → Select the Object: Click on the object you wish to change the transparency of.
Here's how to change the transparency of an image in Google Slides -. 1. Go to Insert Image as usual, and then Image>Upload from Computer> Choose the desired file. 2. Drag and resize or set the dimensions of the image according to your preference.
In this video I show you how to adjust the shape transparency in Google Slides. Adjusting the transparency of shapes in Google Slides is quick and easy to do...
Here's how you can do it: 1. Open Your Google Slides Presentation. First, launch Google Slides and open the presentation that contains the image you want to make transparent. 2. Insert an Image. If you haven't inserted your image yet, go to the menu bar and click on "Insert", then select "Image.".
Here's how to rotate a shape in Google Slides -. Step 1 - Select the shape. Select the shape by clicking on it. Now, you might see a dot at the top of the shape followed by a line. Step 2 - Rotate the shape. Click and hold on the dot and rotate your mouse and adjust the angle as you wish.
1. Click on the picture you want to edit. 2. In the toolbar of Google Slides, click "Format Options.". 3. Click "Adjustments" in the menu. 4. Navigate to the transparency option and use ...
Google Slides image transparency is easy to adjust through Format Options. To get started, add an image to your slide via Insert > Image. Simply select the image to adjust its transparency and go to Format > Format Options. Alternatively, right-click on the image to select Format Options. From the right sidebar, expand the Adjustments menu.
To make a background transparent in Google Slides, upload an image and then under 'Format Options', adjust its transparency properties to fade the image. The...
To turn an image background transparent in Google Slides, you need to first use an external tool. Edit your image in an online editor like Photoroom to remove the image background and add a transparent background. After editing, download the image with a transparent background in PNG format and then insert it into your Google Slides presentation.
By mastering the art of transparency, you can elevate the overall look and feel of your Google Slides presentations. ... Transparency in Google Slides can be a powerful tool to enhance the visual appeal of your presentations. By adjusting the transparency of shapes, you can create overlays, highlight specific content, or add a subtle touch of ...
To change the opacity of shapes in Google Slides, open the presentation you want to edit. Click on the shape you want to alter the transparency by clicking on it. From the toolbar, click on the paint bucket icon to open "color fill options.". Click on the "plus (+)" from the "Custom" tab. Use the slider from the new window to adjust ...
Then right-click or tap and hold on the image and select Format Options from the menu. Select Adjustments from the right-hand menu. Use the Transparency slider to set the transparency to whatever percentage you like. To make the image turn completely transparent, move the slider all the way to the right.
Step 5: Set the Opacity Level. A slider will appear, allowing you to change the opacity of the selected object. Slide the bar left or right to decrease or increase the opacity. As you slide it, the object will become more or less transparent, depending on your preference.
To make text semi transparent in Google Slides: Click "Insert" > "Word Art". Type your desired text. Click on the text to open the formatting options. Click the "Fill color" icon. Select "Custom" at the bottom. Adjust the transparency slider to your preferred level. Click "OK".
Make a Transparent Shape in Google Slides - Step-by-Step Instructions. Use Google Slides to prepare your slideshows and presentations, boasting a collaborative work experience and environment with team members when presenting different proposals and business documents. Emphasize text and other elements on the slide by playing with different effects and functions for the presentation ...
5 Generate key takeaways from a presentation . This is another time-saving Gemini feature in Google Slides. Instead of summarizing selected slides, ask Gemini to generate key takeaways from the ...